扩展 SAP Fiori Launchpad
学习目标
扩展 SAP Fiori launchpad。
SAP Fiori Launchpad 插件
观看此视频,了解可能的扩展的概览。
视频:本节含 SAP 官方视频(视频 ID
1_3thbiksy),需在 learning.sap.com 在线观看。
开发插件涉及以下步骤:
实现插件
激活并配置插件
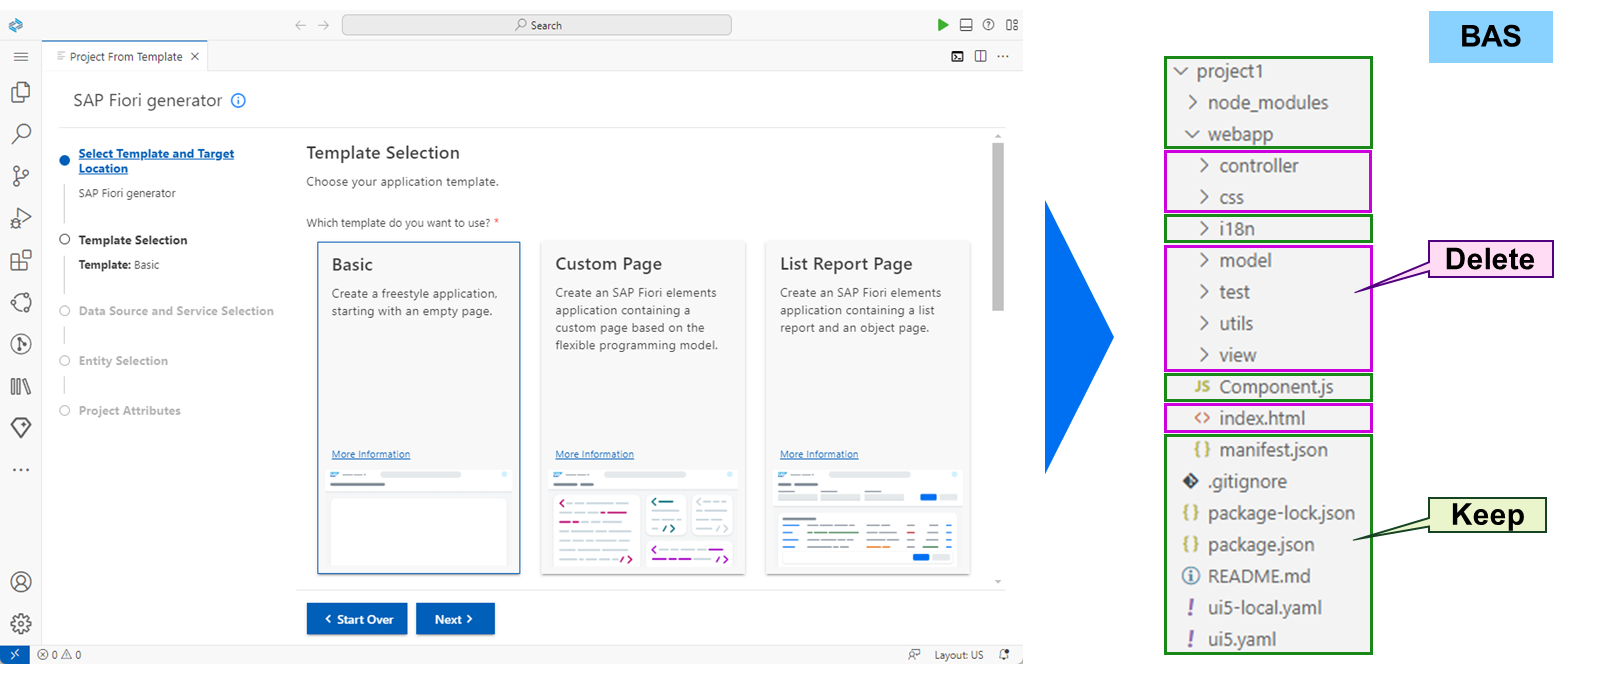
要开始开发 FLP 插件,请在 SAP Business Application Studio (BAS) 中生成一个 SAPUI5 freestyle 应用。然后删除所有不受支持或不必要的文件夹和文件。
下一步是将 SAPUI5 项目定义为 FLP 插件。这通过 manifest.json 文件完成:
{
"_version": "1.37.0",
"sap.app": {
"id": "project1",
"type": "component",
"i18n": "i18n/i18n.properties",
"applicationVersion": {
"version": "0.0.1"
},
"title": "{{appTitle}}",
"description": "{{appDescription}}",
"resources": "resources.json",
"sourceTemplate": {
"id": "@sap/generator-fiori:basic",
"version": "1.6.7",
"toolsId": "4ef10253-5957-4a76-863b-06d7fd654689"
}
},
"sap.ui": {
"technology": "UI5",
"deviceTypes": {
"desktop": true,
"tablet": true,
"phone": true
}
},
"sap.flp": {
"type": "plugin"
}
}
通常,插件中没有视图。对 FLP 的所有更改都通过在 Component.js 文件中访问 FLP 的渲染器来定义。这使 FLP 能够在启动期间自动加载并实例化插件。典型的初始 Component.js 如下所示:
sap.ui.define([
"sap/ui/core/Component",
"sap/m/Button",
"sap/m/Bar",
"sap/m/MessageToast"
], function (Component, Button, Bar, MessageToast) {

return Component.extend("project1.Component", {

metadata: {
"manifest": "json"
},

_getRenderer: function () {
var that = this,
oDeferred = new jQuery.Deferred(),
oRenderer;

that._oShellContainer =
jQuery.sap.getObject("sap.ushell.Container");
if (!that._oShellContainer) {
oDeferred.reject(
"Illegal state: shell container not available;
it must be executed in a unified shell runtime context.");
} else {
oRenderer = that._oShellContainer.getRenderer();
if (oRenderer) {
oDeferred.resolve(oRenderer);
} else {
// renderer not initialized yet
// listen to rendererCreated event
that._onRendererCreated = function (oEvent) {
oRenderer = oEvent.getParameter("renderer");
if (oRenderer) {
oDeferred.resolve(oRenderer);
} else {
oDeferred.reject("Illegal state: shell renderer
not available after recieving
'rendererLoaded' event.");
}
};
that._oShellContainer.attachRendererCreatedEvent(
that._onRendererCreated);
}
}
return oDeferred.promise();
}
});
});
在 https://help.sap.com 上的 FLP 文档中,许多代码片段可作为模板使用。用于更改 shell 页眉的代码如下所示:
...

init: function () {
var rendererPromise = this._getRenderer();

/**
* Set header title
*/
rendererPromise.then(function (oRenderer) {
oRenderer.setHeaderTitle("SAP Education");
});
},

...
SAP 注释 3085381 – Developing SAP Fiori launchpad plug-ins with SAP Fiori Tools 提供了该过程的完整说明。
注意
插件是异步加载并实例化的。当加载多个插件时,不要假定组件有任何特定的实例化顺序。
每个插件都必须先在事务 /UI2/FLP_CONF_DEF 中定义,然后才能通过定制激活。
观看视频,了解如何通过定制激活插件。
视频:本节含 SAP 官方视频(视频 ID
1_dsd6dm13),需在 learning.sap.com 在线观看。
为 SAP Fiori Launchpad 激活插件
业务示例
你想通过向配置中添加插件来扩展 SAP Fiori launchpad。
解决方案
SAP_UX100_BC_S_FLP_PLUGIN(业务目录)
SAP_UX100_TC_S_FLP_PLUGINS(标准目录)
注意
此练习需要 SAP Learning 系统。登录信息由你的系统设置指南提供。
注意
只要本练习中的值或对象名称包含 ##,请将 ## 替换为你的用户编号。
前提条件
该角色已在练习 Create SAP Fiori Spaces and Pages 中创建。
任务 1:在 FLP 设置定义中检查插件
Exercise:Start Exercise(SAP 官方交互式练习)
步骤
在你的 SAP S/4HANA (S4H) 系统的 Definition of FLP Settings(
/UI2/FLP_CONF_DEF)中,检查 UX100_FLP_PLUG FLP 插件的技术信息,并记下 UI5 Component ID 和 URL。 UI5 Component ID:____________________________________________________________ URL:________________________________________________________________________在你的 S4H 的 SAP Easy Access 菜单中,搜索 Definition of FLP Settings 或启动事务
/UI2/FLP_CONF_DEF。双击左侧的 Define Launchpad Plug-Ins。
在 Launchpad Plug-in ID 列中双击 UX100_FLP_PLUG。
记下 UI5 Component ID**
sap.ux100.flp.plugin** 和 URL**/sap/bc/ui5_ui5/sap/ux100_flp_plug**。
任务 2:为 SAP Fiori Launchpad 插件创建应用描述符
Exercise:Start Exercise(SAP 官方交互式练习)
步骤
在你的 S4H 的 SAP Fiori launchpad application manager 中,以本地对象的形式创建空的标准目录
Z_##_TC_FLP_PLUGINS,其标题为Z## - SAP Fiori Launchpad Plugins。在你的 S4H 的 SAP Fiori launchpad 中,选择 Launchpad App Manager 磁贴或启动事务
/UI2/FLPAM。在 SAP Fiori launchpad application manager 中,选择 New Technical Catalog。
在 Technical Catalog ID 字段中,输入
Z_##_TC_FLP_PLUGINS。在 Technical Catalog Title 字段中,输入
Z## - SAP Fiori Launchpad Plugins。从 Technical Catalog Type 下拉列表中,选择
Standard Catalog。选择 Create empty technical catalog only。
选择 Local Object。
使用以下值,在你的 Z_##_TC_FLP_PLUGINS 目录中为 UX100_FLP_PLUG 插件添加 SAPUI5 Fiori 应用描述符: | 字段 | 值 | | --- | --- | | Semantic Object |
Shell| | Action |plugin| | SAPUI5 Component ID |sap.ux100.flp.plugin| | ICF Path |/sap/bc/ui5_ui5/sap/ux100_flp_plug| | Suppress Tile |checked|在 Search Term 字段中,输入
z_##并选择 Go。在 Technical Catalogs 表中,选择 Z_##_TC_FLP_PLUGINS。
选择左上角的 Edit。
在 Select Transport Request 弹出窗口中,选择 Local Object。
选择 Add App→SAPUI5 Fiori App。
在 Target Application Fields 选项卡中,输入以下值: | 字段 | 值 | | --- | --- | | Semantic Object |
Shell| | Action |plugin| | SAPUI5 Component ID |sap.ux100.flp.plugin| | ICF Path |/sap/bc/ui5_ui5/sap/ux100_flp_plug| | Suppress Tile |checked|选择 Save。
结果
将显示警告
Transaction code is not entered
。此问题将在下一步中解决。
8. 关闭警告消息。
3. 为该应用描述符创建事务代码 Z##_FLPPLUG,文本为 FLP Plugin ##。
选择左上角的 Edit。
在 SAP Fiori ID 字段中,输入
Z##_FLPPLUG。对于 Transaction Code,选择 Click for creation。
在 Warning 弹出窗口中,选择 OK。
在 Create / Display Transaction 窗口中,在 Transaction Text 字段中输入
FLP Plugin ##。选择 Create Transaction。
关闭 Create / Display Transaction 窗口。
选择 Save。
任务 3:复制目录、将其分配到角色,并在 SAP Fiori Launchpad 中测试插件
Exercise:Start Exercise(SAP 官方交互式练习)
步骤
在你的 S4H 的定制用 SAP Fiori launchpad content manager 中,使用 ID
Z_##_BC_FLP_PLUGIN和标题Z## - SAP Fiori Launchpad Plugin复制 Z_##_TC_FLP_PLUGINS 目录。在你的 S4H 的 SAP Easy Access 菜单中,搜索 SAP Fiori launchpad content manager 或启动事务
/UI2/FLPCM_CUST。在定制用 SAP Fiori launchpad content manager 中,选择 Z_##_TC_FLP_PLUGINS 目录。
选择 Copy。
在 New ID 字段中,输入
Z_##_BC_FLP_PLUGIN。在 New Title 字段中,输入
Z## - SAP Fiori Launchpad Plugin。选择 Continue。
选择提供给你的传输请求。
在你的 S4H 的 SAP Fiori launchpad content manager 中,将 Z_##_BC_MIG_DATA_STATUS 目录分配到 Z_##_BC_FLP_PLUGIN 角色。
在定制用 SAP Fiori launchpad content manager 中,选择 Z_##_BC_FLP_PLUGIN 目录。
选择 Show Usage in Roles。
在 Roles containing Catalog Z_##_BC_FLP_PLUGIN 表中,选择 Assign Role。
在 Assign Role to Catalog 弹出窗口中,为 Role ID 字段打开值帮助。
在弹出的窗口中,在 Single Role 字段中输入
z_##*。双击 Z_##_BR_TRAINING。
在 Assign Role to Catalog 弹出窗口中,选择 Continue。
在你的 S4H 的 SAP Fiori launchpad 中查找更改。
在你选择的客户端中启动或重新加载你的 S4H 的 SAP Fiori launchpad。
选择页脚中的 Important Information。
选择左侧页眉中的 Add bookmark。
选择右上角的用户。
在 User Actions Menu 中,选择 Help for FLP page。
选择任意一个启动 SAPUI5 应用的磁贴。
选择右上角的用户。
在 User Actions Menu 中,选择 Help for App page。