端到端扩展场景用例集 · 带 AI 能力的代码构建
项目 |
内容 |
|---|---|
官方仓库 |
|
业务场景 |
以 S/4HANA 公有云为起点的多个完整并行扩展场景 |
技术栈 |
SAP BTP、CAP、Cloud Foundry / Kyma、目标(Destination)、通信安排、事件 |
对应课程 |
|
对应路径 |
第 2 条:在 SAP BTP 上构建并行扩展 |
为什么值得做:这是一本「菜谱」。每个用例都是一条可独立复现的端到端 链路,覆盖从 BTP 账户搭建、连通性配置,到部署,再到与 S/4HANA 公有云交互的完整过程。
动手要点:
每个用例都从前提条件讲起(需要哪些服务、哪些通信安排)——请严格照做。
如果连不通,先拿目标(Destination)和通信安排对照检查一遍;这是最常见的坑。
本页内容抓取自官方仓库 SAP-samples/btp-end-to-end-scenario-use-cases,共收录 15 篇官方文档(README 与 docs)。原仓库内容版权归 SAP SE,遵循其许可证。
开发由 AI 驱动的全栈 BTP 应用
在本动手练习中,你将学习如何借助由 Joule 驱动的 SAP Build Code,快速启动一个基于 SAP Cloud Application Programming Model(CAP)的全栈应用开发。Joule 是能够理解你的业务、并与 SAP 业务系统交互的 AI 副驾驶。你还会学习如何把 AI 嵌入这个基于 CAP 的应用。 本次动手练习的主要收获包括:
使用由 Joule 驱动的 SAP Build Code,在 SAP BTP 上开发全栈 CAP 应用
使用 SAP AI Core 嵌入 AI 能力
将应用部署到 SAP BTP Cloud Foundry 运行时
SAP Build Code 的核心能力
SAP Build Code 提供由 AI 驱动的云端开发环境,专门面向 SAP Cloud Application Programming Model(CAP)、SAP Fiori、移动应用和 SAPUI5 开发者。SAP Build Code 可以:
让开发者更快、更智能地编码,借助生成式 AI 从自然语言描述生成代码。
构建扩展应用,并将其与 SAP 及非 SAP 系统集成。
使用集中式的 Lobby 进行融合开发。
由 Joule 驱动的 SAP Build Code
SAP Build Code 把编码、测试和应用管理无缝集成在一起,简化了 SAP BTP 上的应用开发流程。它把 SAP Business Application Studio 与 SAP BTP 上最核心的服务和 SDK 结合起来。
集成 Joule 这一 SAP 创新的 AI 副驾驶后,SAP Build Code 能够自动生成应用代码、数据模型、服务和示例数据。使用 SAP Build Code 可以确保遵循 SAP BTP Developer's Guide 中列出的最佳实践与指导。
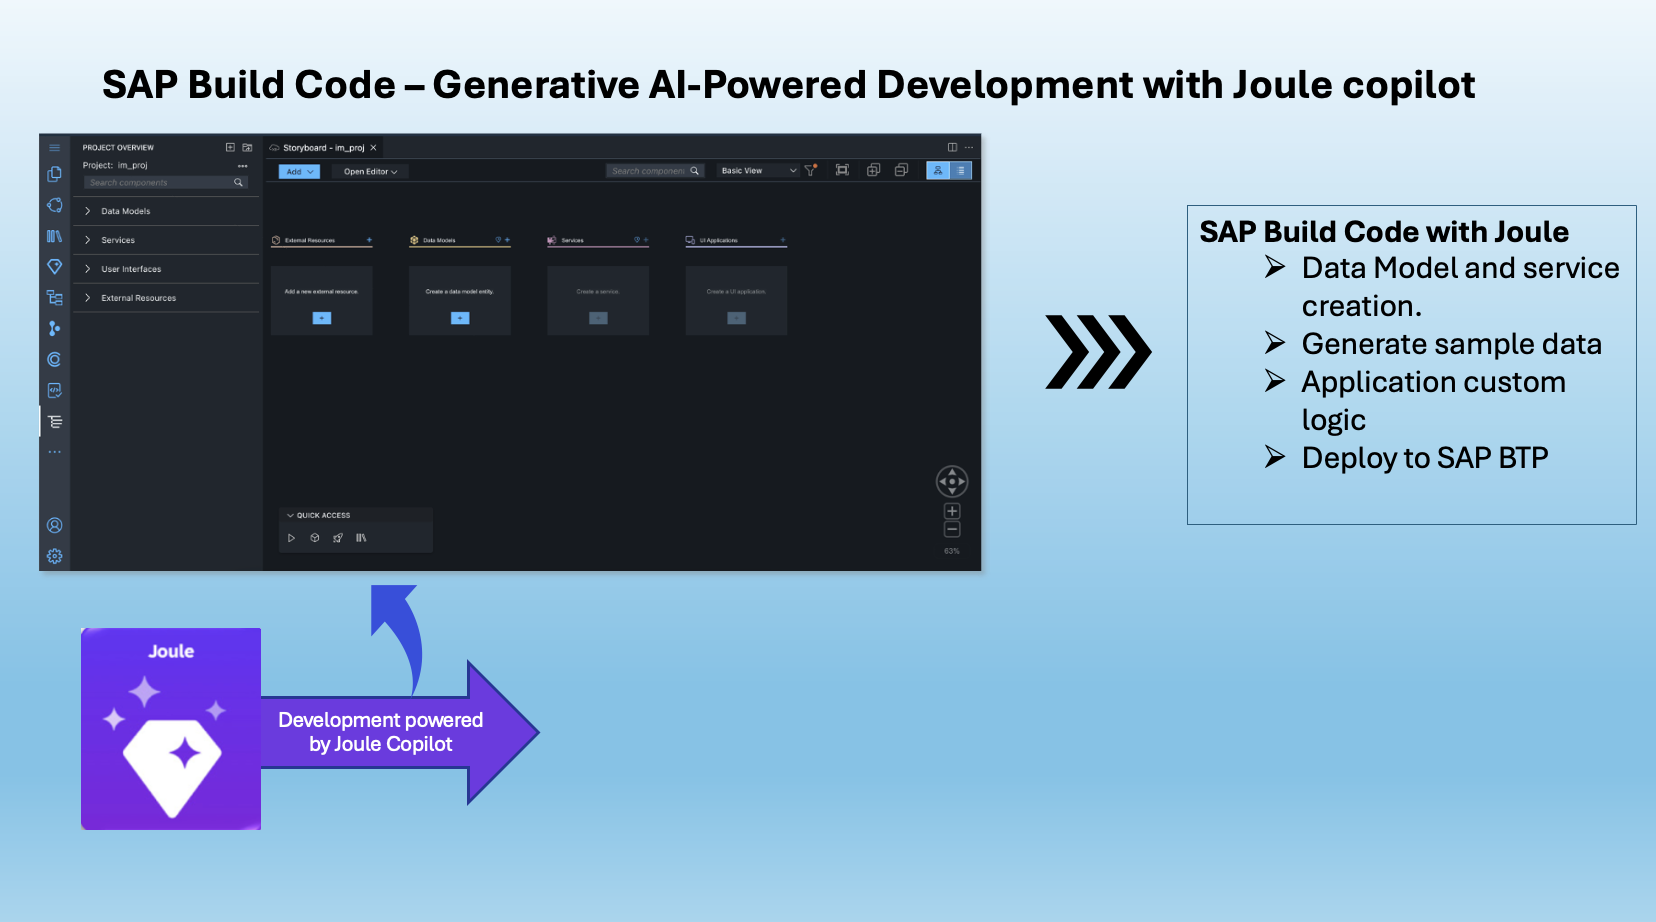
业务场景
在本动手练习中,你将使用 SAP Build Code 构建一个名为 Incident Management 的应用。Incident Management 应用的业务场景如下:
ACME 是一家知名的电子公司。ACME 聘请呼叫中心支持代表来处理和管理客户事件。呼叫中心支持代表(Processor)接到现有客户的电话后,代客户创建一个新事件。新建的事件基于电话中收到的客户投诉。处理该事件的呼叫中心主管会获得由 AI 推荐的解决方案。
解决方案架构图
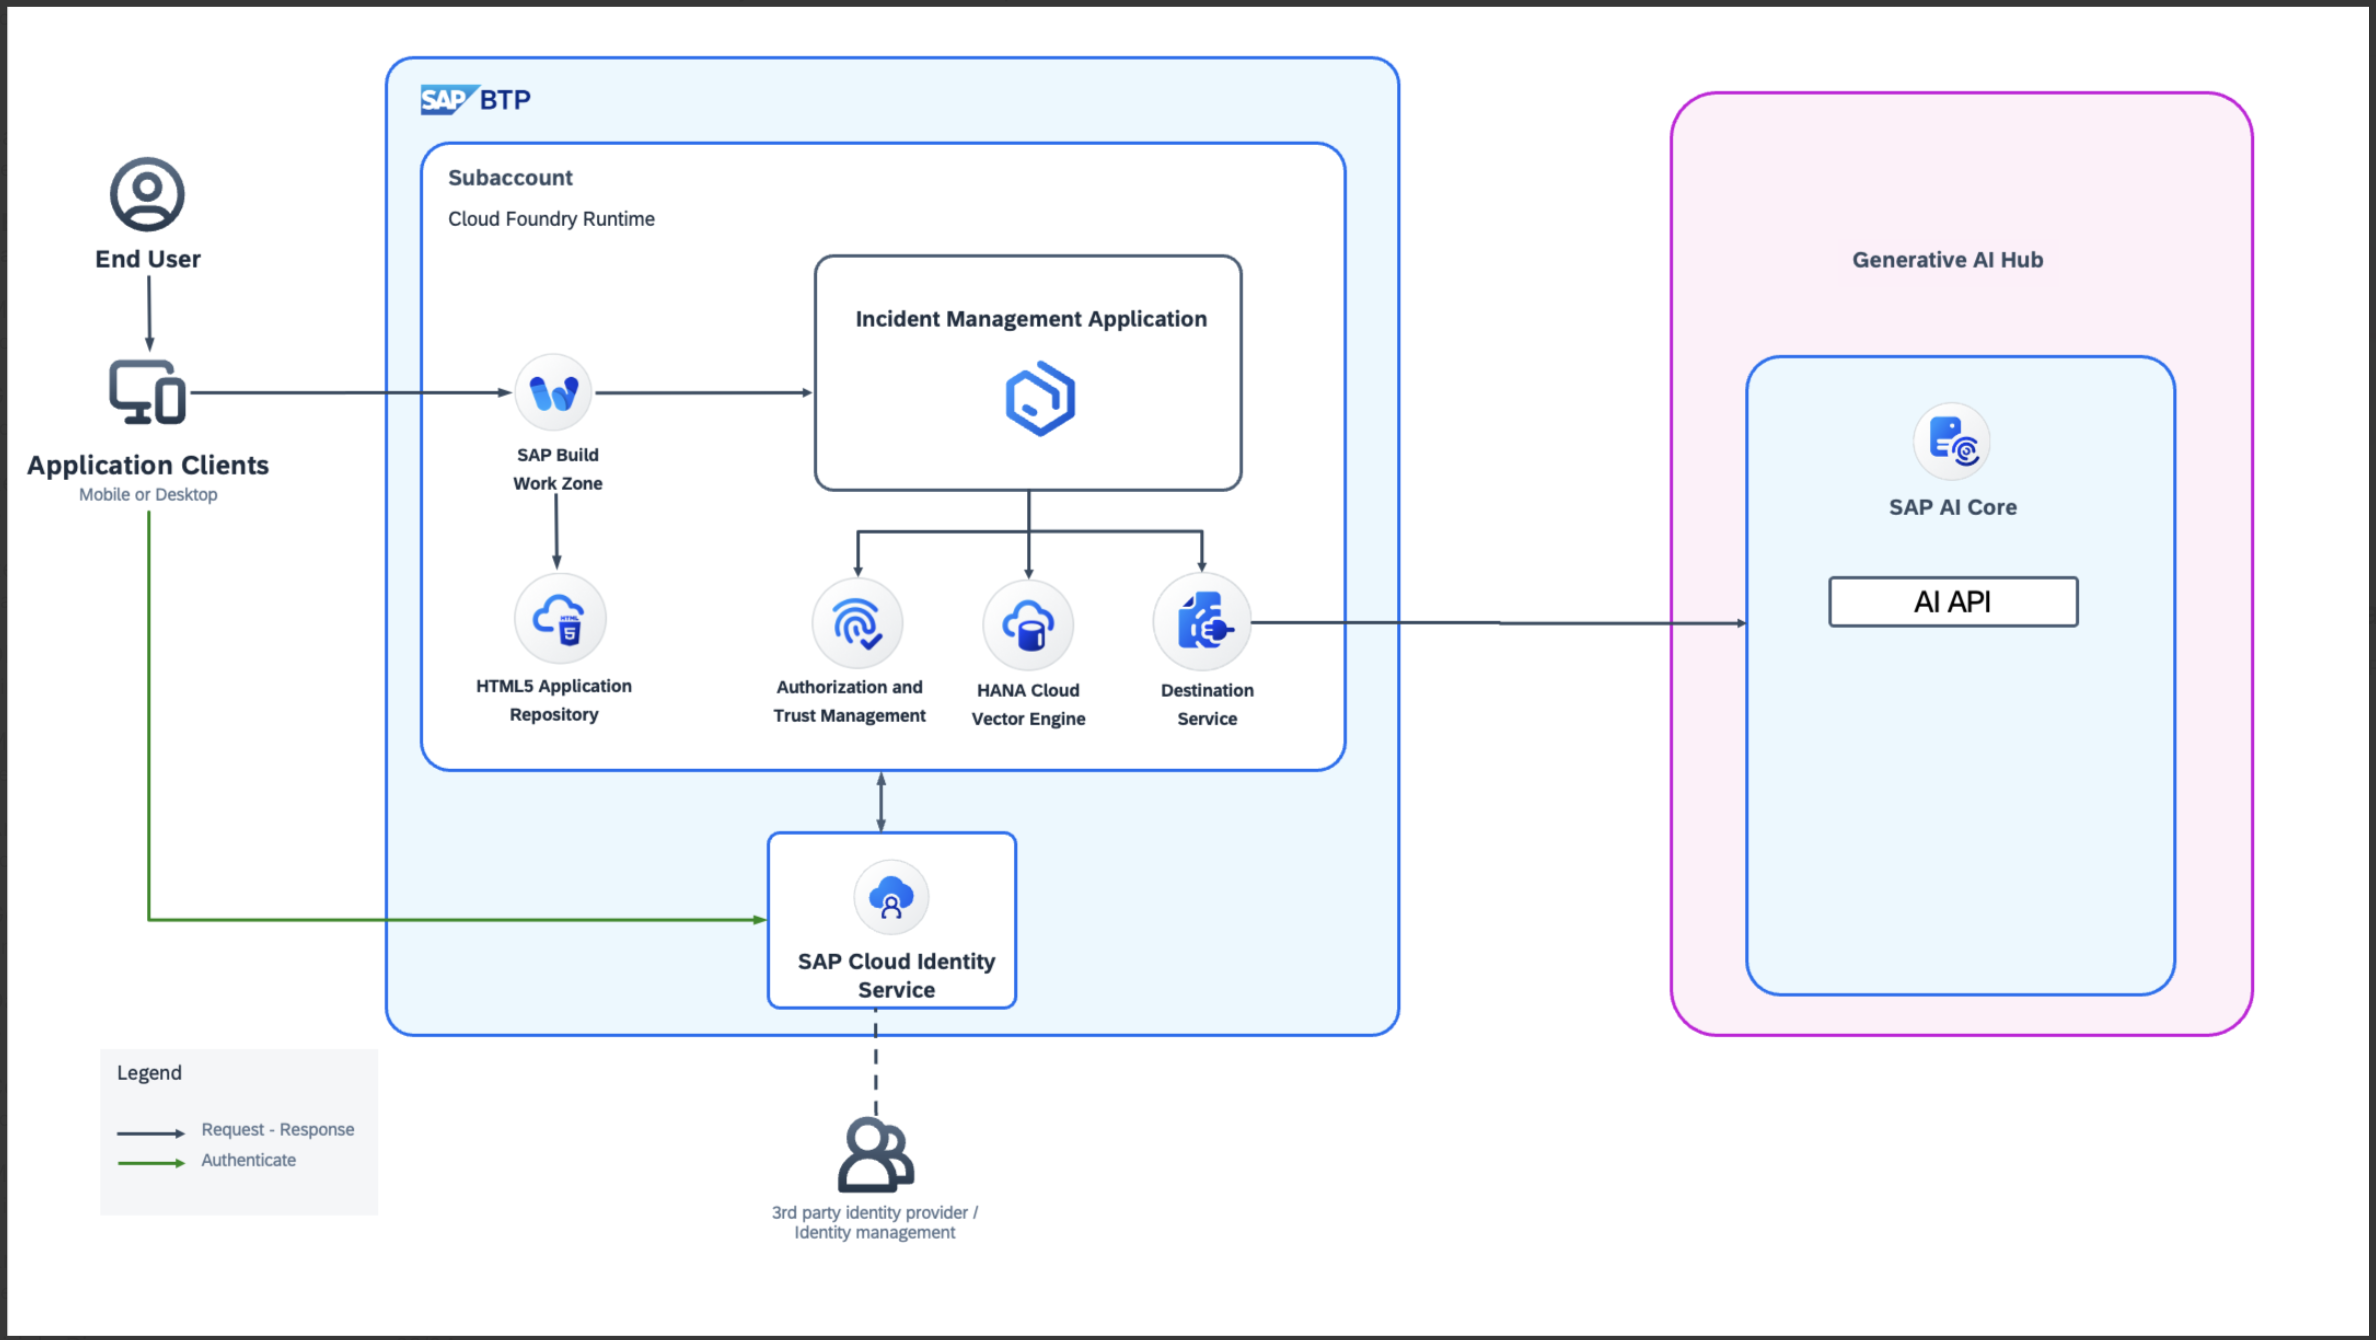
动手练习
练习 1:使用 SAP Build Code CAP 开发基础的 Incident Management 应用
在 SAP BTP 中创建 Space
创建项目
创建数据实体
添加示例数据
添加 CDS 服务
使用 Joule 添加业务逻辑
使用 Joule 添加 Fiori UI
练习 2:使用 SAP AI SDK 添加 AI 能力
为 SAP Cloud SDK for AI 添加依赖
扩展 Incident Management 应用
端到端测试场景
[可选] 练习 3:部署到 SAP BTP Cloud Foundry 运行时
部署到 SAP BTP Cloud Foundry 运行时
端到端测试场景
为 SAP Cloud SDK for AI 添加依赖
添加并安装所需的包
打开
Package.json,添加以下依赖
"dependencies": {
    ...
    "@sap-ai-sdk/foundation-models": "^1.12.0",
    "@sap-ai-sdk/langchain": "^1.12.0",
    "csv-parser": "^3.2.0",
    "fs": "^0.0.1-security",
    "natural": "^8.0.1"
},
添加这些包之后,最终的 package.json 如下所示。
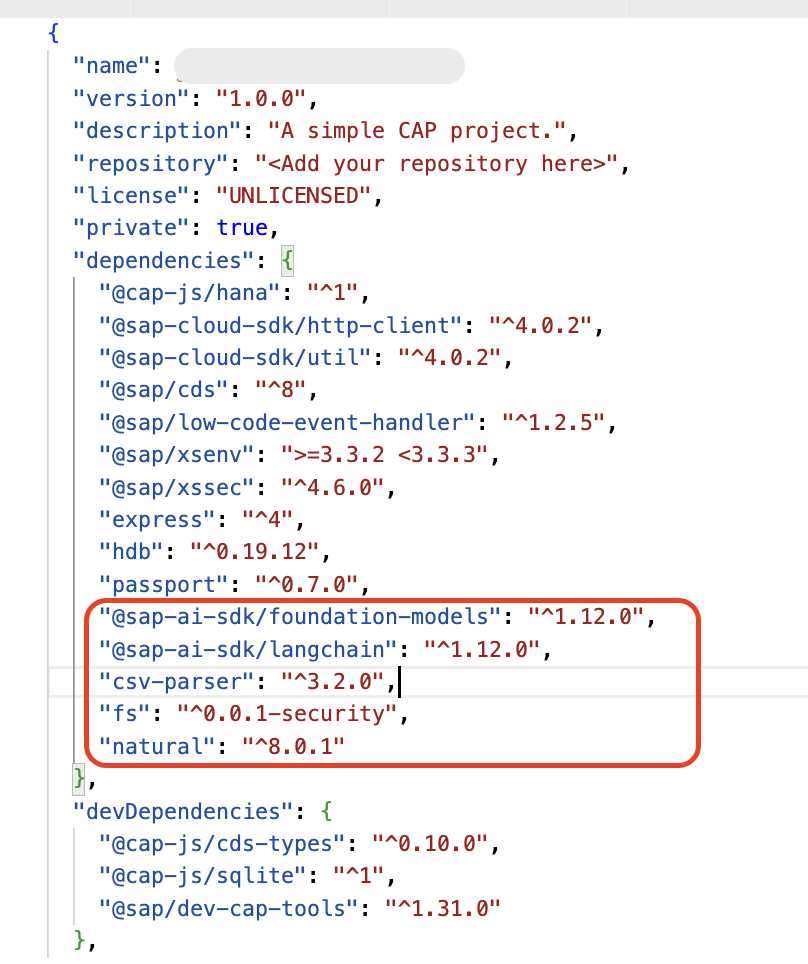
[!Tip] 这些包用于在 CAP 应用内启用 AI 集成、文本处理和文件处理。
@sap-ai-sdk/foundation-models 与 @sap-ai-sdk/langchain 用于与 SAP AI Core 服务交互并管理 AI 相关工作流。
csv-parser 用于读取和解析 CSV 文件,在导入或处理批量数据时很有用。
fs(File System) 用于处理读取或写入本地文件等文件操作。
natural 提供基础的自然语言处理(NLP)能力,例如分词、词干提取和文本相似度计算。
在项目根目录下,选择汉堡菜单,然后选择 Terminal → New Terminal。
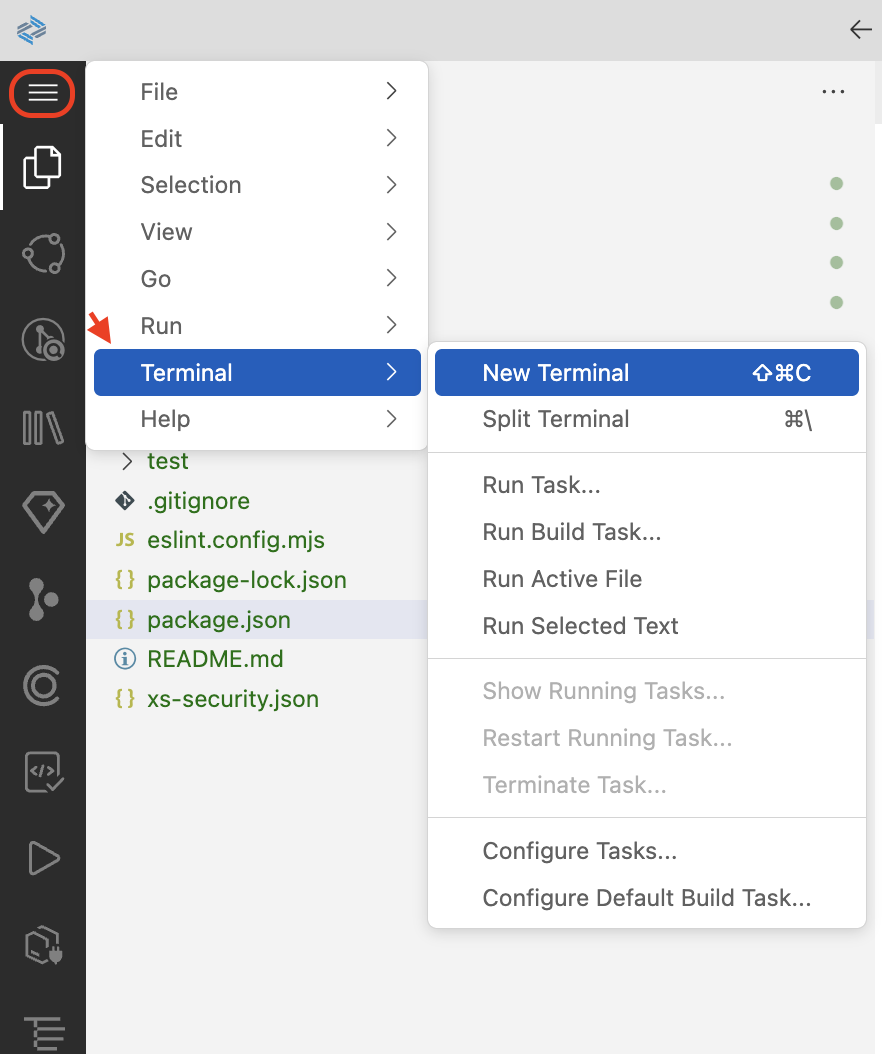
运行
npm install安装所需的依赖。
登录 Cloud Foundry
选择汉堡菜单,然后选择 View → Command Palette。
[!Note] 也可以使用以下快捷键快速调用 Command Palette:
macOS:Command + Shift + P
Windows:Ctrl + Shift + P
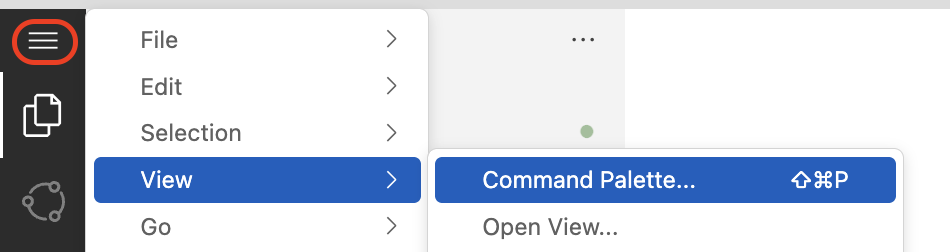
在输入框中输入 CF: Login,然后从列表中选择 CF: Login to Cloud Foundry。

在 Cloud Foundry Sign in 弹窗中,执行以下操作:
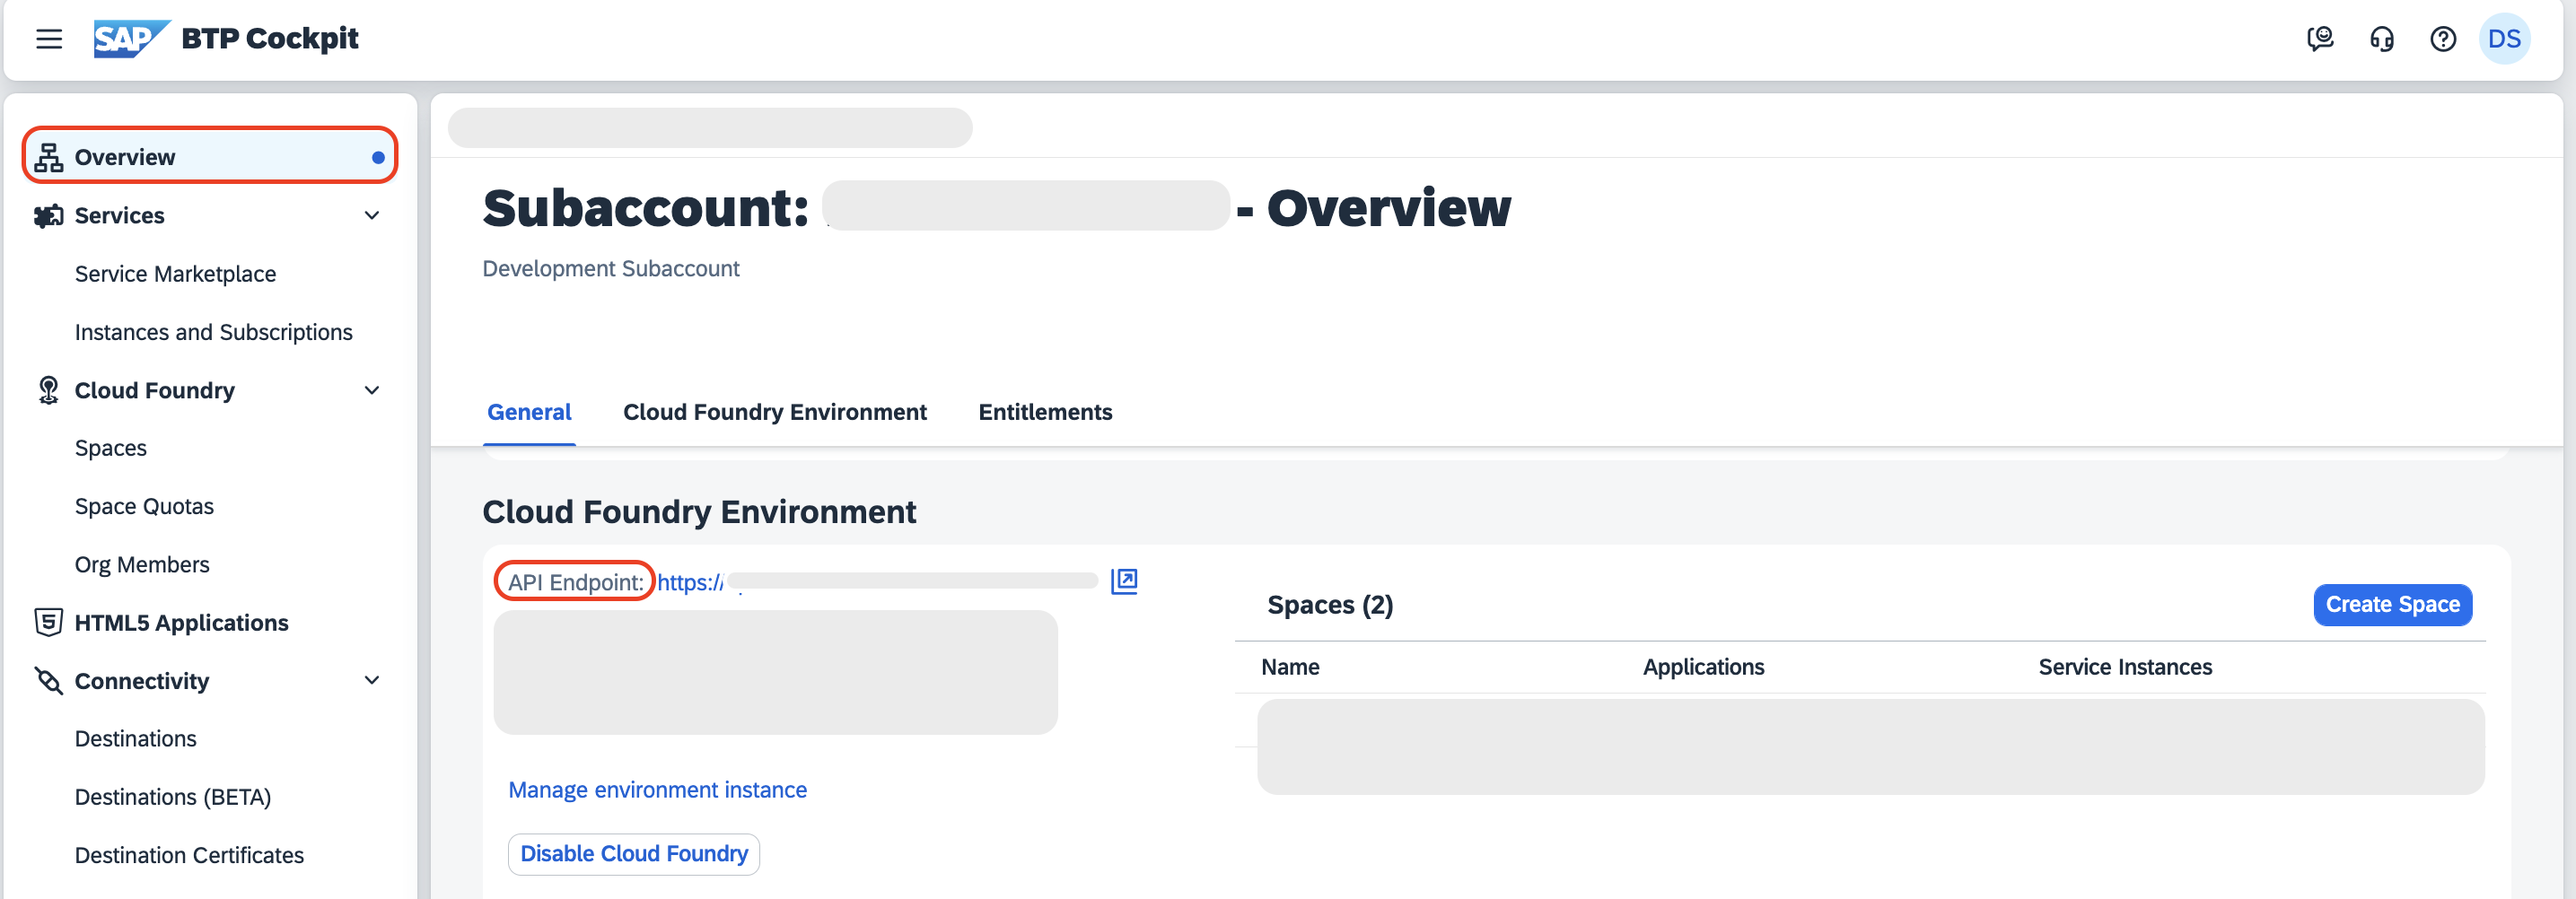
在 Enter Cloud Foundry Endpoint 字段中,输入 SAP BTP Cockpit 中的 API Endpoint。
注意:Cloud Foundry Endpoint 可从 SAP BTP Cockpit 获取。
选择 SSO Passcode 作为身份验证方式。
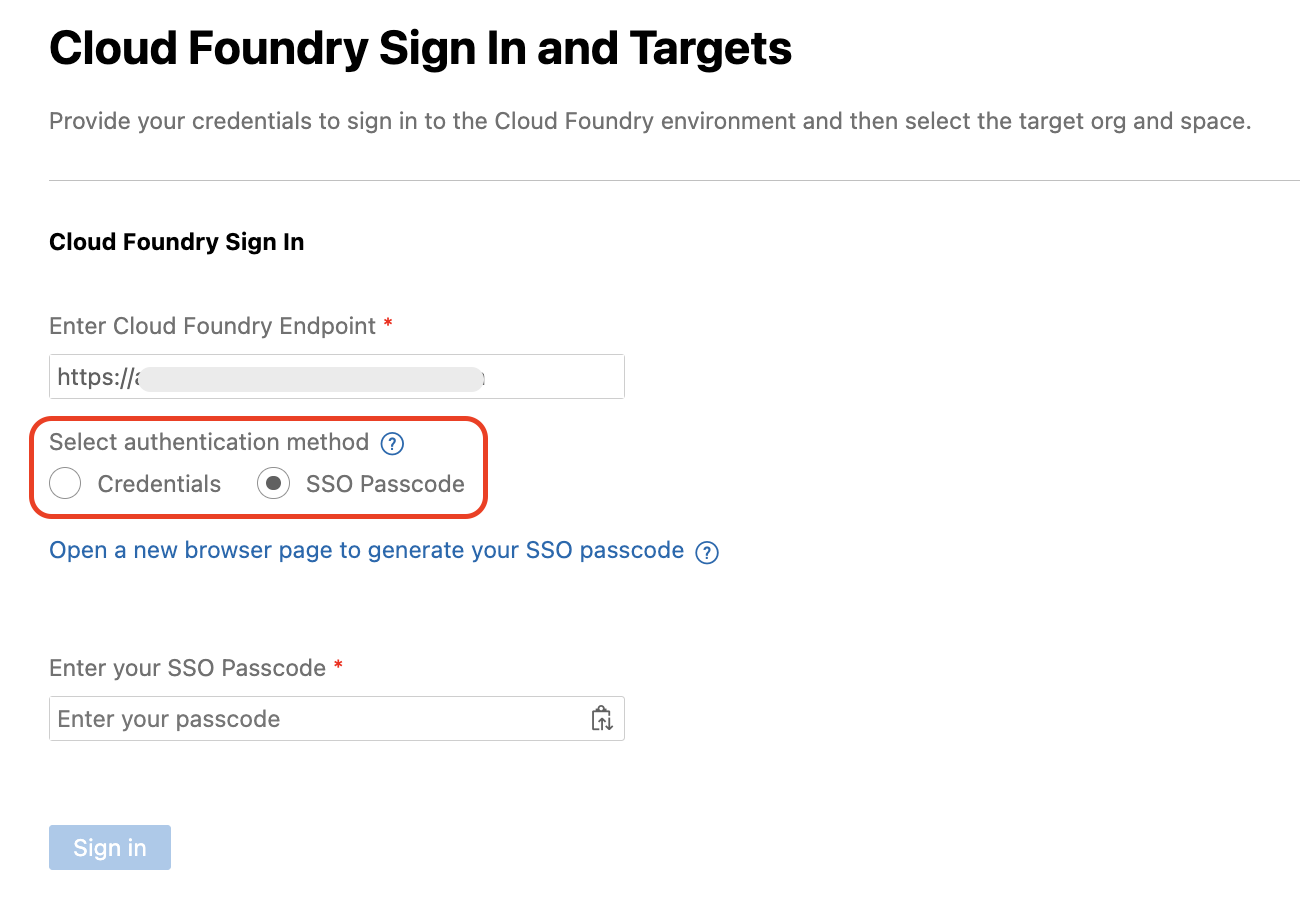
选择 Open a new browser page to generate your SSO passcode,在 SAP BTP 中登录你的子账户,浏览器会打开一个新页面。
找到 Enter the origin key 文本框,输入 aviss4yru-platform,然后单击 Sign in with alternative identity provider。
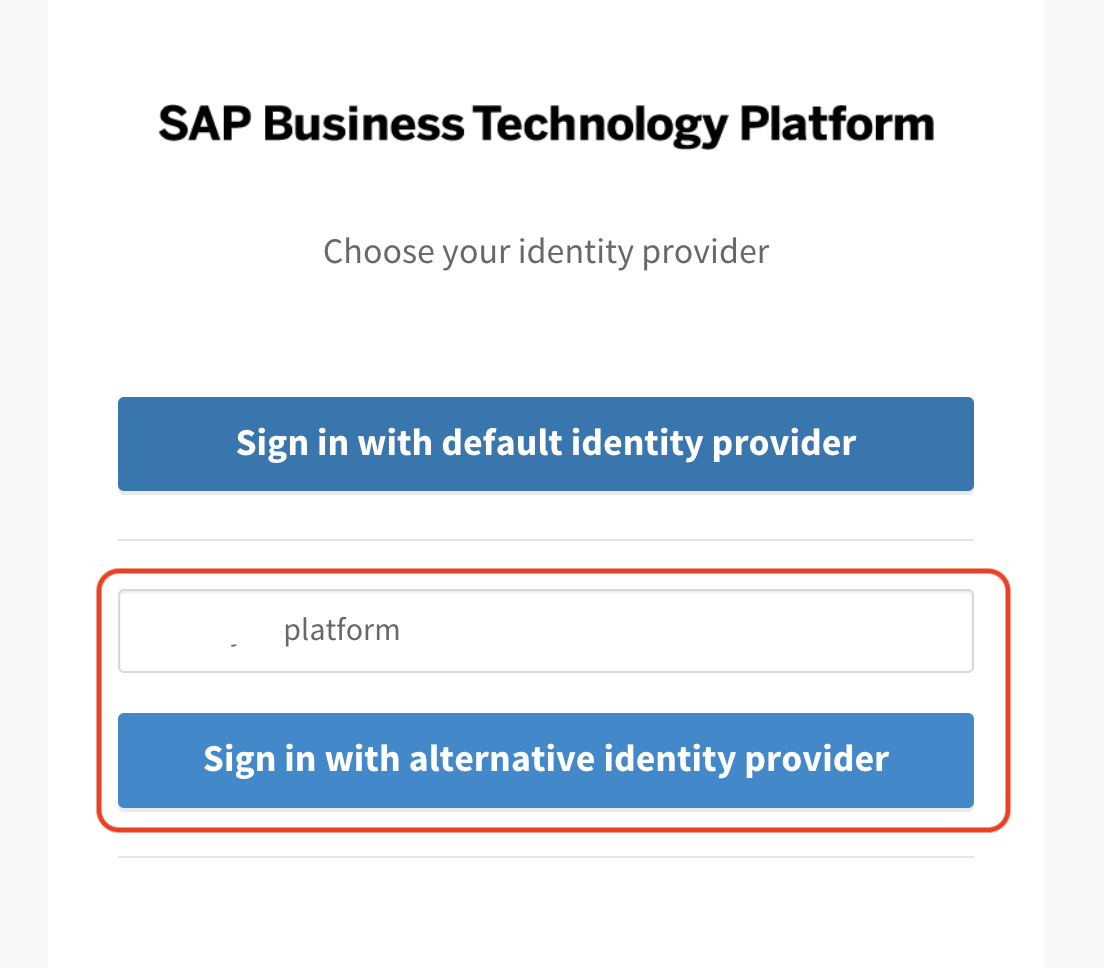
注意:选择 Sign in with alternative identity provider 时,如果提示登录,请输入用户名和密码。 如果你已使用 Default Identity 登录,也可以选择用默认身份提供方登录。
选择 Copy 图标,获取临时身份验证码。
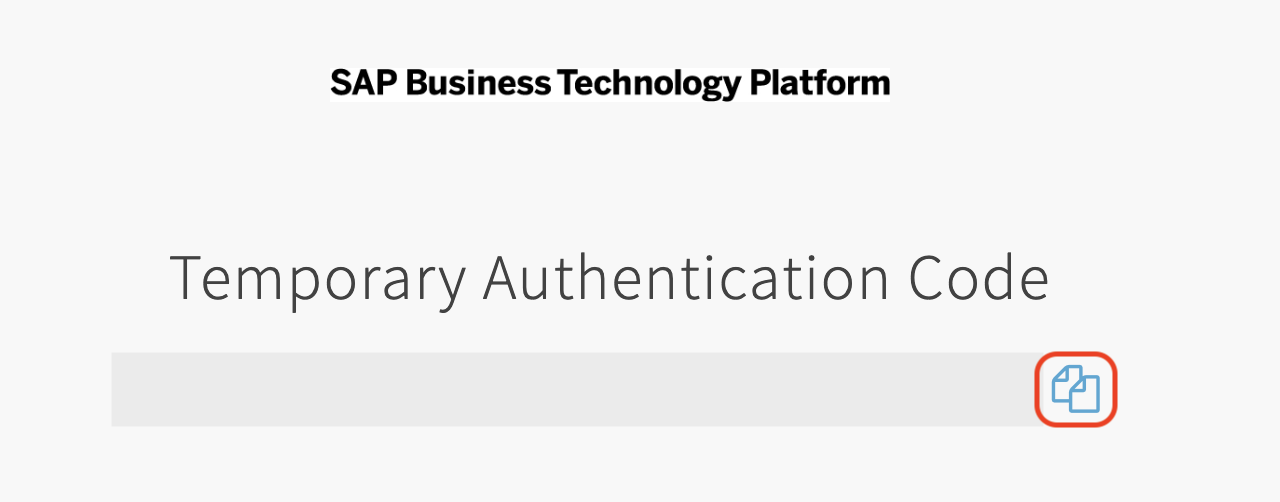
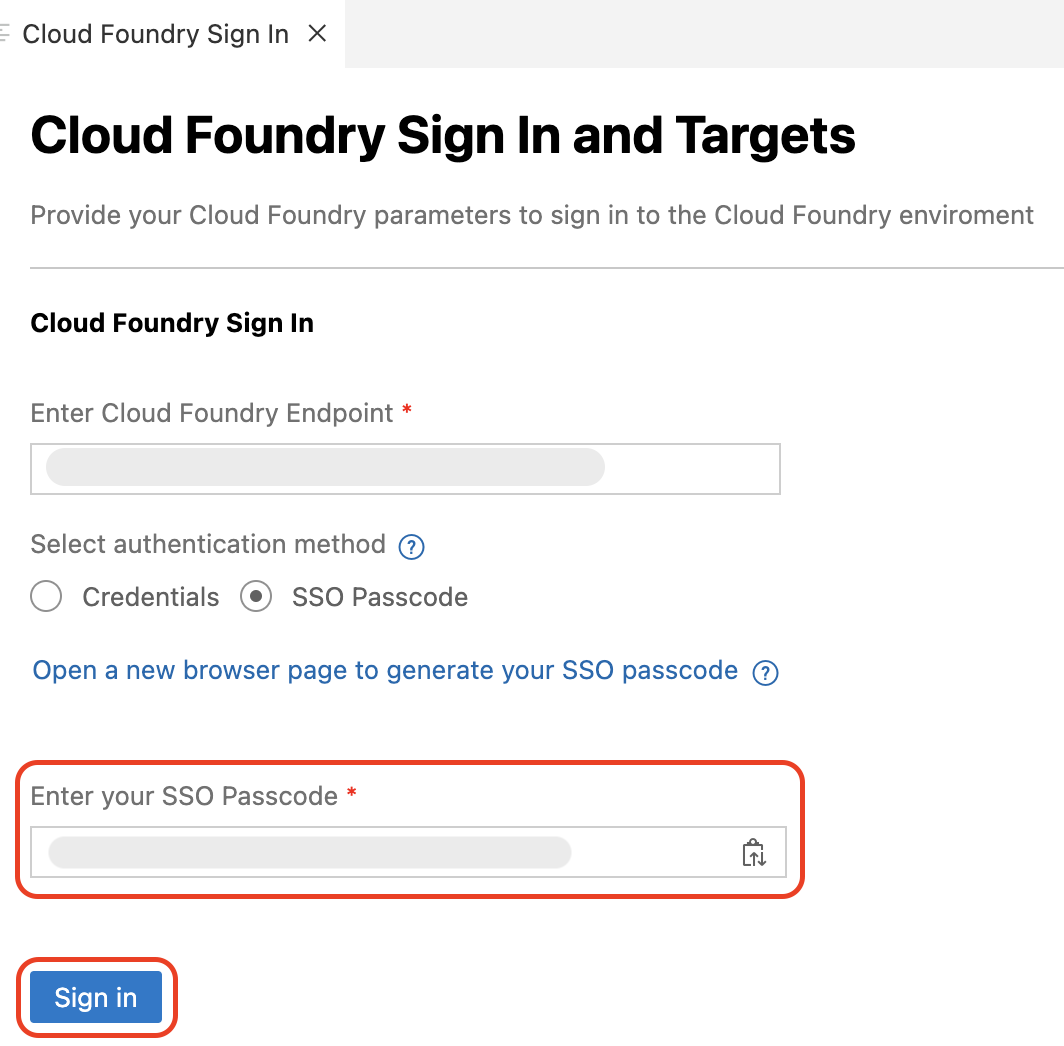
将复制的验证码粘贴到 Cloud Foundry 登录页面的 Enter your SSO Passcode 字段中。
选择 Sign In。
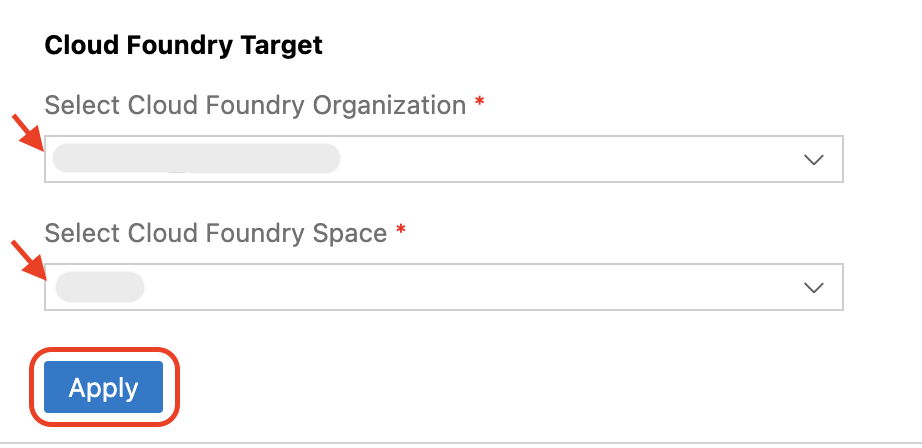
在 Cloud Foundry Target 区域中,执行以下操作:
在 Select Cloud Foundry Organization 下拉菜单中选择相应的 Org 名称。
在 Select Cloud Foundry Space 下拉菜单中,选择在练习 1 第 1 步「Create Cloud Foundry Space」中创建的 Cloud Foundry space。
选择 Apply。
扩展 Incident Management 应用的数据模型
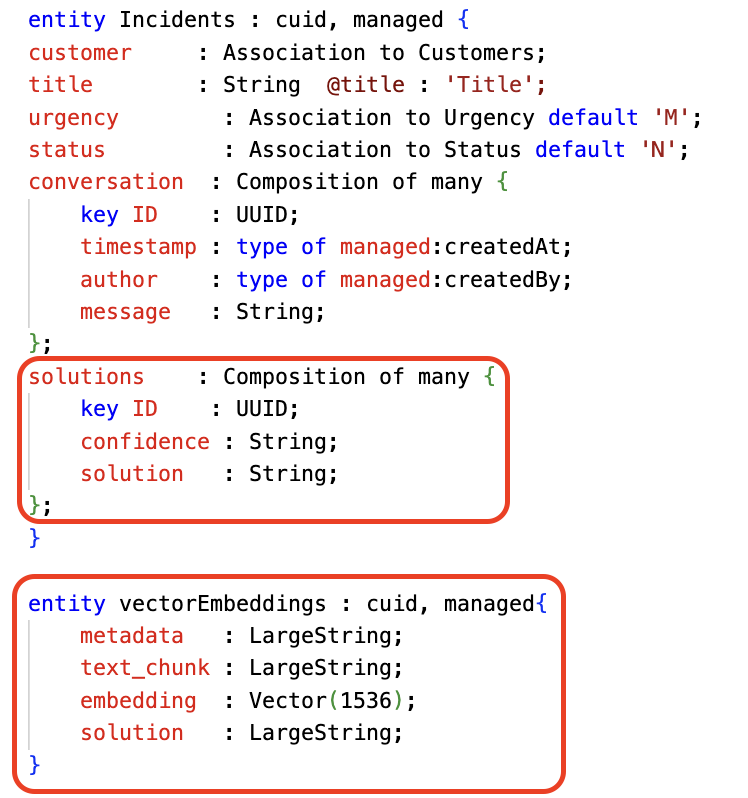
本节将扩展 Incident Management 应用的数据模型,以支持向量嵌入(Vector Embeddings)。
打开
schema.cds,添加以下代码片段:在
Incidents实体下添加solutions。solutions : Composition of many { key ID : UUID; confidence : String; solution : String; };
添加一个名为
vectorEmbeddings的新实体。entity vectorEmbeddings : cuid, managed{ metadata : LargeString; text_chunk : LargeString; embedding : Vector(1536); solution : LargeString; }
前面步骤生成的示例数据会在 test 文件夹下创建一个 data 文件夹。要在生产用途中使用这些数据,请将 data 文件夹移动到 db 文件夹。打开终端,运行以下命令移动 csv 文件。
mv test/data db/data
在终端中运行以下命令,对应用执行生产构建。
cds build --production
在终端中运行以下命令,创建到 SAP Destination Service 的服务绑定。
cf create-service destination lite <destination-name>
cds bind --to <destination-name>
在终端中运行以下命令,将 csv 文件部署到 hana 数据库。
cds deploy --to hana
[!Note] 部署到 hana 可能需要几秒钟,完成后会收到部署成功的消息。
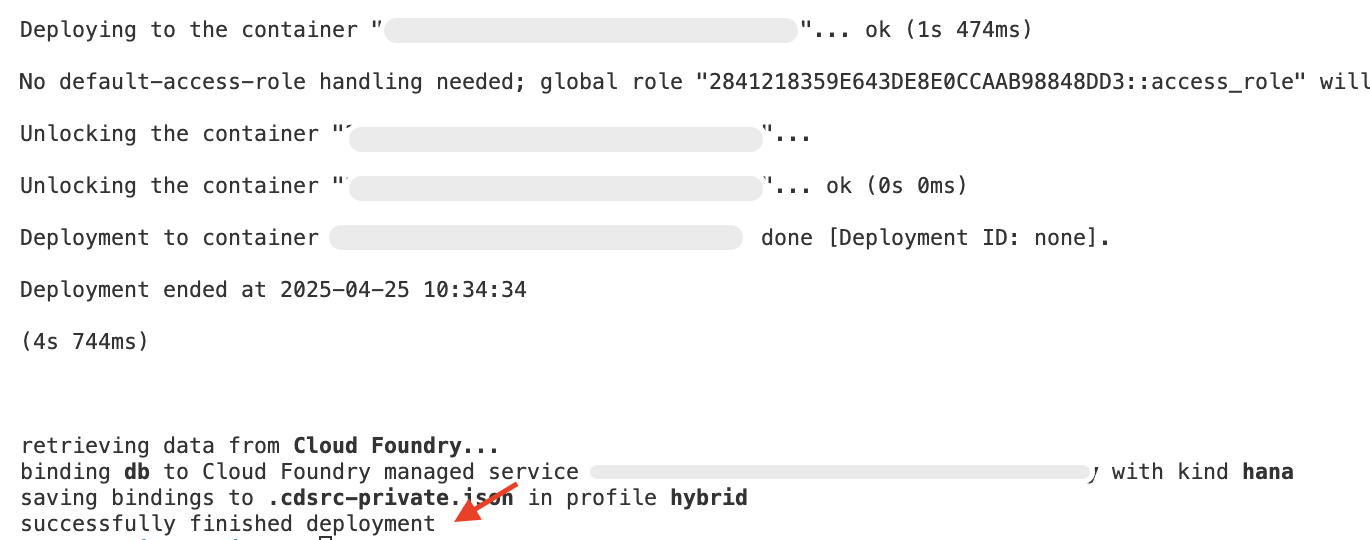
下一步
扩展 Incident Management 应用
创建数据实体
Joule 是能够把应用的数据模型生成为 CDS(Core Data Services)实体的 AI 副驾驶。不过,每次触发提示词时生成的模型可能会略有差异,因此我们提供一个预定义的 CDS 数据模型。采用结构化的手工方式可以保证练习过程的一致性。请按分步教程手工创建 CDS 实体,而不要依赖 AI 生成的代码。
前提条件
你已按照 Create the Project 创建了项目。
添加领域模型
在 SAP Business Application Studio 中,选择 Project Explorer。
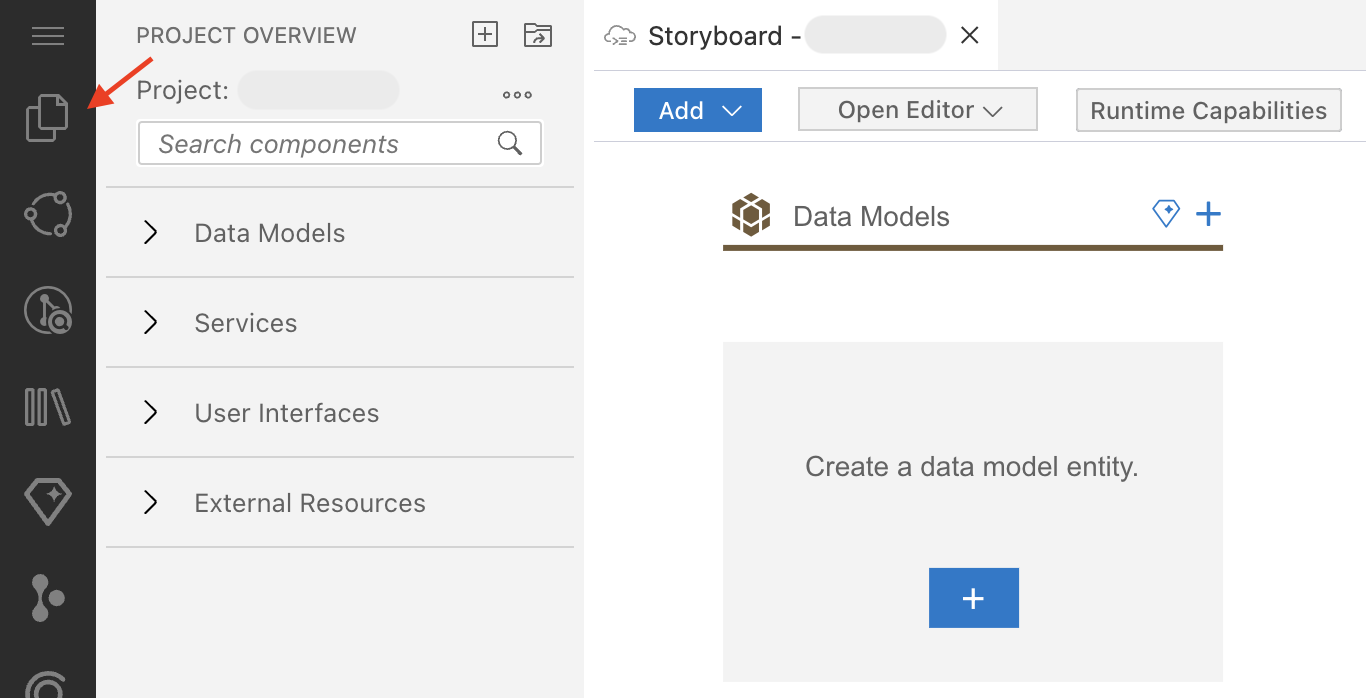
展开 db 文件夹。选择创建新文件的图标,并将文件名设为 schema.cds。
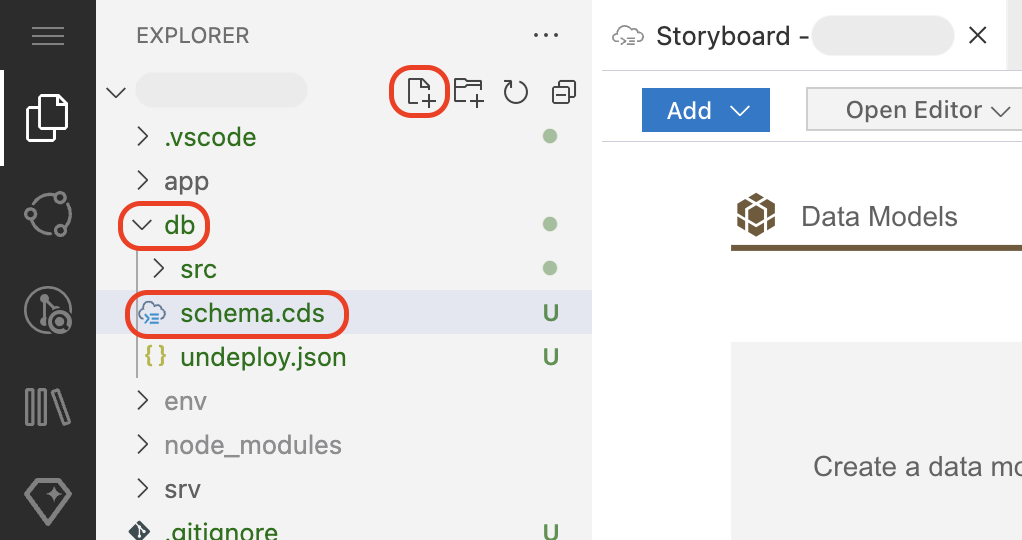
将以下 schema 复制到 schema.cds 文件中。
using { cuid, managed, sap.common.CodeList } from '@sap/cds/common';
namespace sap.capire.incidents;

/**
* Incidents created by Customers.
*/
entity Incidents : cuid, managed {
customer     : Association to Customers;
title        : String  @title : 'Title';
urgency        : Association to Urgency default 'M';
status         : Association to Status default 'N';
conversation  : Composition of many {
    key ID    : UUID;
    timestamp : type of managed:createdAt;
    author    : type of managed:createdBy;
    message   : String;
};
}

/**
* Customers entitled to create support Incidents.
*/
entity Customers : managed {
key ID        : String;
firstName     : String;
lastName      : String;
name          : String = firstName ||' '|| lastName;
email         : EMailAddress;
phone         : PhoneNumber;
incidents     : Association to many Incidents on incidents.customer = $self;
creditCardNo  : String(16) @assert.format: '^[1-9]\d{15}$';
addresses     : Composition of many Addresses on addresses.customer = $self;
}

entity Addresses : cuid, managed {
customer      : Association to Customers;
city          : String;
postCode      : String;
streetAddress : String;
}

entity Status : CodeList {
key code: String enum {
    new = 'N';
    assigned = 'A';
    in_process = 'I';
    on_hold = 'H';
    resolved = 'R';
    closed = 'C';
};
criticality : Integer;
}

entity Urgency : CodeList {
key code: String enum {
    high = 'H';
    medium = 'M';
    low = 'L';
};
}

type EMailAddress : String;
type PhoneNumber : String;
[!Note] 该 CDS 文件定义了 Incident Management 应用的数据模型。模型包括:
Incidents:表示客户提出的支持工单。
Customers:存储客户详细信息,并将客户与其事件和地址关联起来。
Addresses:存储客户地址。
Status:定义事件可以处于的各种状态,例如 New(N)、In Process(I)等。
Urgency:定义事件的不同紧急程度:High(H)、Medium(M)和 Low(L)。
模型中涵盖的关键 CAP 特性
使用 managed 与 cuid:确保自动时间戳和基于 UUID 的主键。
关联与组合:
Customers ↔ Incidents(一对多)
Customers ↔ Addresses(一对多)
Incidents ↔ Status 与 Urgency(提供默认值)
校验: 使用正则表达式强制信用卡号格式。
嵌套组合: 每个事件都维护一份带时间戳和作者的聊天记录。
在编辑器中转到 Storyboard,确认 Data Models 区域已更新为 schema.cds 文件中提到的实体。
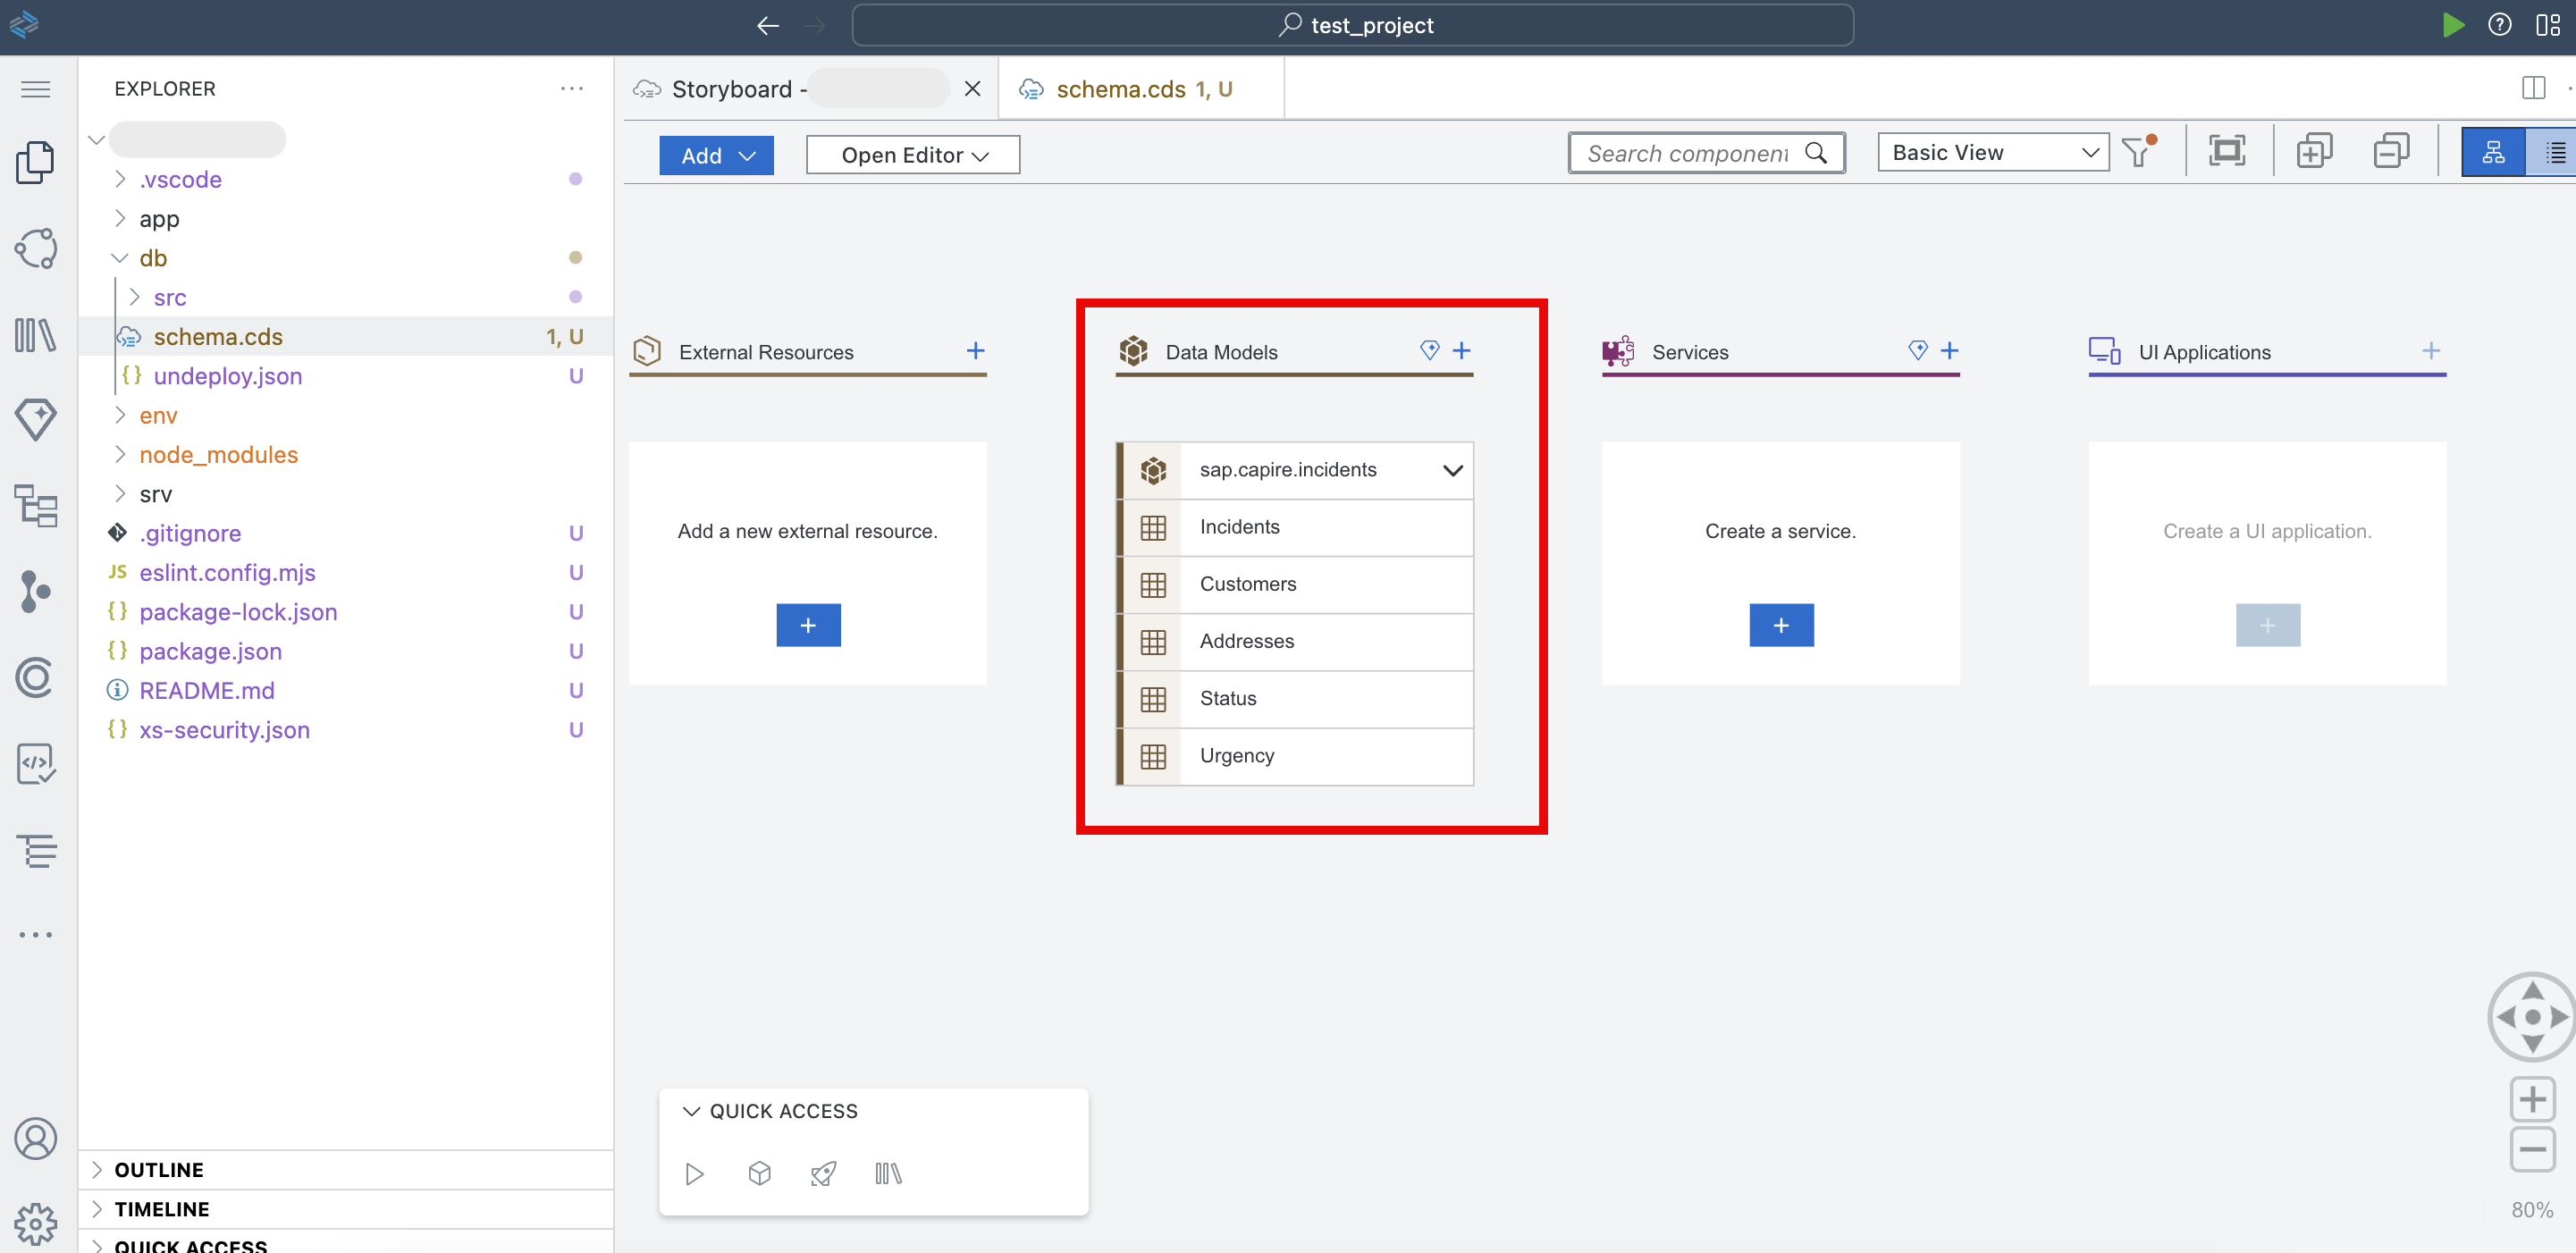
下一步
添加示例数据
创建项目
本节介绍如何访问 SAP Build Lobby,并创建一个使用 SAP Build Code 开发全栈应用的项目。
Joule 提示词旨在生成在由 Joule 驱动的 SAP Build Code 中成功开发全栈应用所需的完整代码。这些提示词专门按照本动手教程的流程编写,确保每一步都能按顺序顺畅执行。
打开 SAP Build Lobby。
在 Create 下拉菜单中选择 Create。
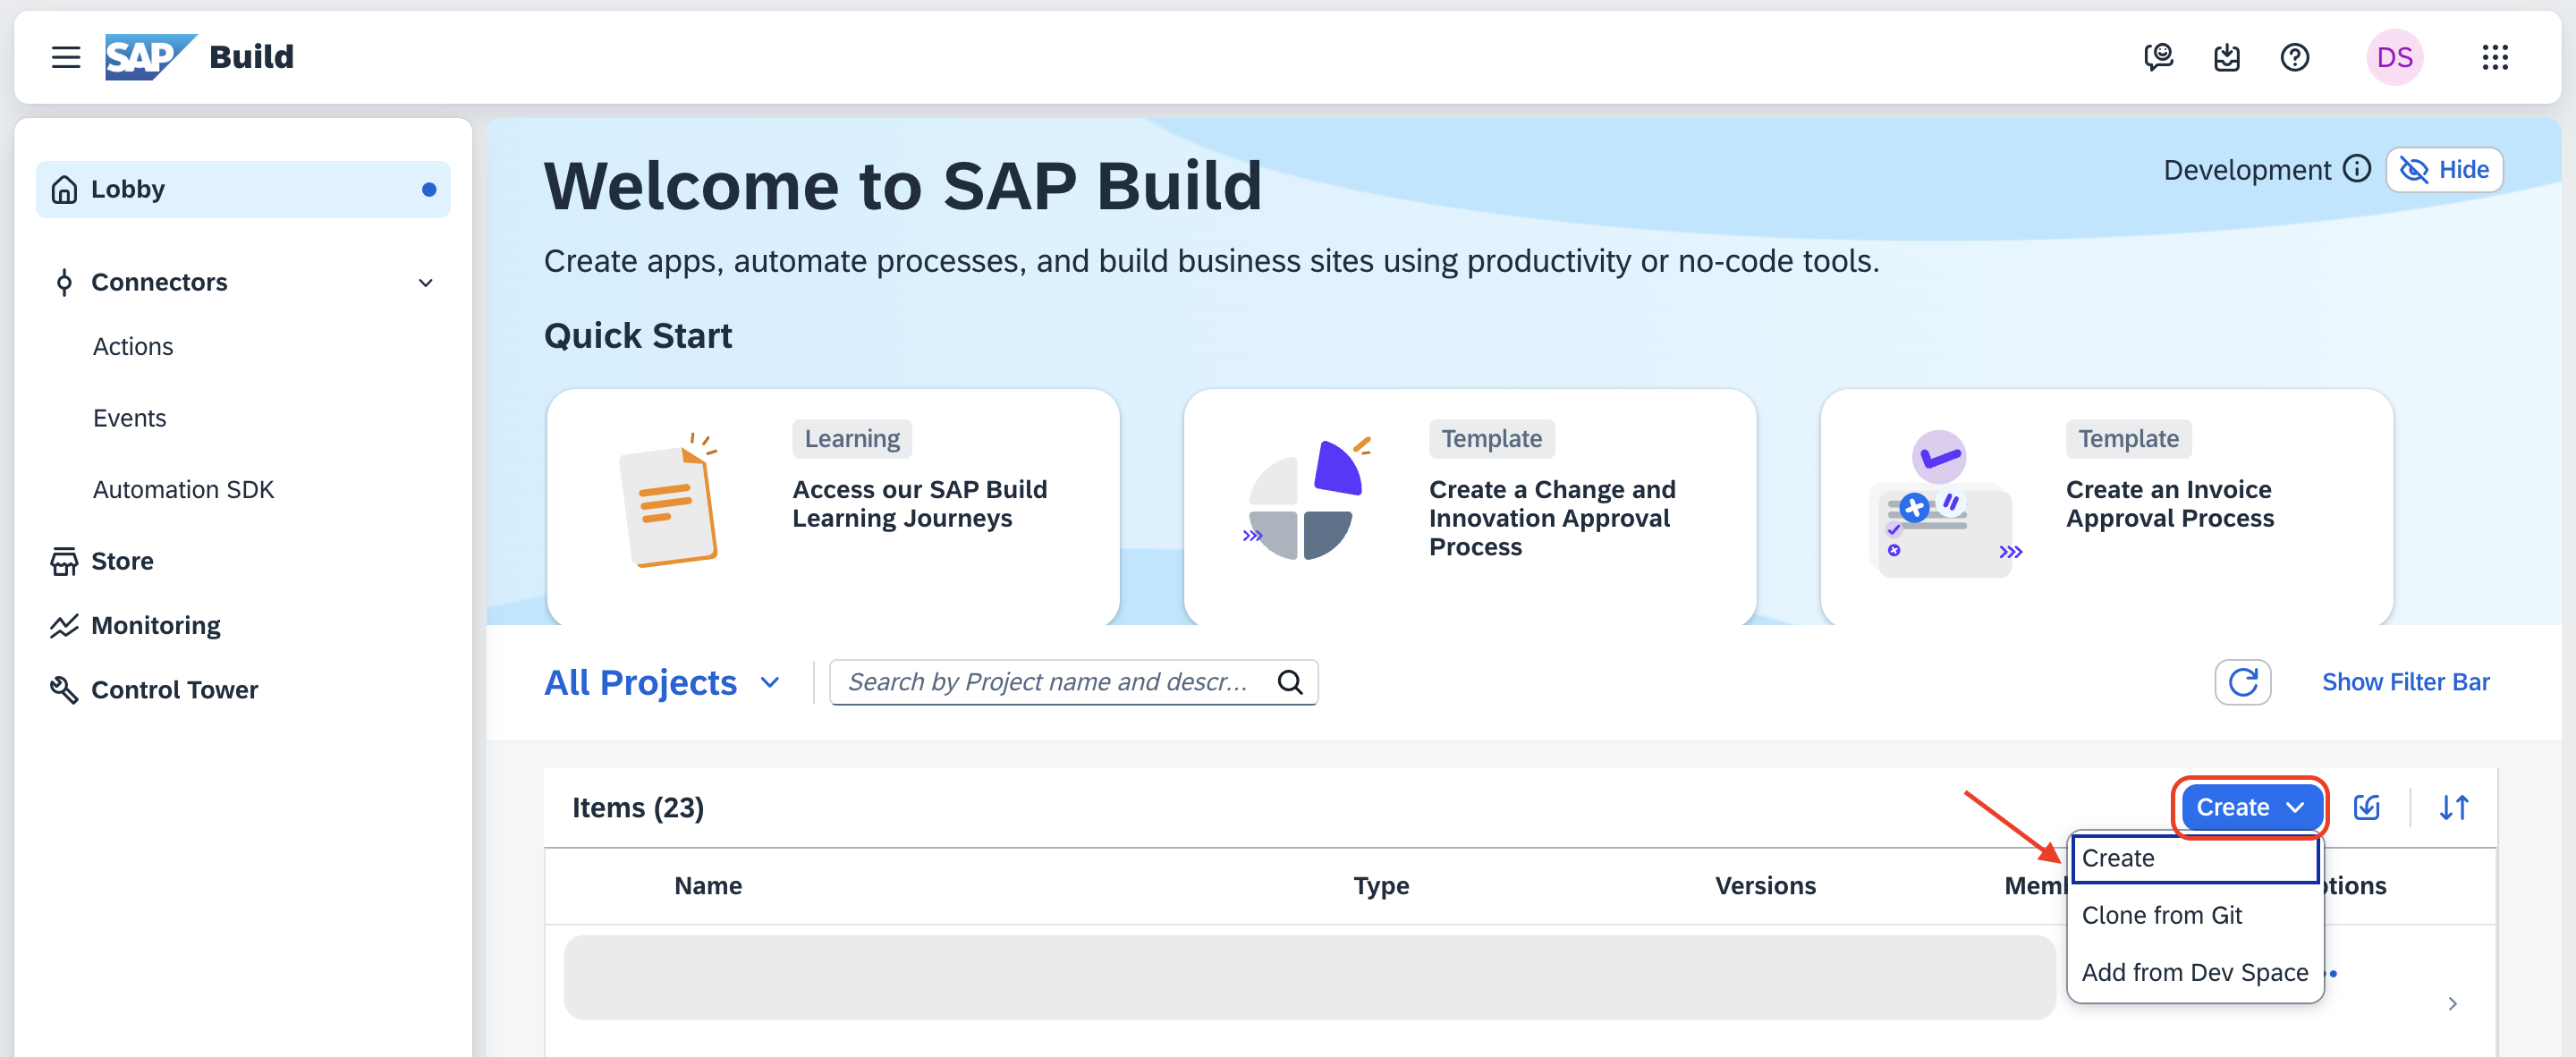
在 Create Project 对话框中,在 Objective 下单击 Application 磁贴,然后选择 Next。
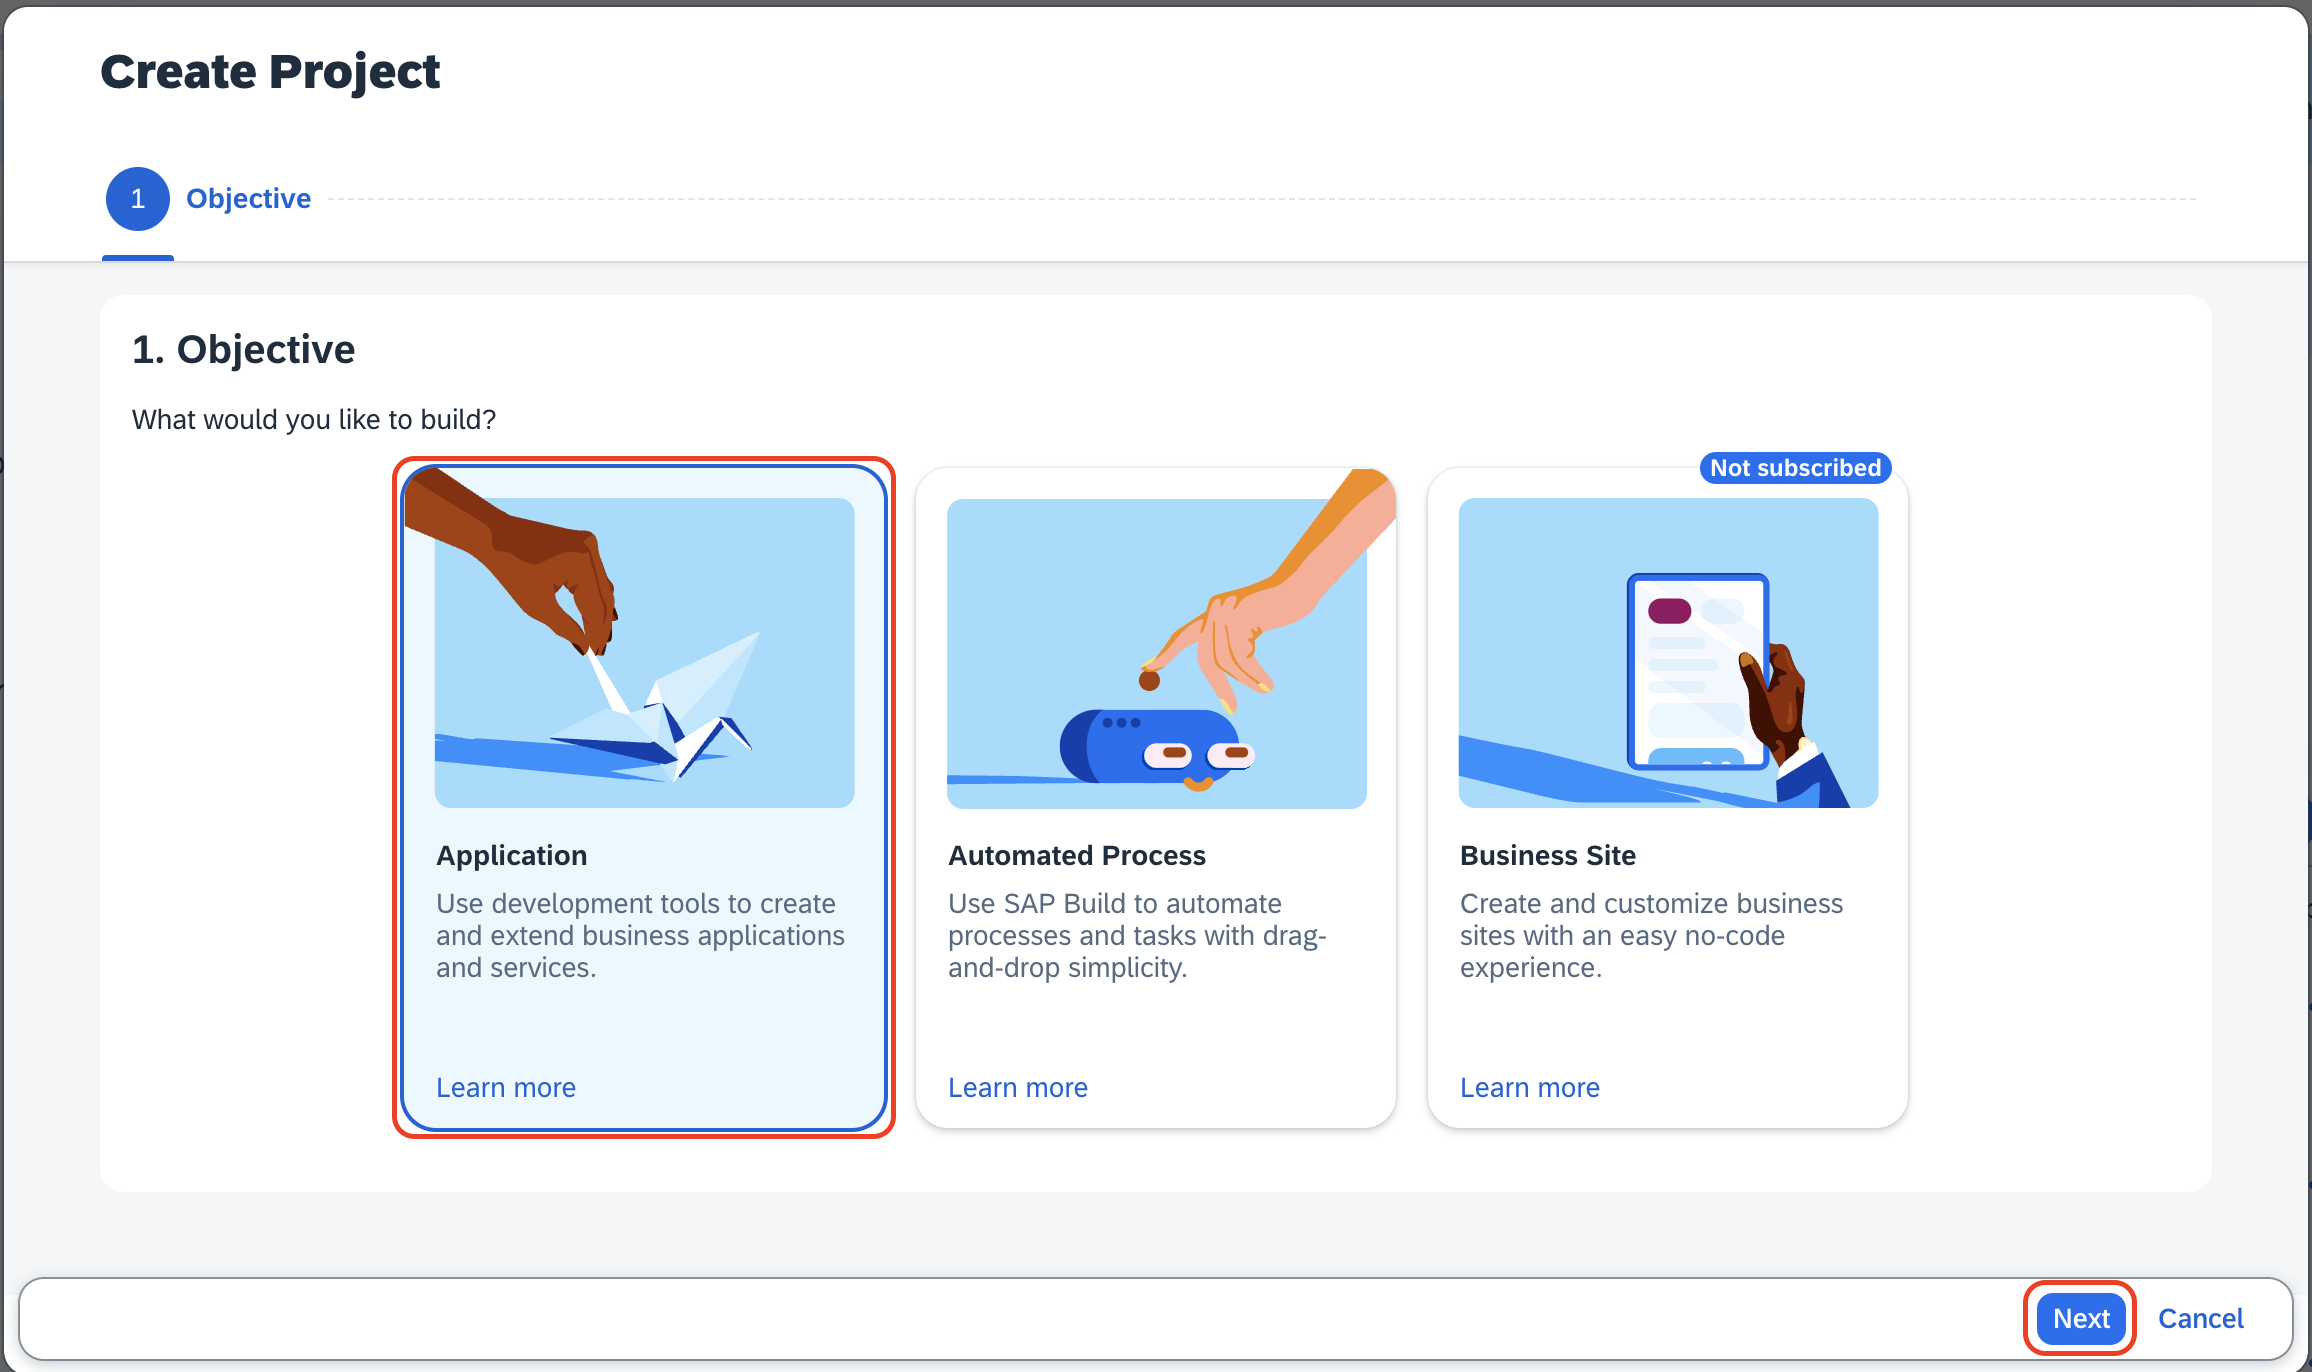
在 Category 下选择 Full-Stack 磁贴,然后单击 Next。
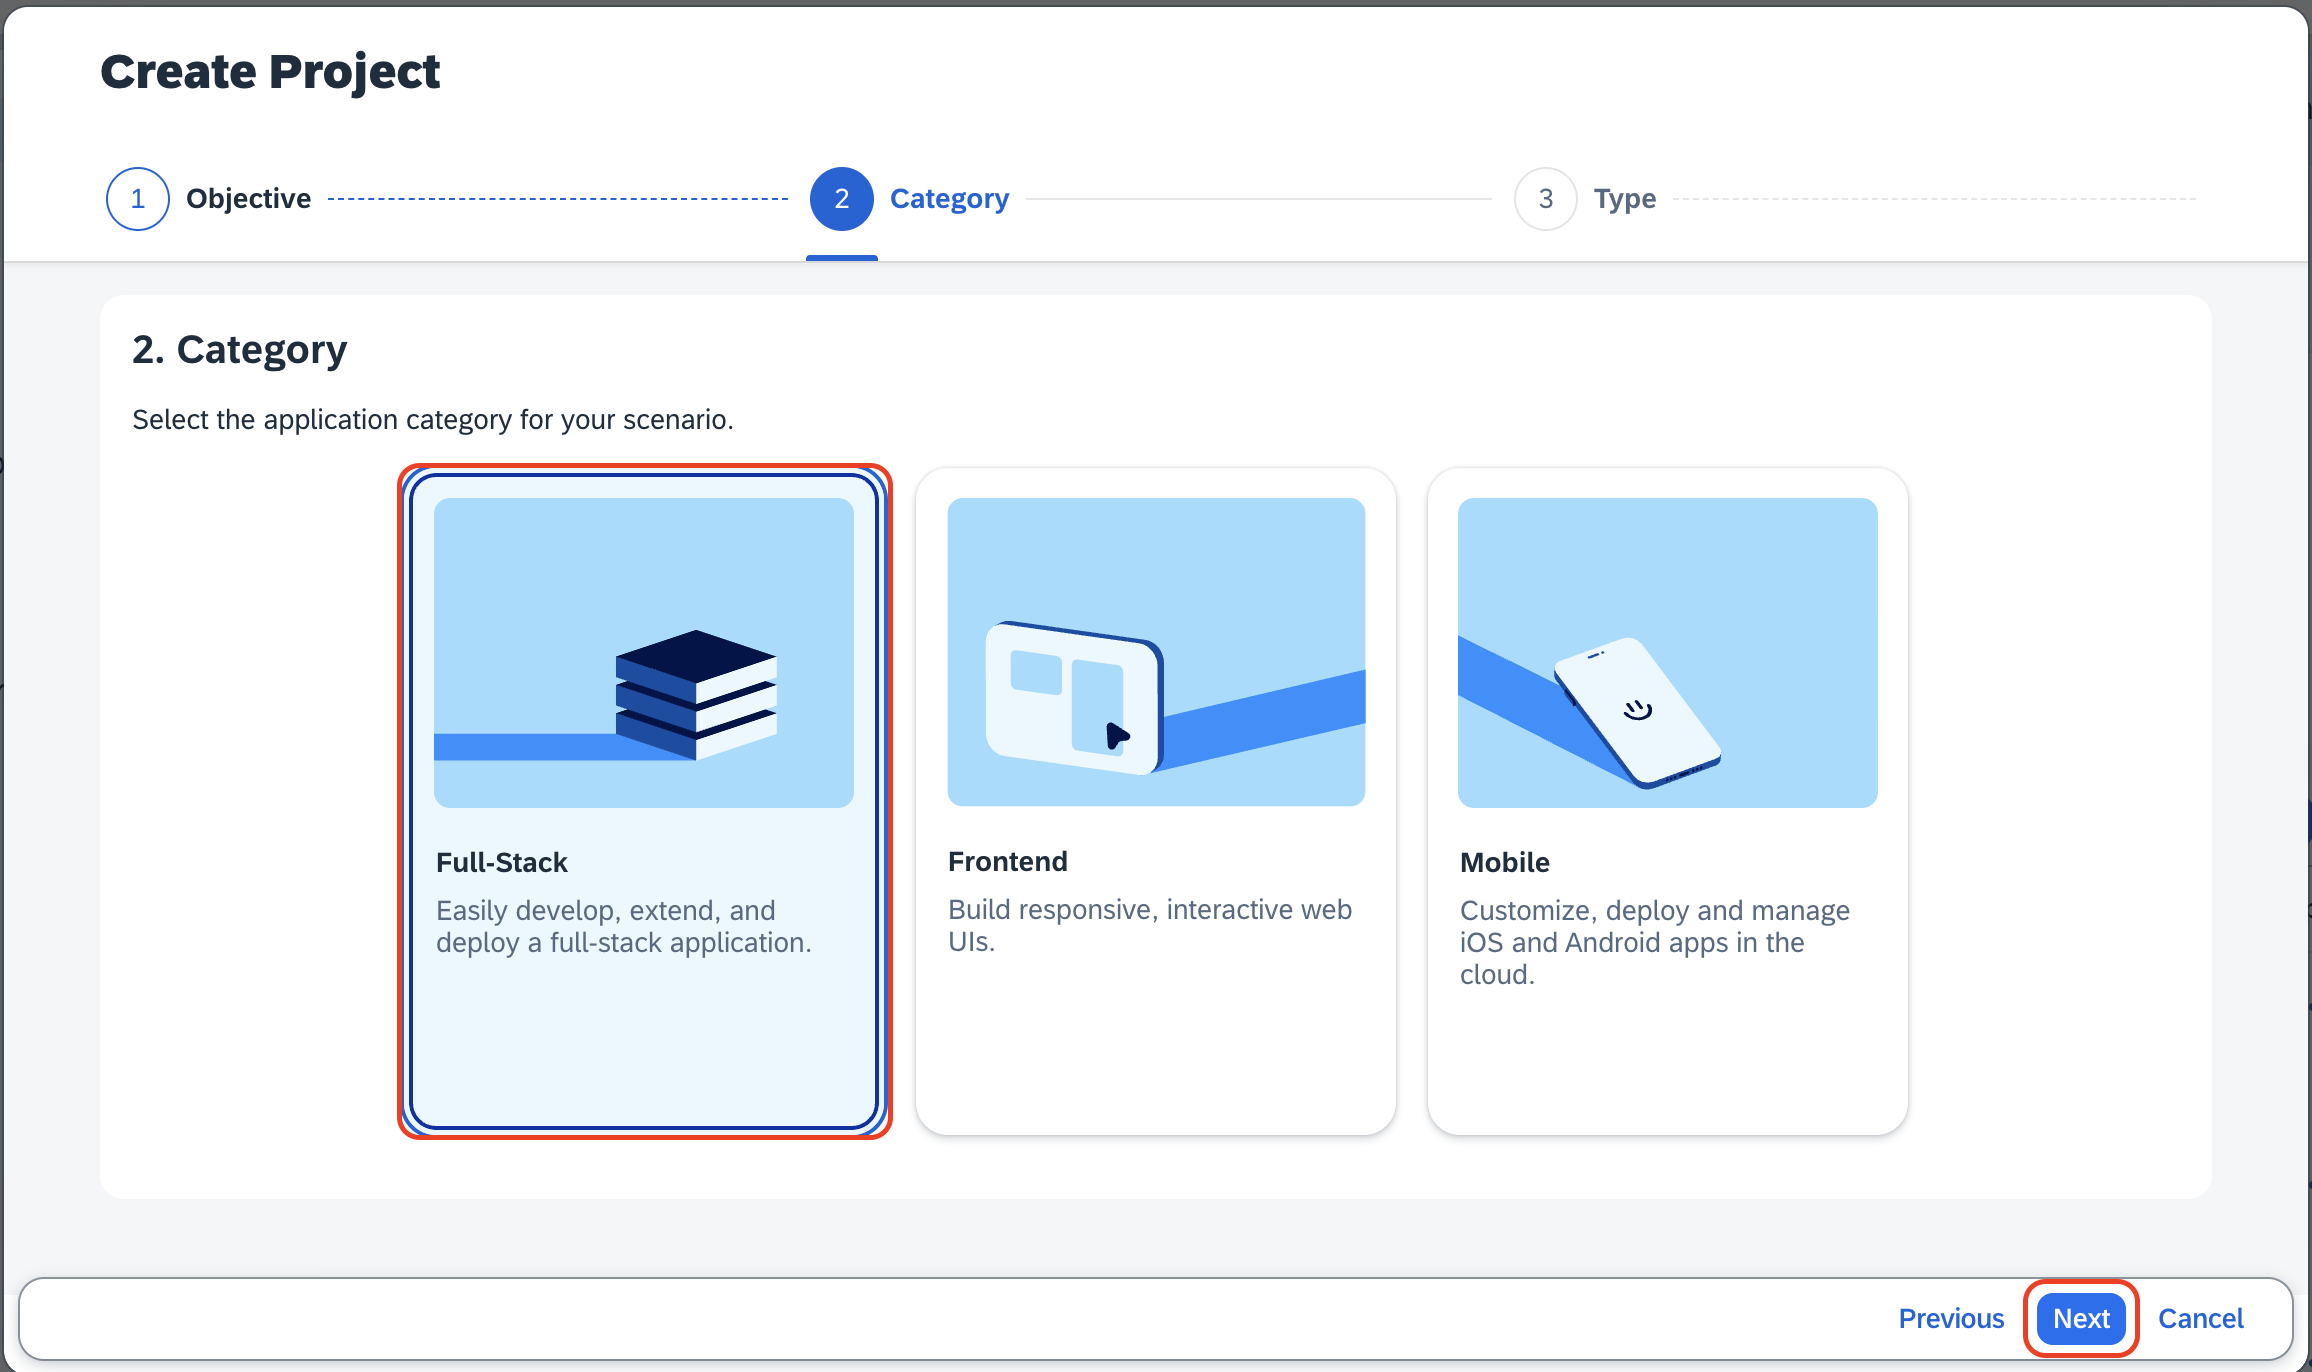
在 Type 下将开发配置选择为 Full-Stack Node.JS,然后单击 Next。
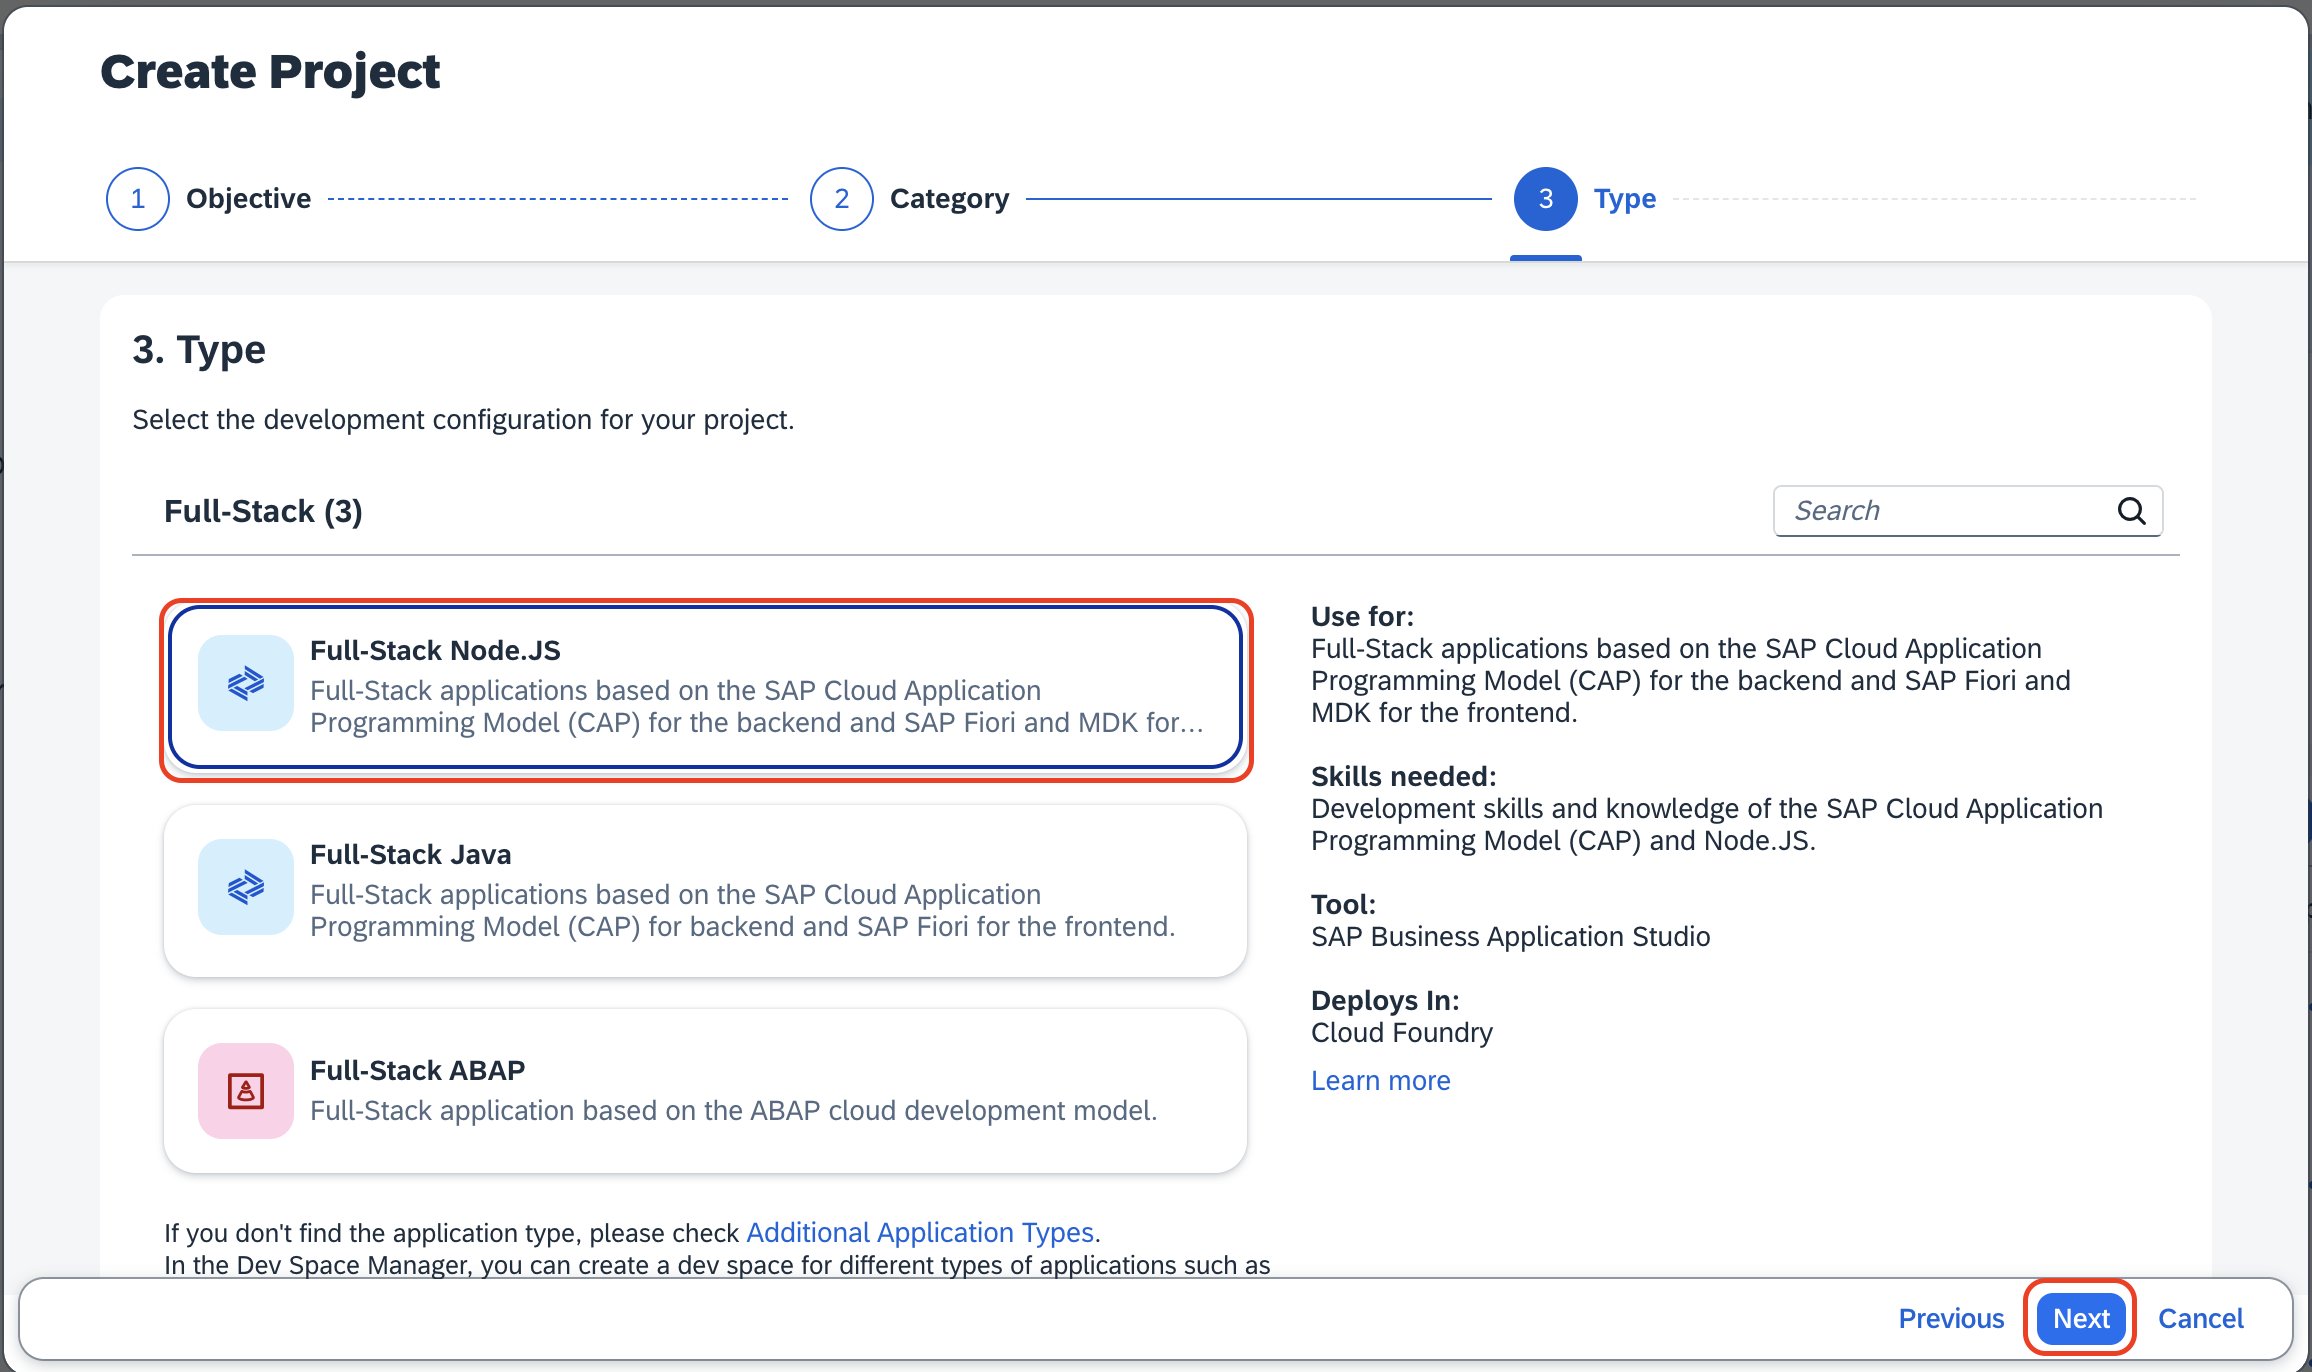
在 Name 选项卡下,执行以下操作:
将名称输入为
Incidents<your-initials><unique-random-number>。例如,如果你的名字是John Doe,项目名称可以是 Incidentsjd12(12 是某个随机数)。注意: 项目名称必须唯一,以便在部署时识别你的项目,并避免重复错误。
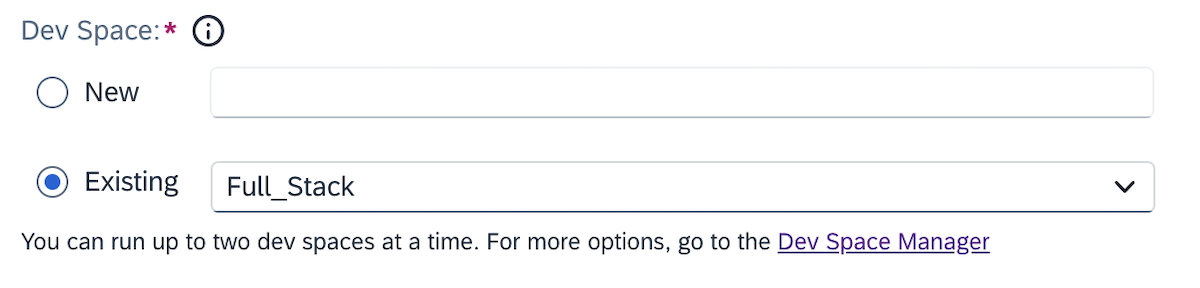
将 Full_Stack 作为默认 Dev Space。
单击 Review。
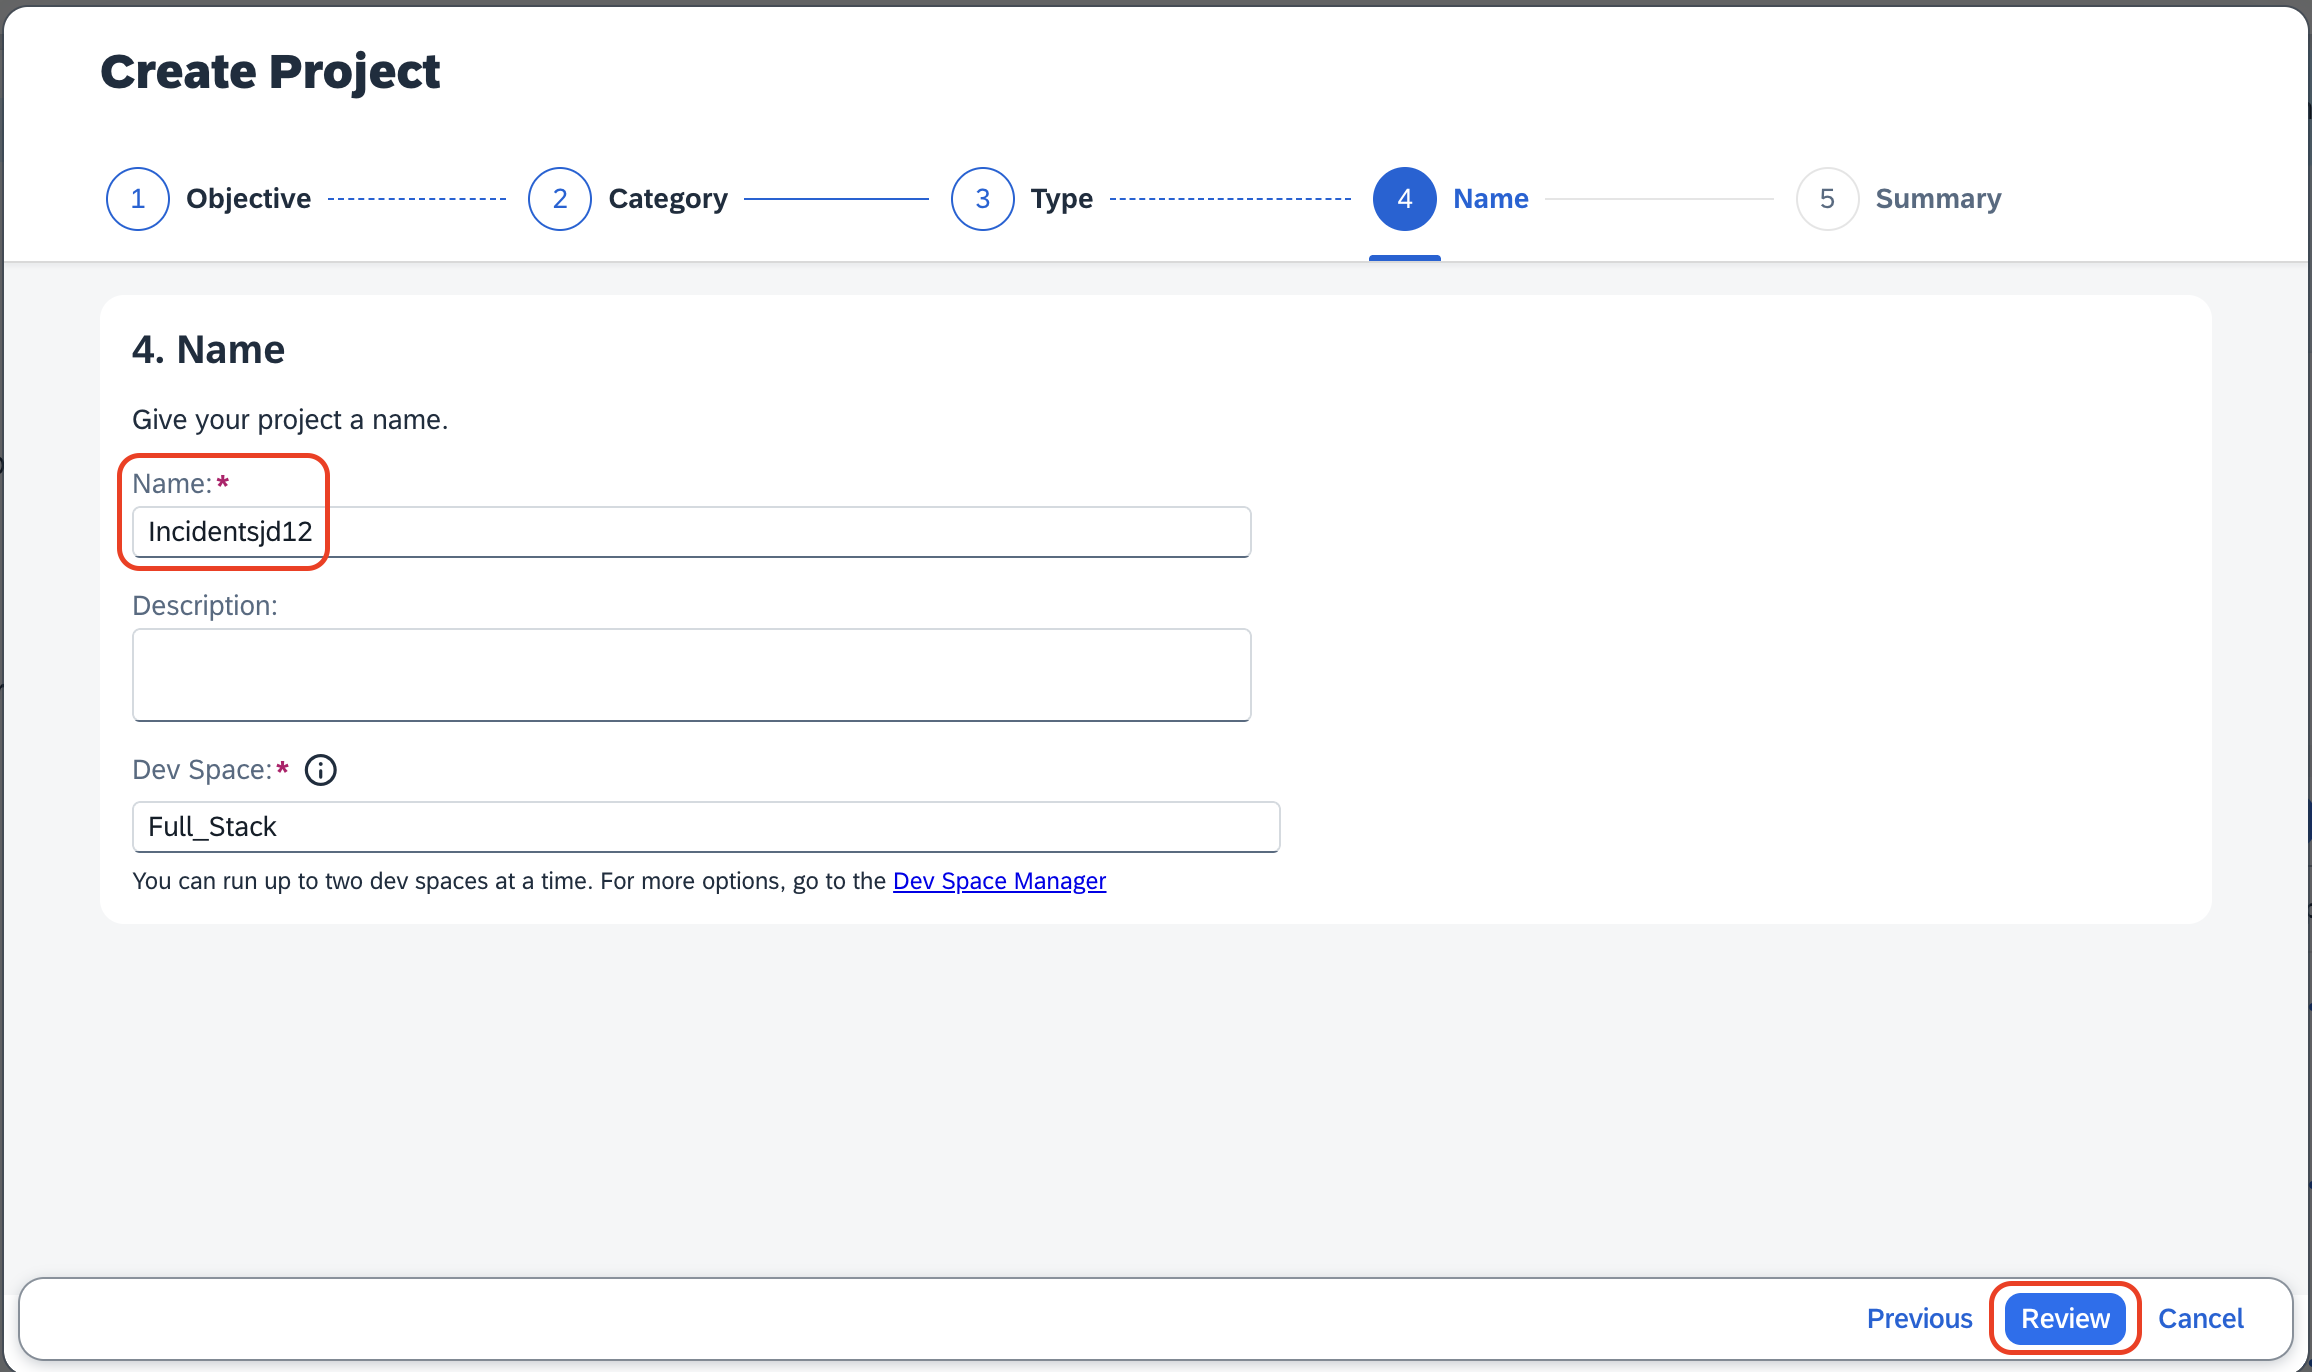
[!Note] 如果界面上的 Dev space 显示 New 选项,你可以选择现有的 Dev Space,而不必新建。
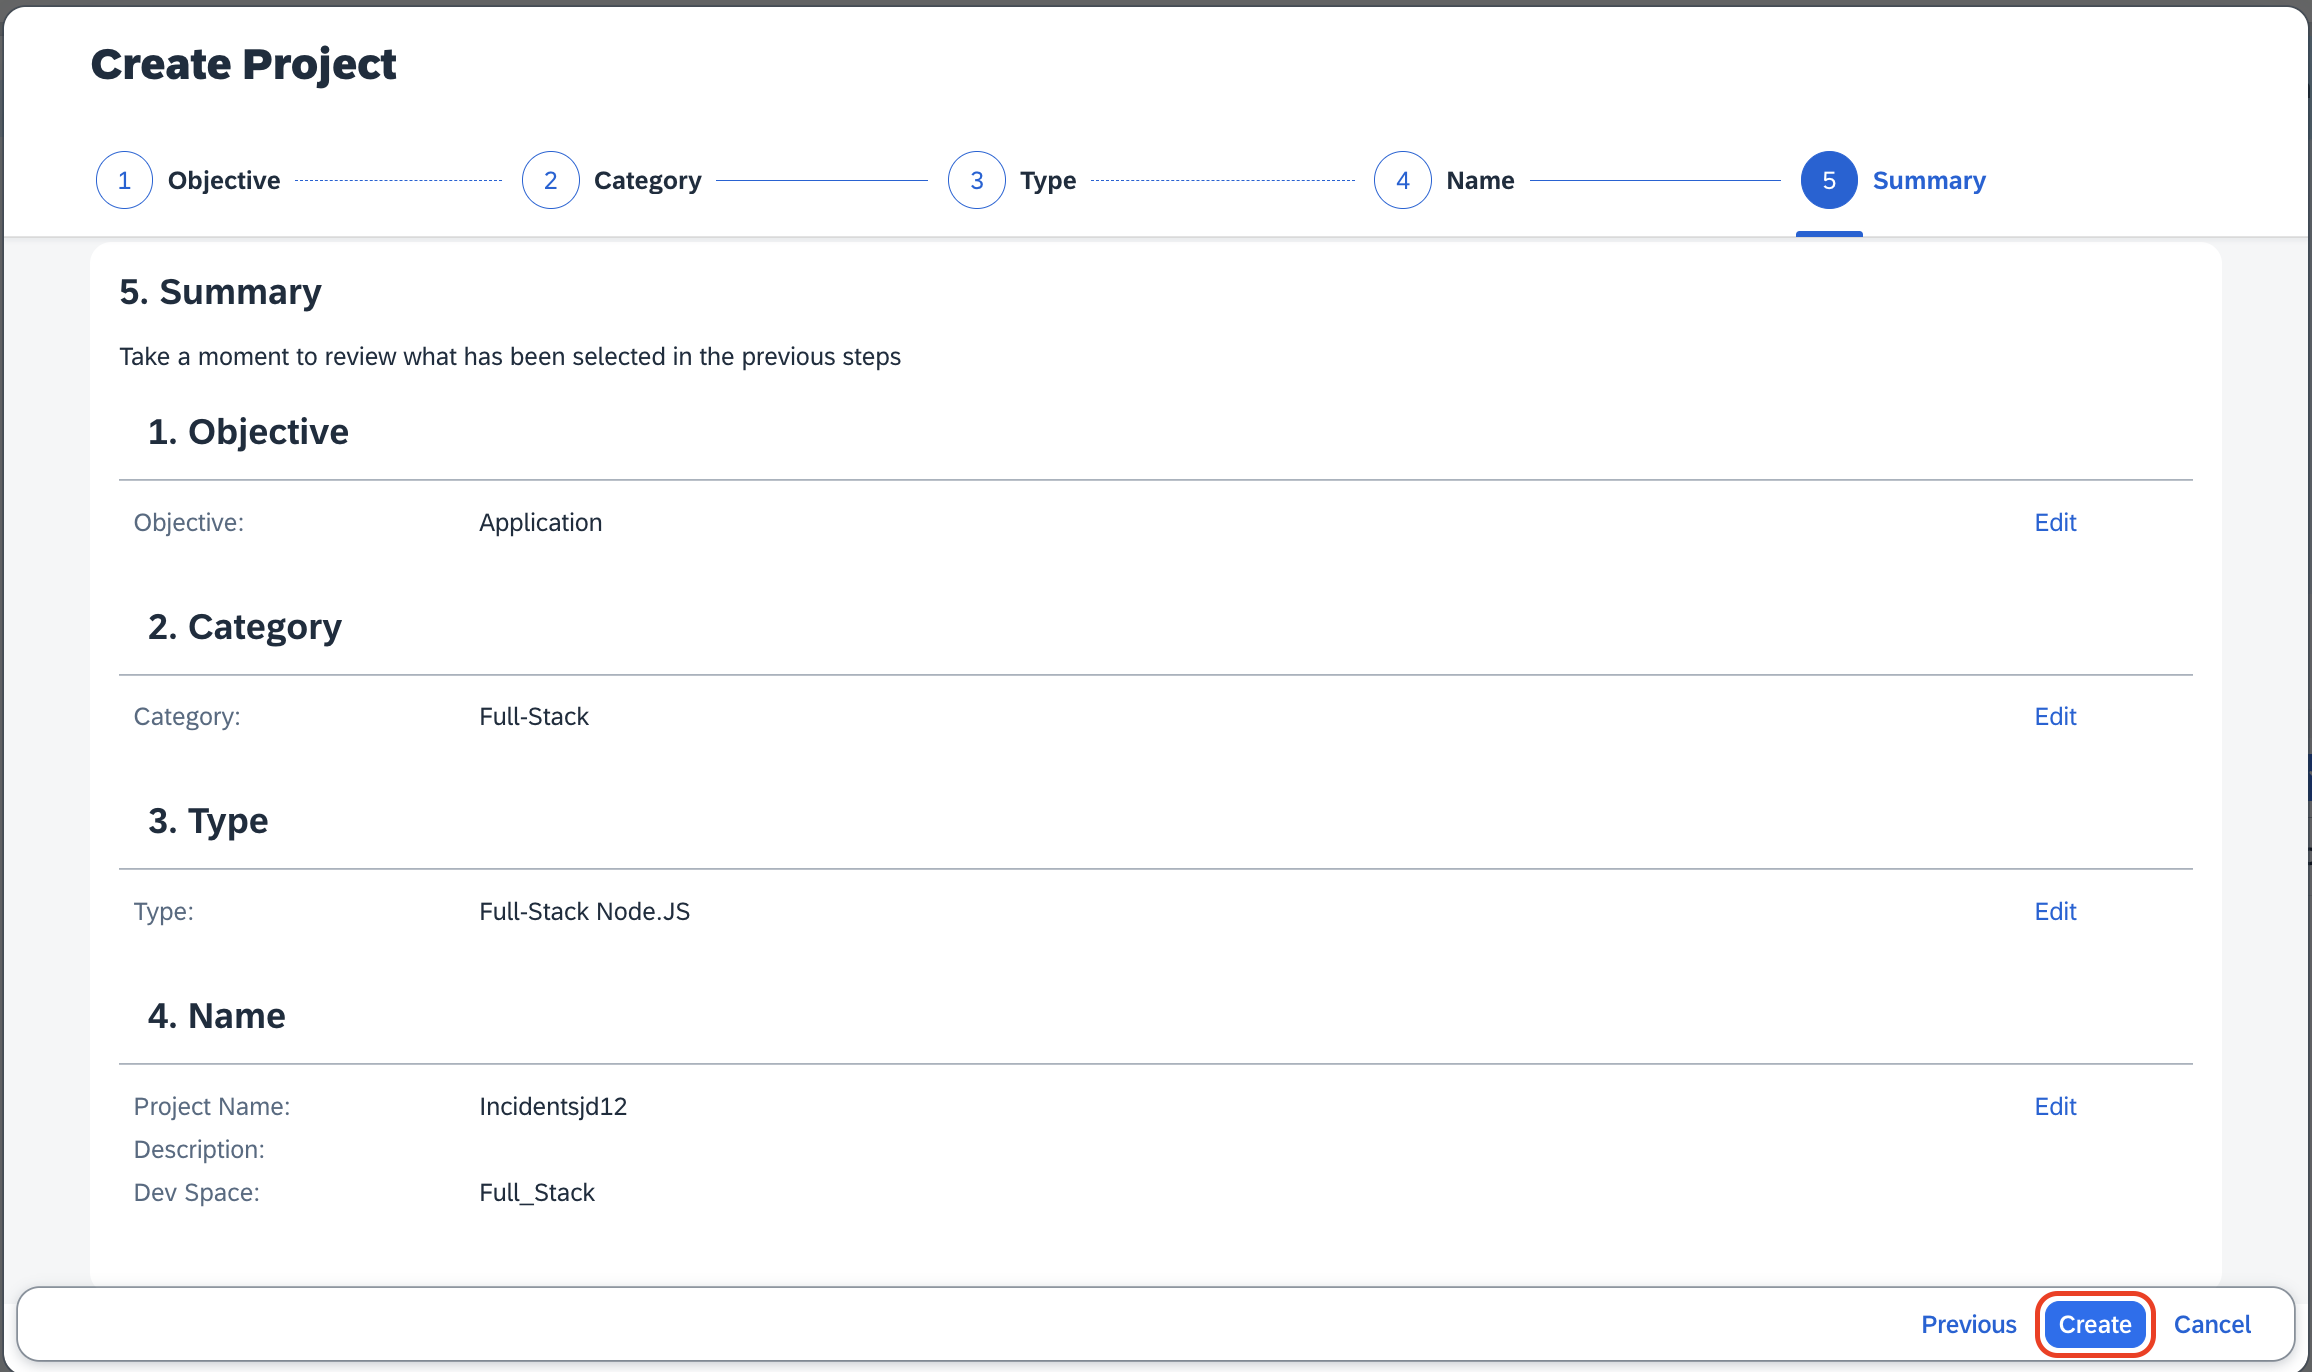
在 Summary 页面中,检查前面步骤中给出的 Objective、Category、Type 和 name,然后单击 Create。
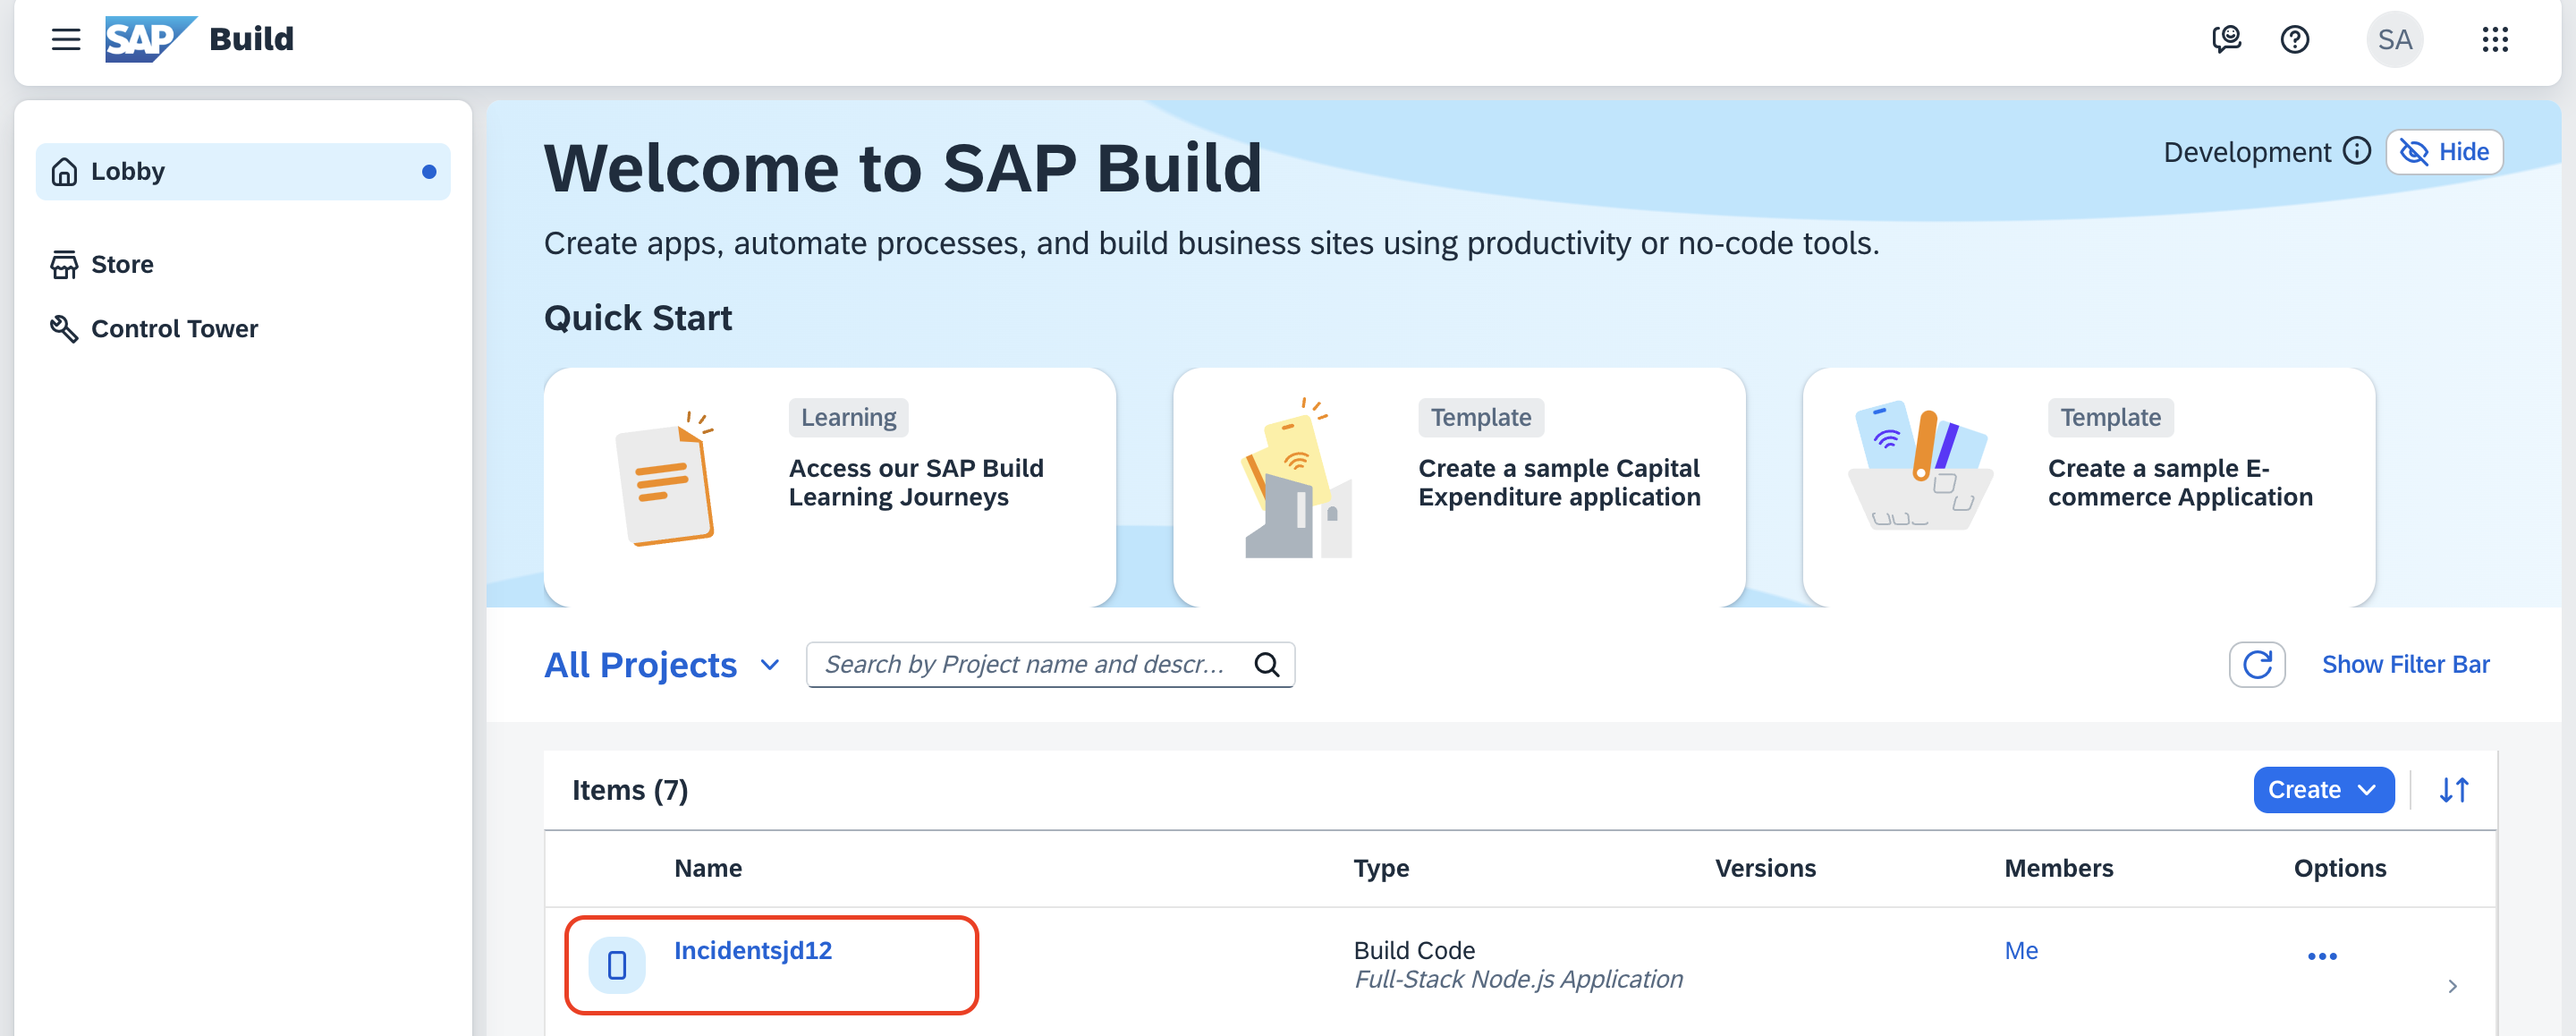
等待项目创建完成。创建完成后单击该项目,项目会在新标签页中打开。
项目打开后会加载 storyboard。确认你的 storyboard 与下图一致。
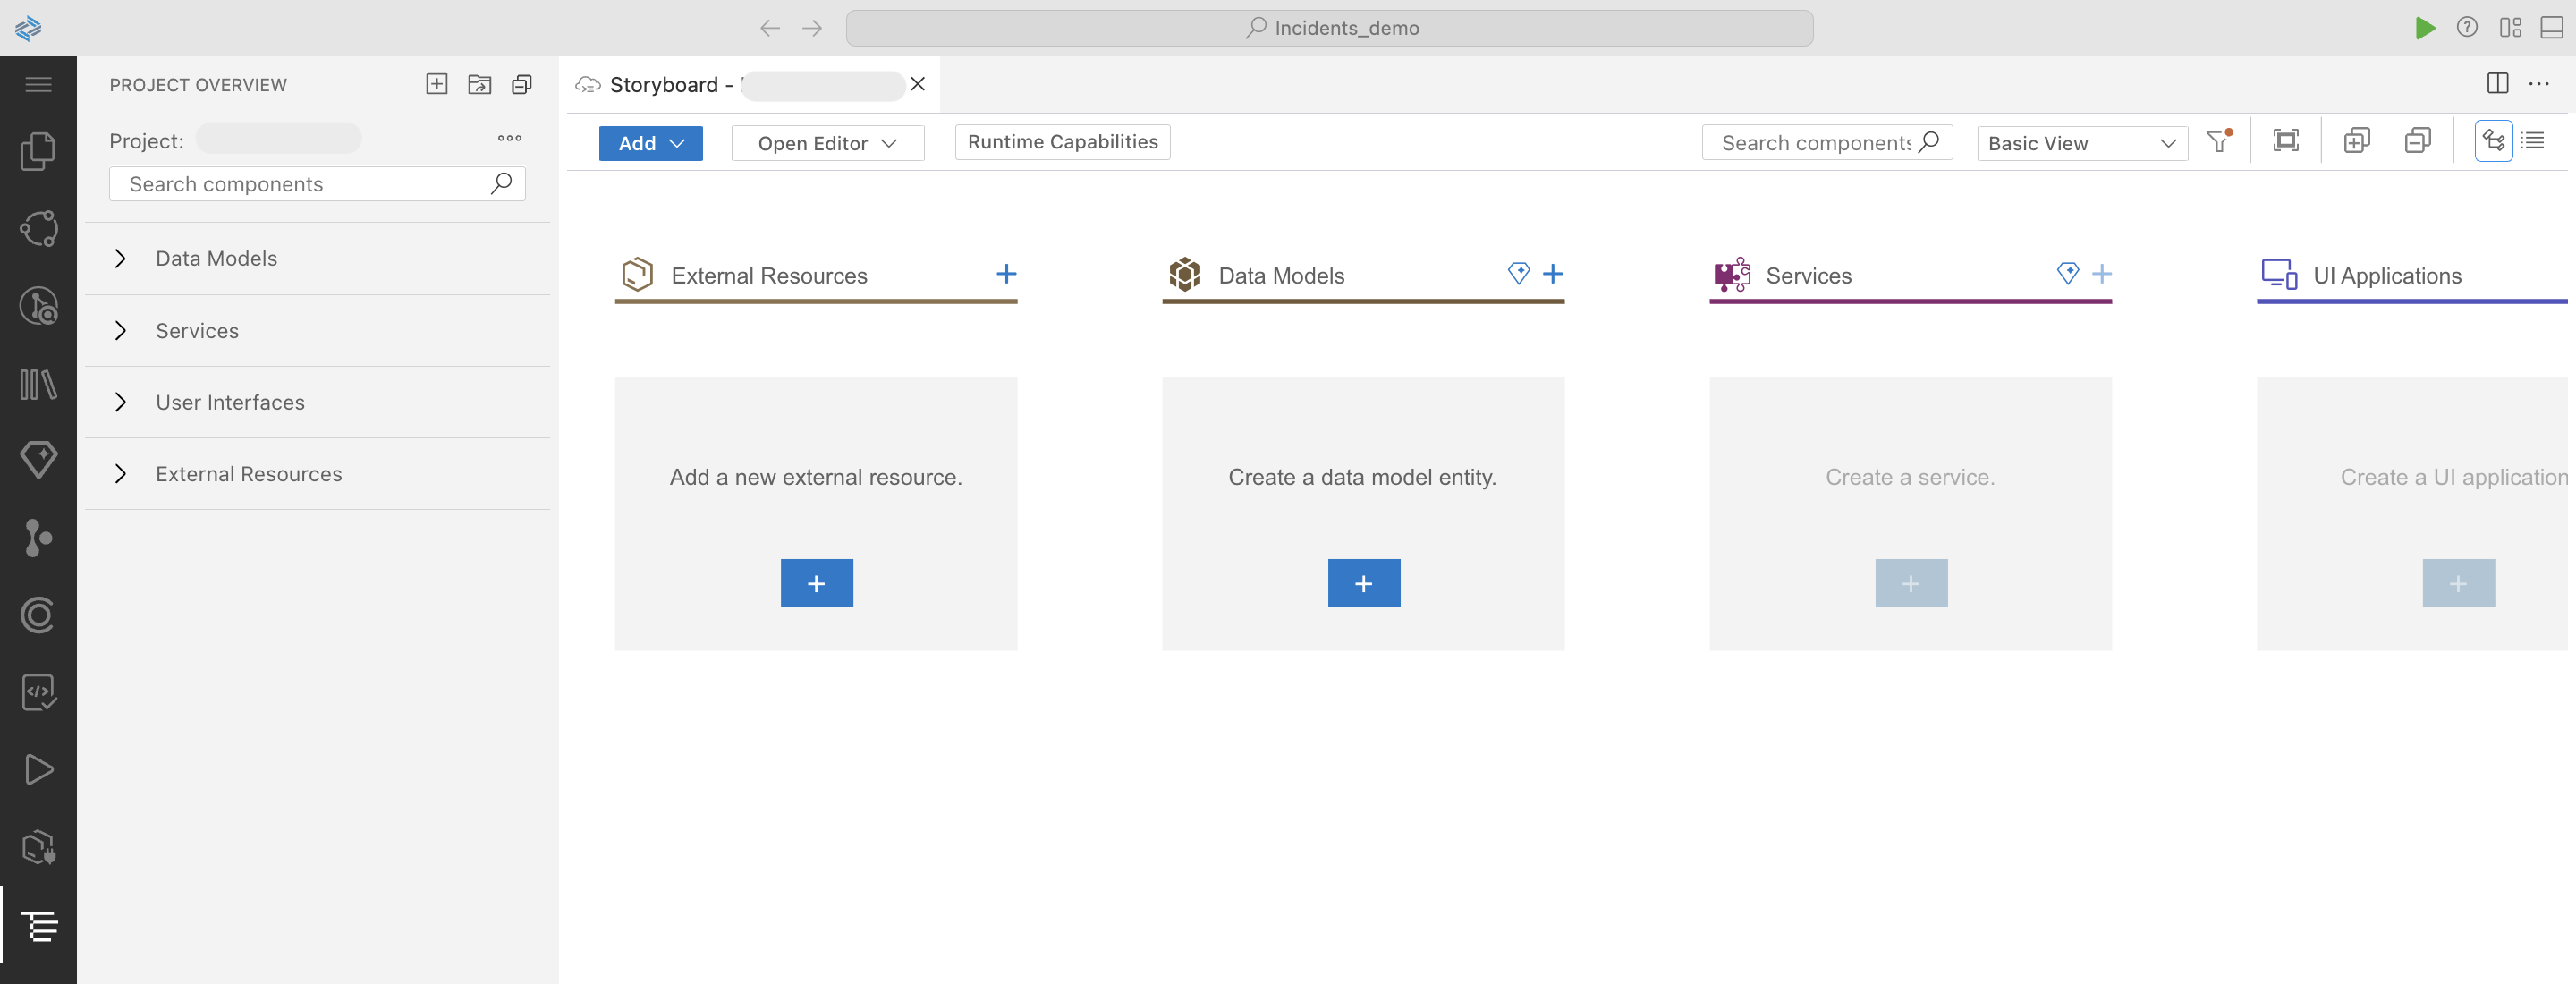
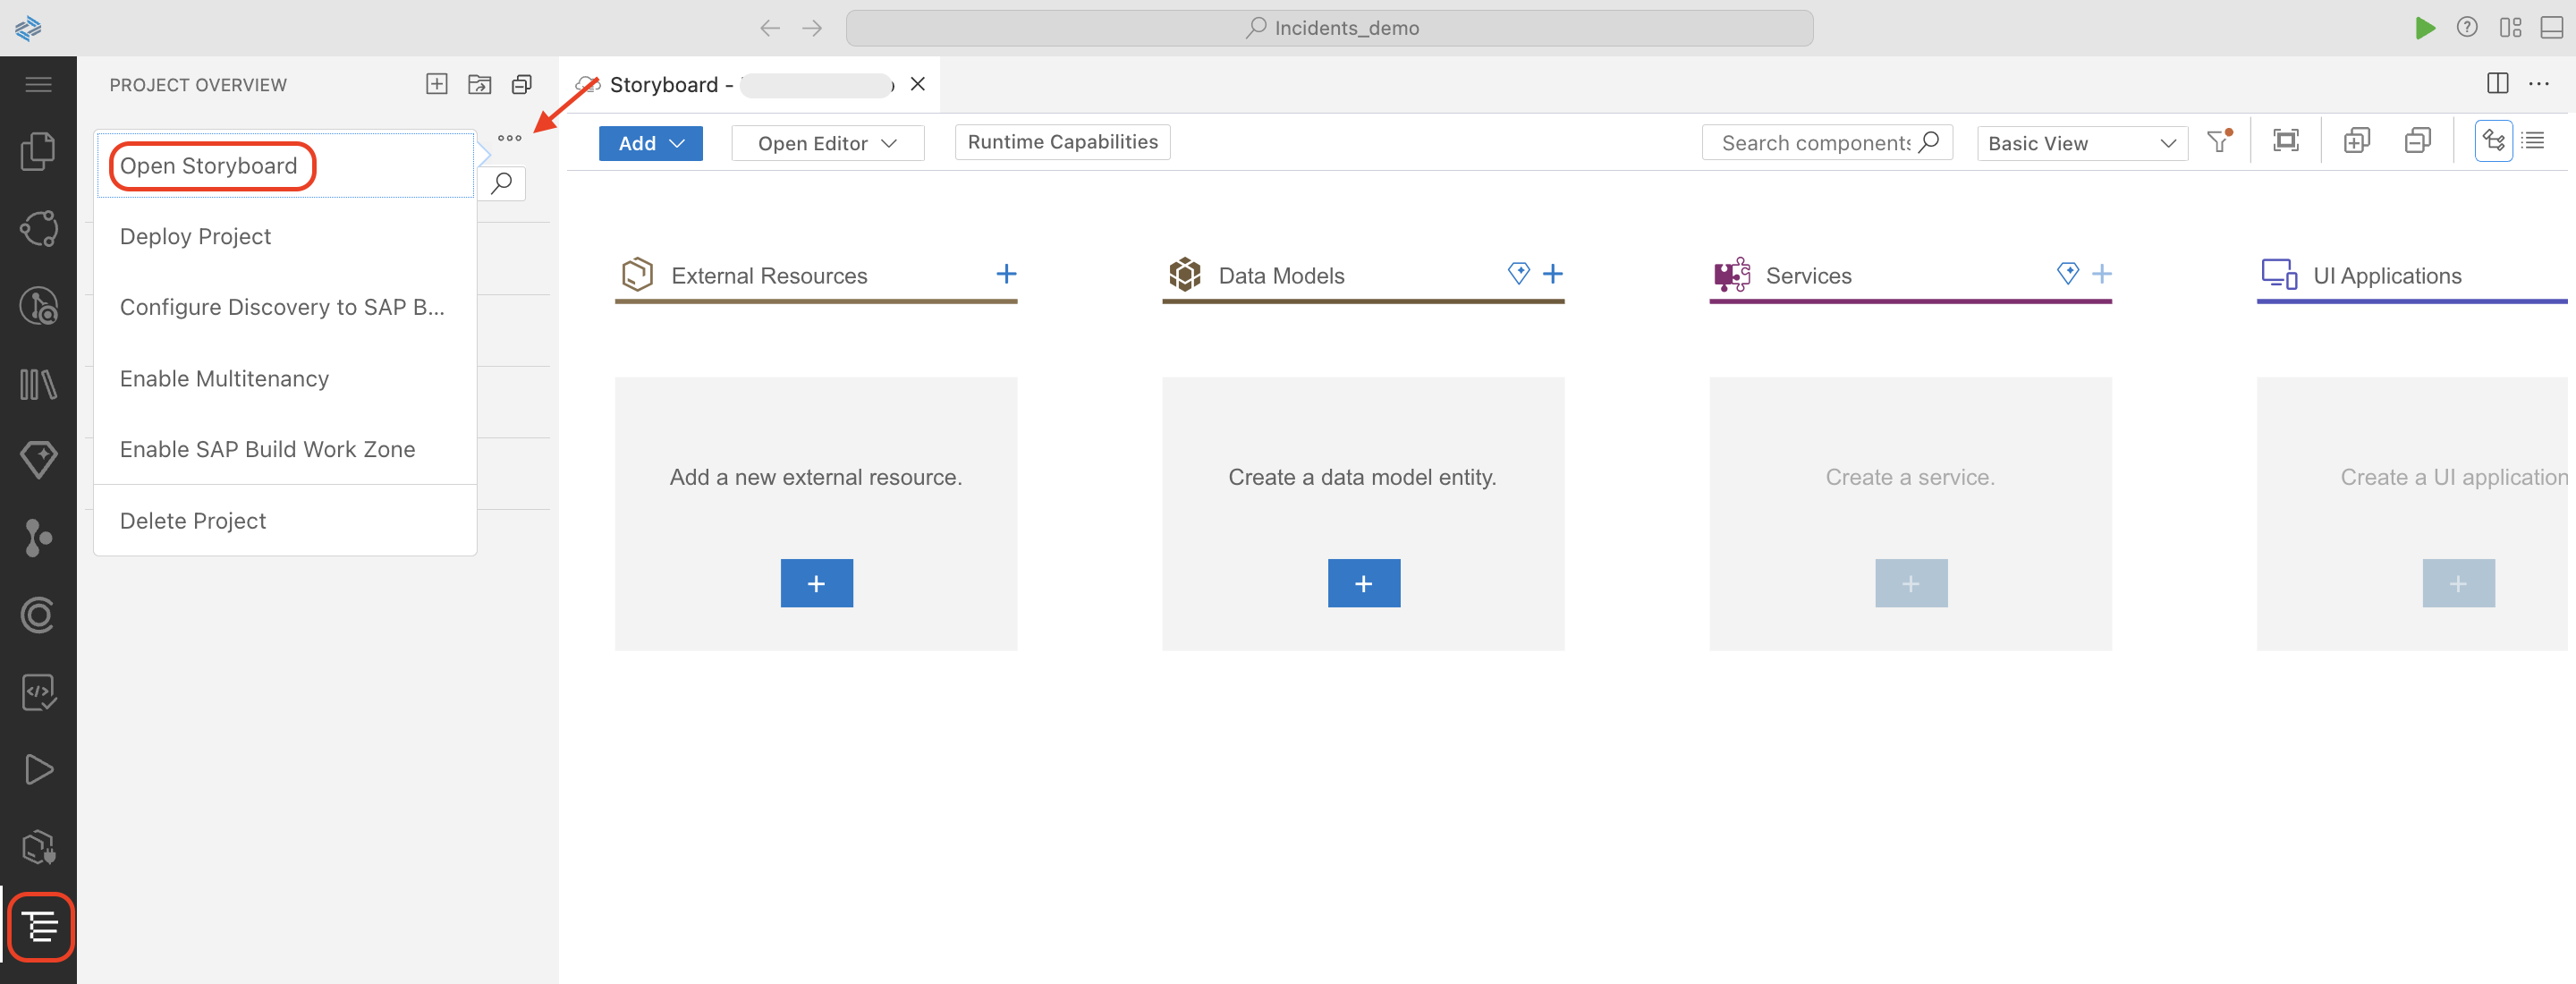
[!Note] 如果你不小心关闭了 storyboard,可以从左侧磁贴栏的 Project Overview 图标重新打开。
下一步
创建数据实体
创建 Cloud Foundry Space
打开 SAP BTP Cockpit。
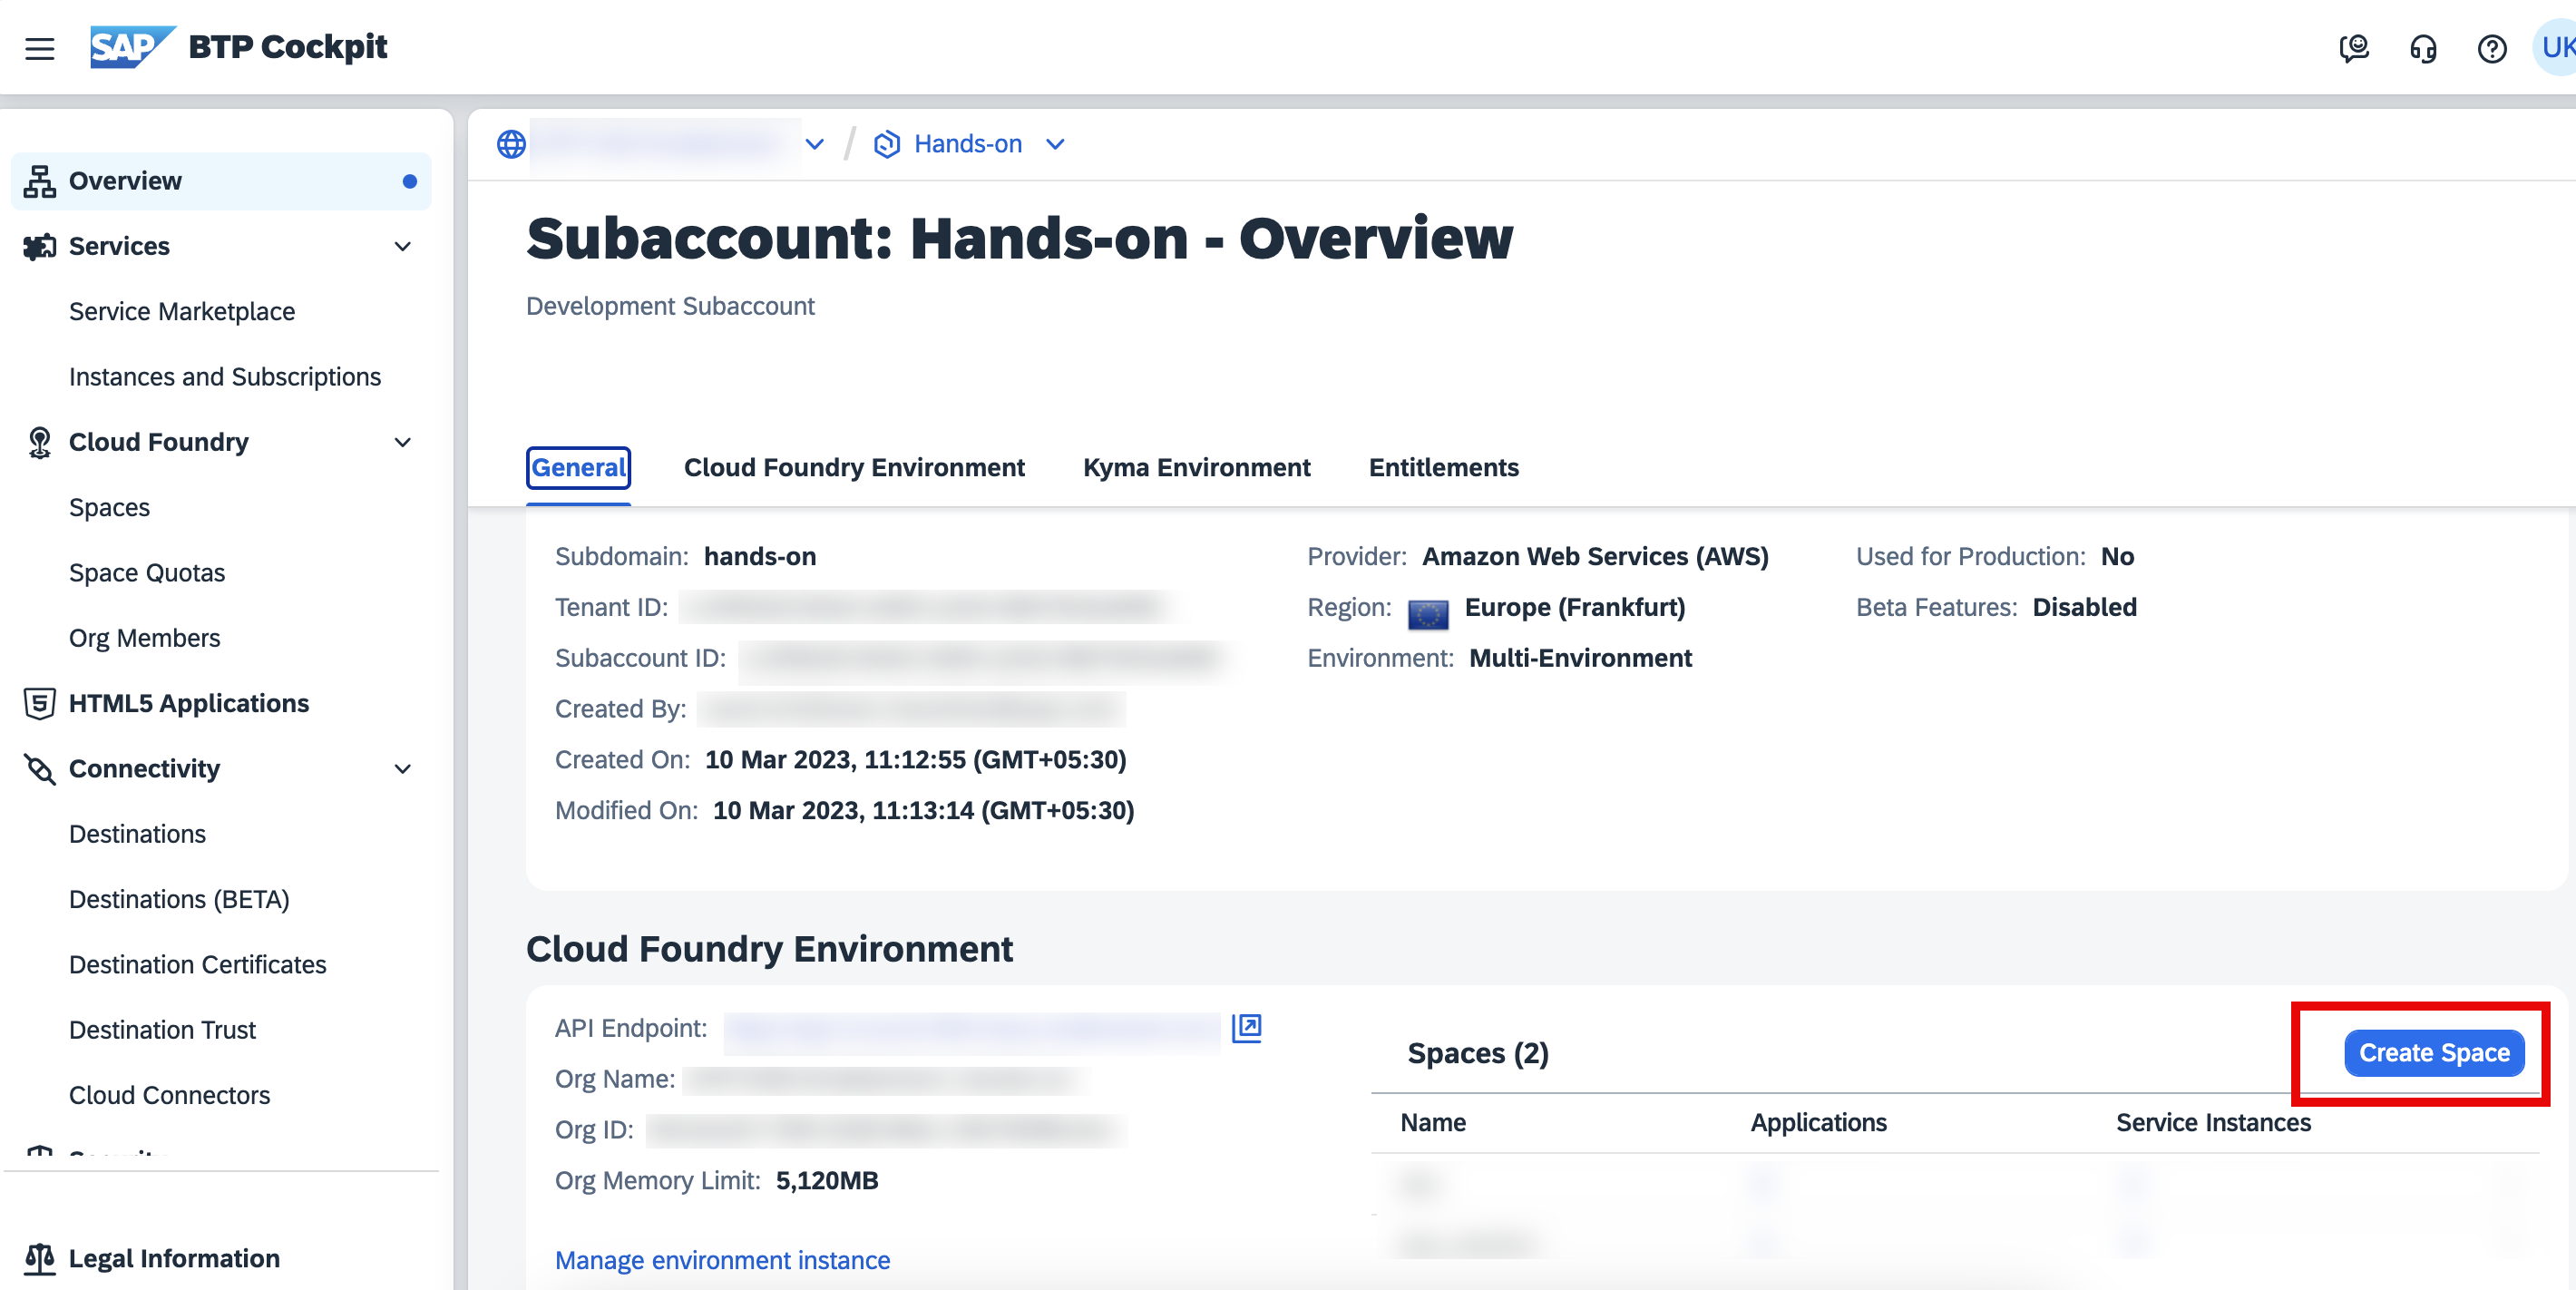
在 Overview 中可以看到 Spaces 表格。在该表格右上角选择 Create Space。
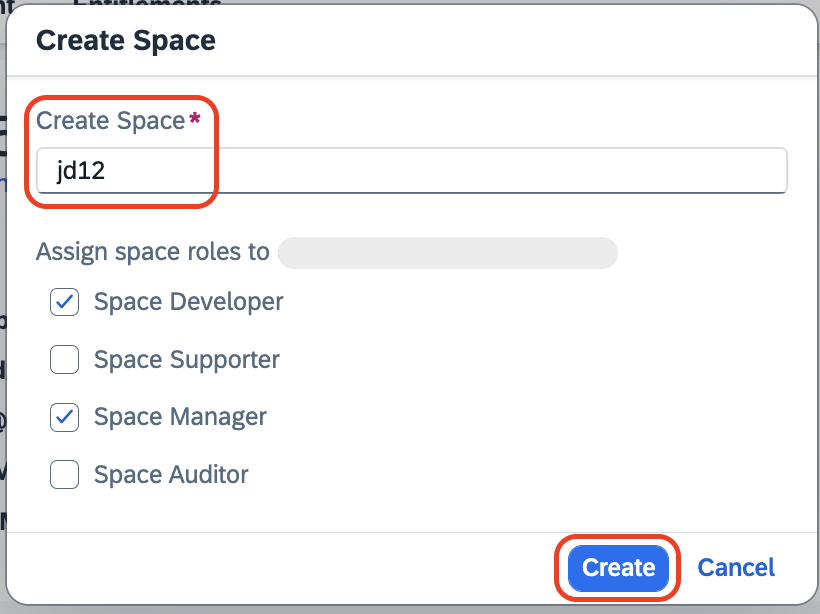
在 Create Space 弹窗中,执行以下操作:
在 Create Space 字段中输入
<your-initials><unique-random-number>。例如,如果你的名字是John Doe,space 名称可以是 jd12(12 是唯一的随机数)。注意: 名称必须唯一,以便在部署时识别你的 space,并避免重复错误。
保留默认分配的角色。
单击 Create。
会显示 Space created successfully 的弹出消息。你也可以验证 space 已创建。
下一步
创建全栈应用
使用 Joule 添加业务逻辑
本节将借助 Joule,为上一节生成的 ProcessorService 服务生成在创建和更新事件之前执行的业务逻辑。
前提条件
你已按照 Add CDS Services 中的步骤创建了 CDS 服务。
ProcessorService 的业务逻辑
转到 Storyboard。
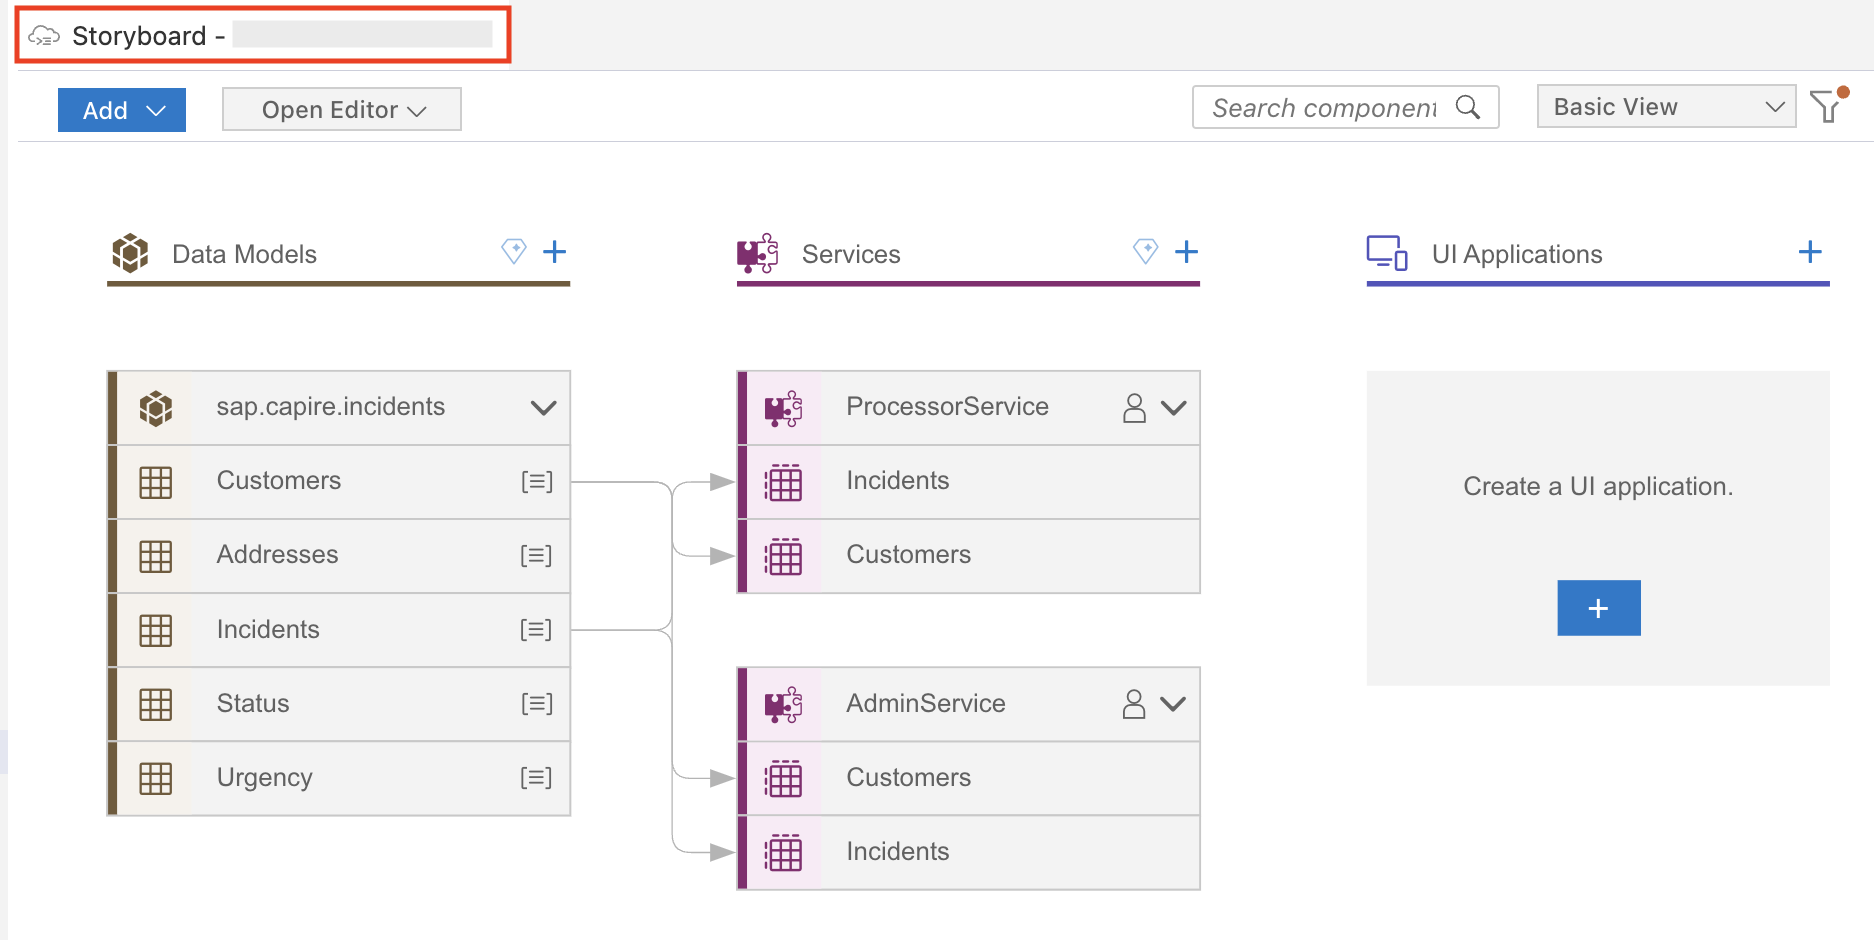
在 Services 区域中,选择 ProcessorService 下的 Incidents 实体,然后选择 Add Logic。
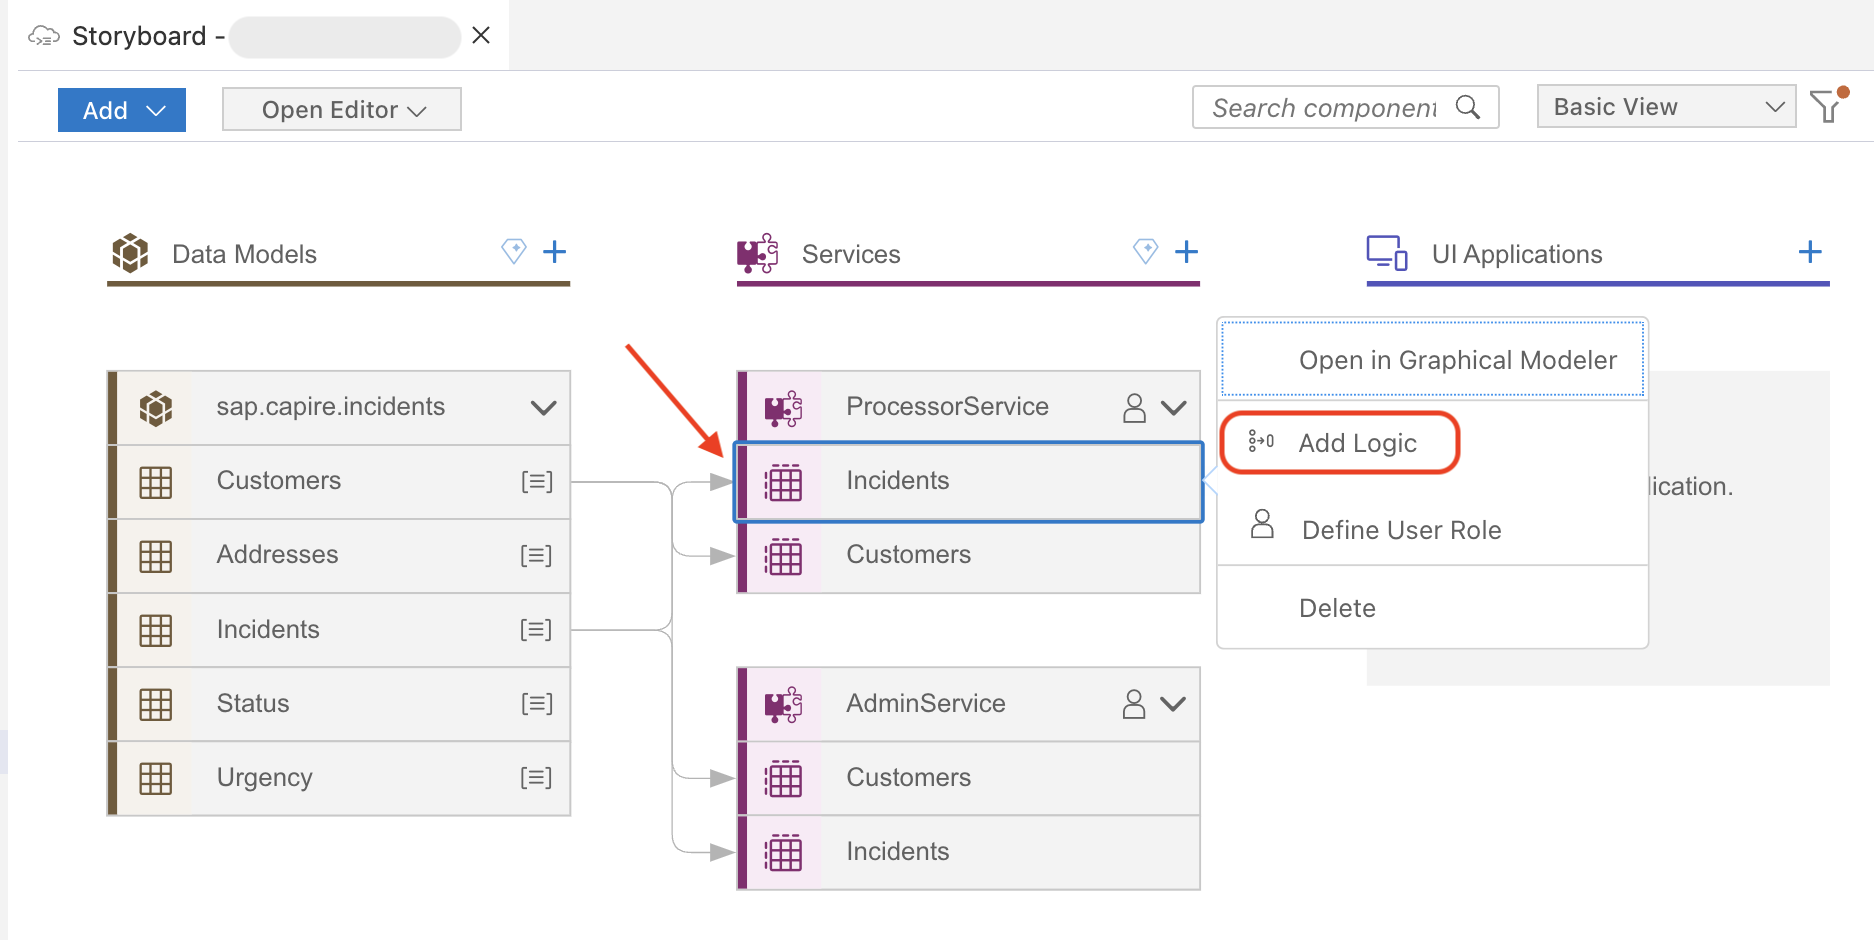
出现 Application Logic Editor。
1:根据主题更改紧急度
使用 Joule,我们将定义一个事件处理程序:如果事件标题包含 “urgent” 一词,就自动把该事件的紧急度设为 High('H')。函数 changeUrgencyDueToSubject 会在对 ProcessorService.Incidents 实体执行 CREATE 或 UPDATE 操作之前触发。
在 Application Logic Editor 中,将 Name 字段的值改为 changeUrgencyDueToSubject,然后选择 Add。
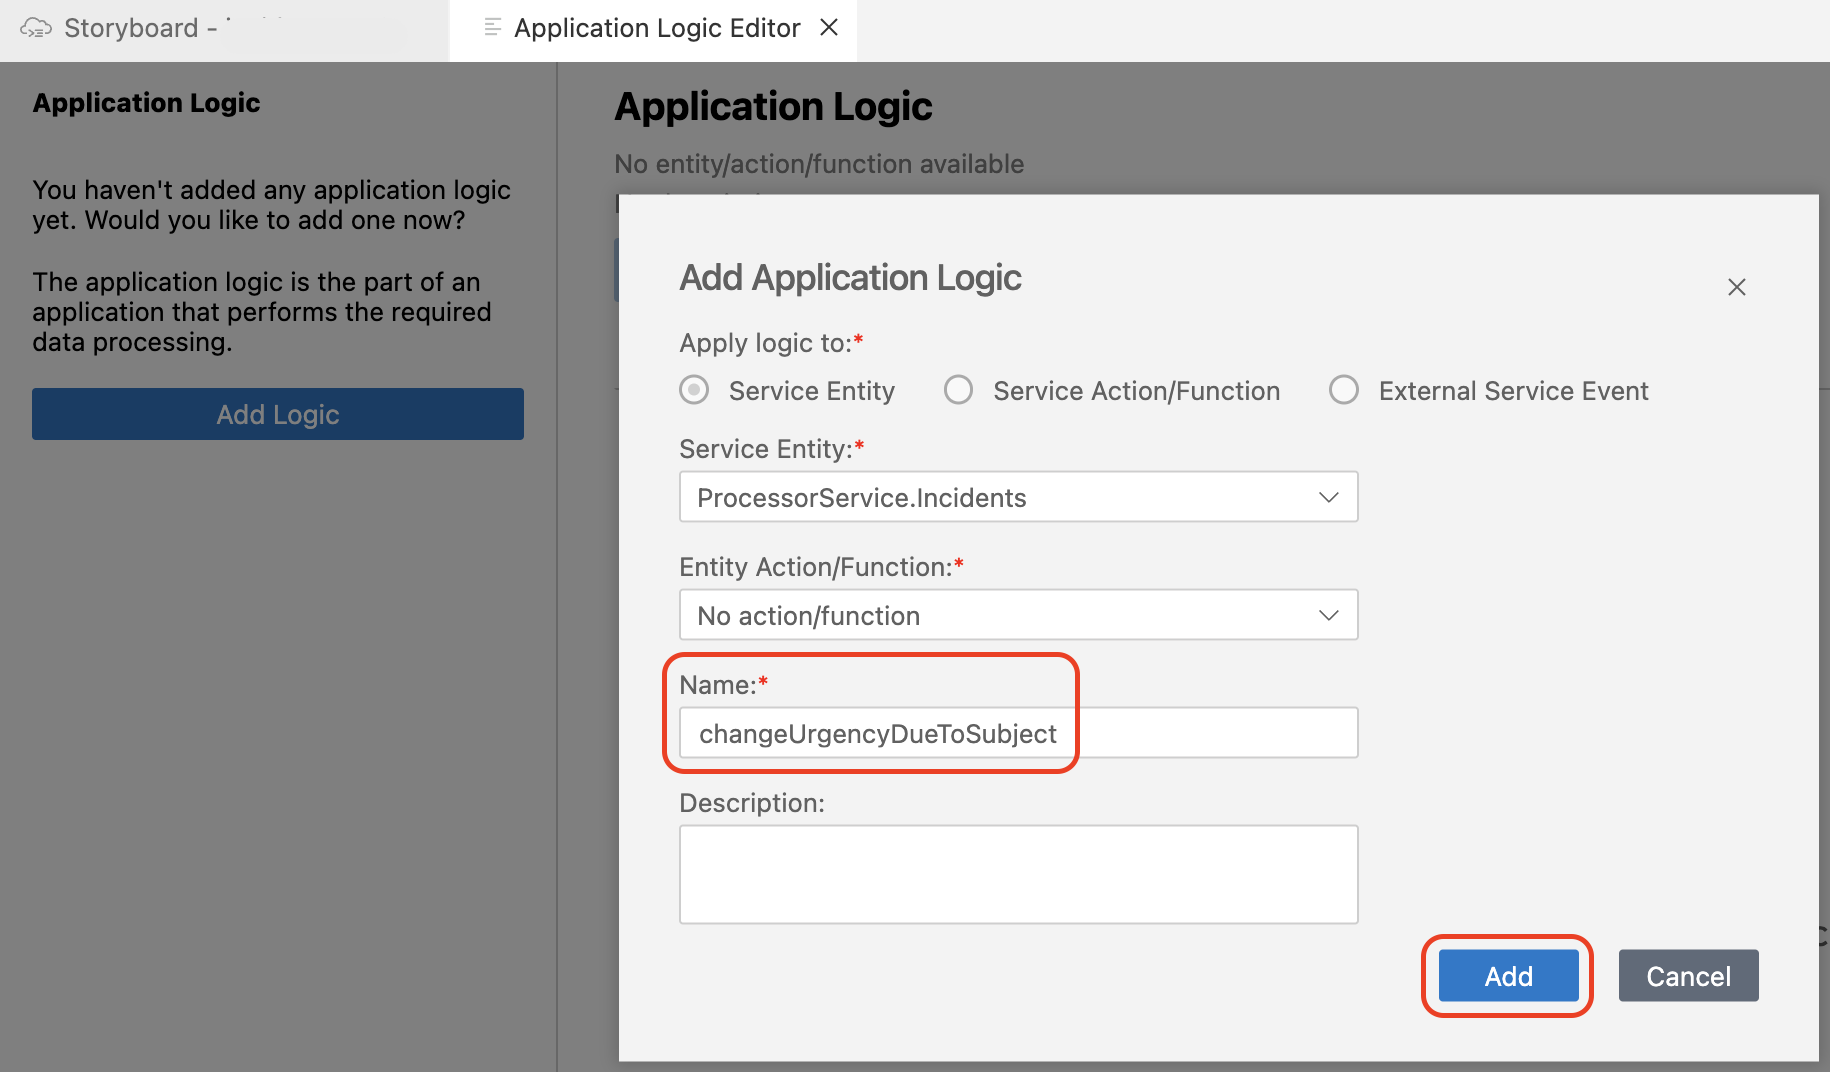
在 Phase 区域中选择 Before,在 Standard Event 中选择 Create 和 Update。
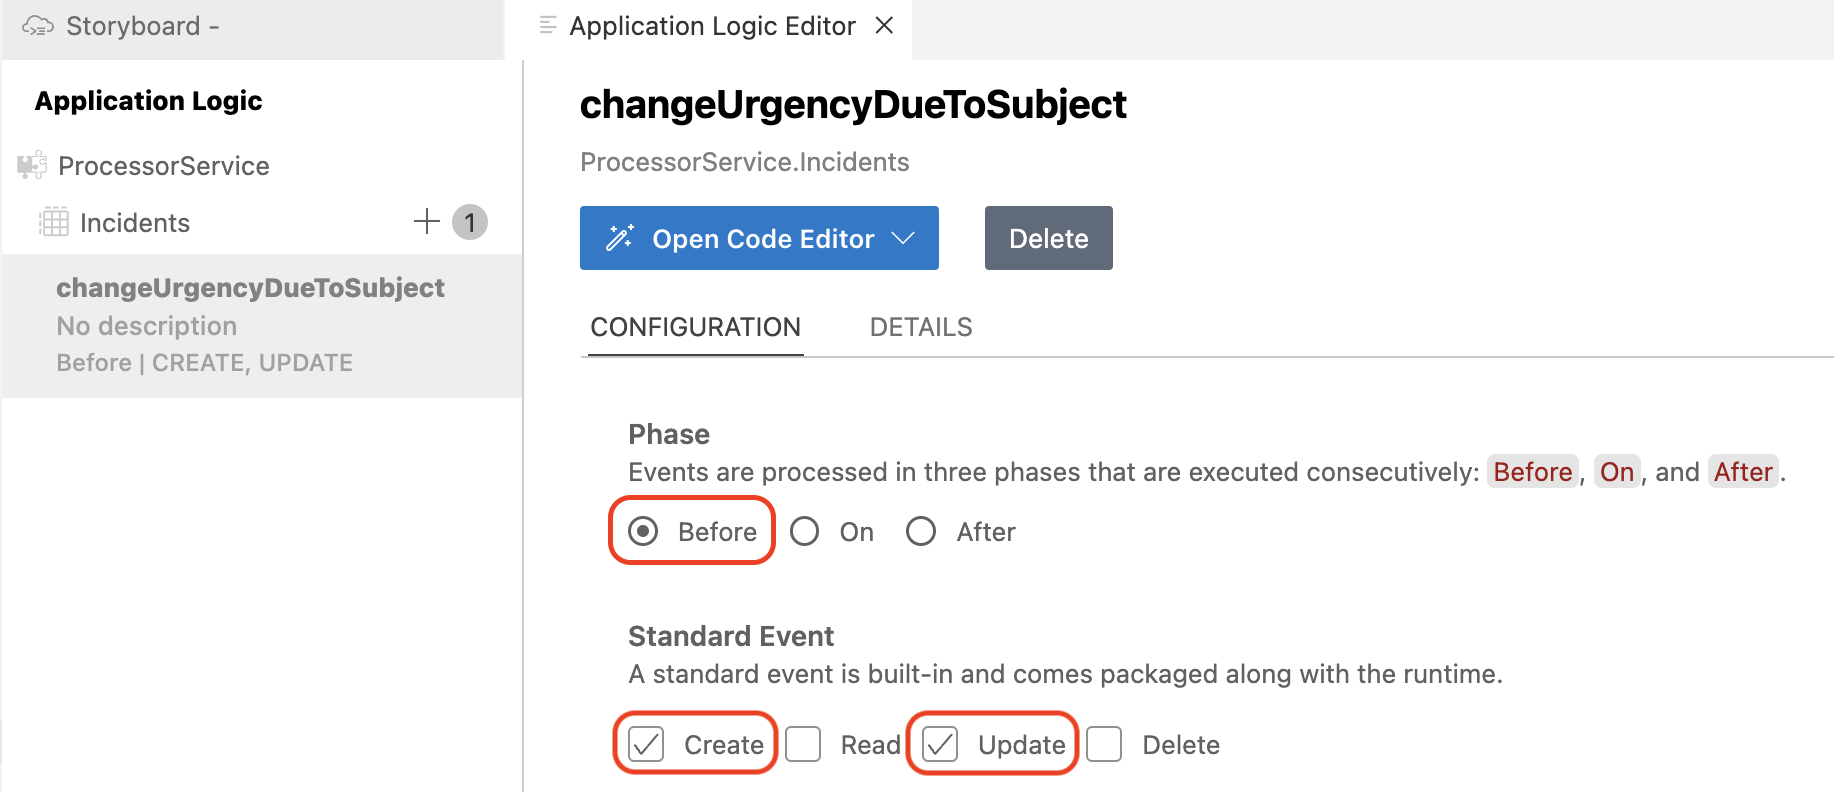
该逻辑会在创建或更新特定事件之前自动执行。
选择 Open Code Editor > Application Logic。
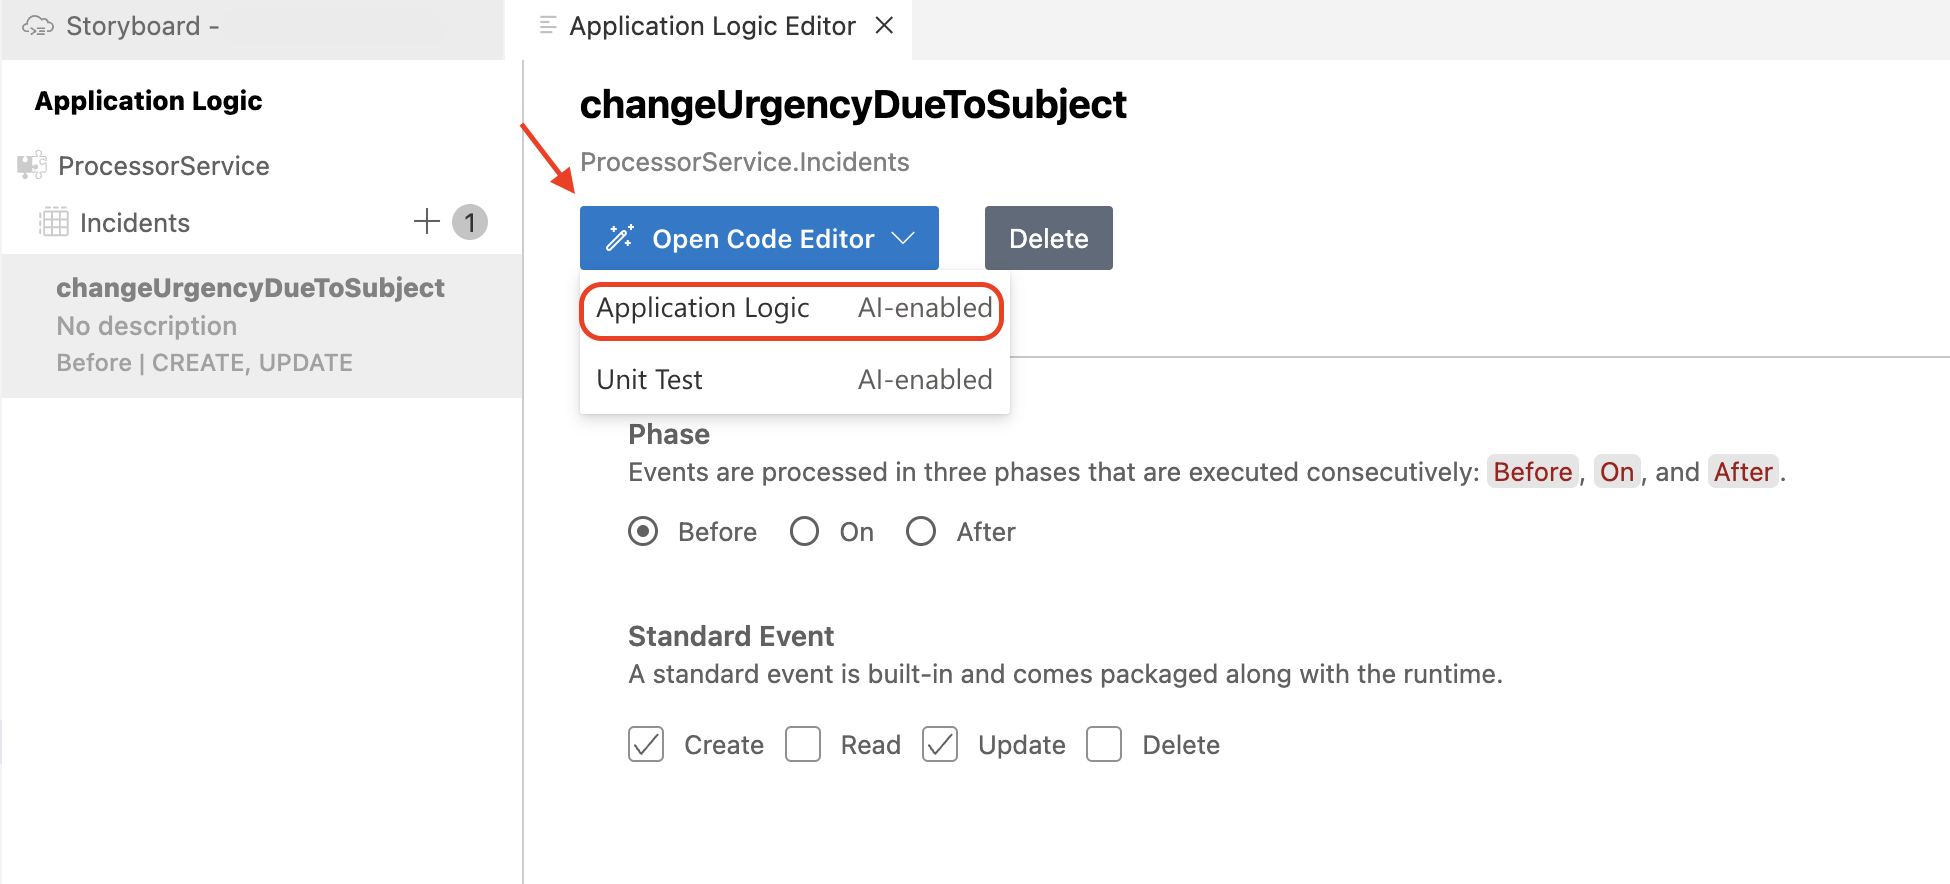
这会打开 Joule,为 changeUrgencyDueToSubject 创建逻辑。
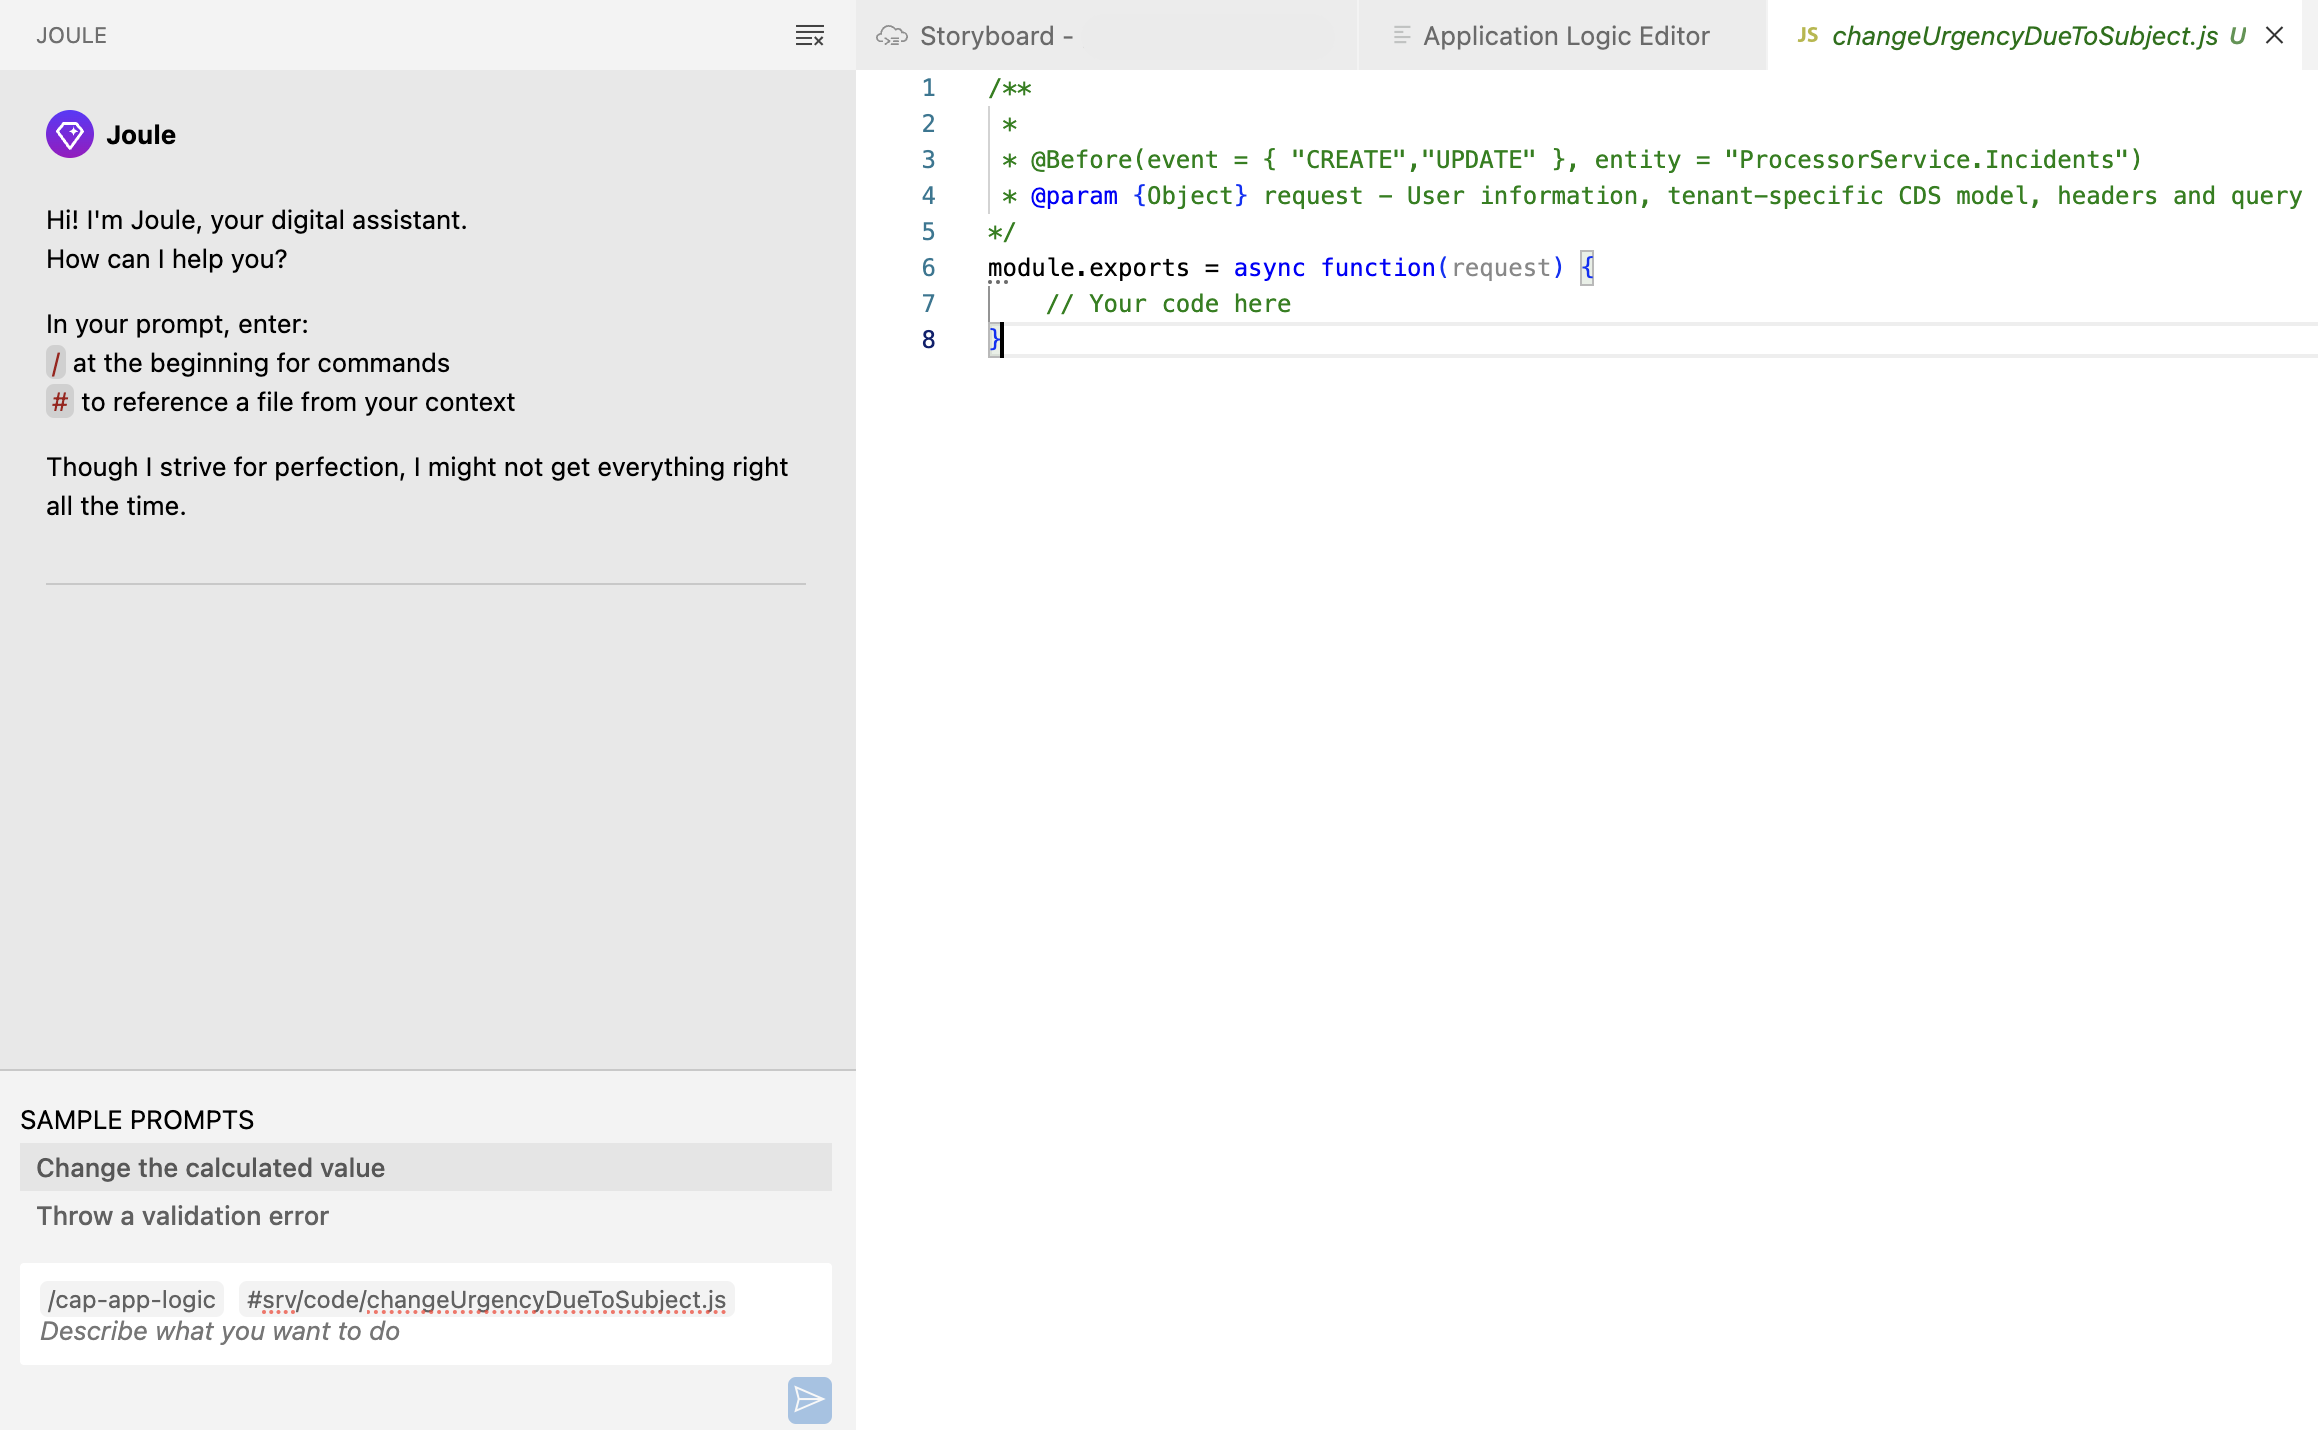
在 Joule 提示词中,/cap-app-logic 用于为已创建的服务生成自定义后端逻辑。Joule 生成代码后,#srv/code/changeUrgencyDueToSubject.js 指明生成的代码要填入哪个文件。
Joule 提示词会预填为
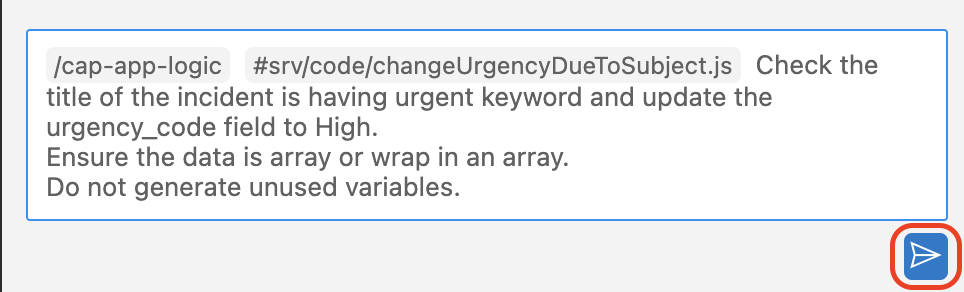
/cap-app-logic #srv/code/changeUrgencyDueToSubject.js。在预填的命令之后,使用以下提示词创建业务逻辑。Check the title of the incident is having urgent keyword and update the urgency_code field to High. Ensure the data is array or wrap in an array. Do not generate unused variables.
选择 Send 图标。
Joule 返回代码后,检查实现并接受。
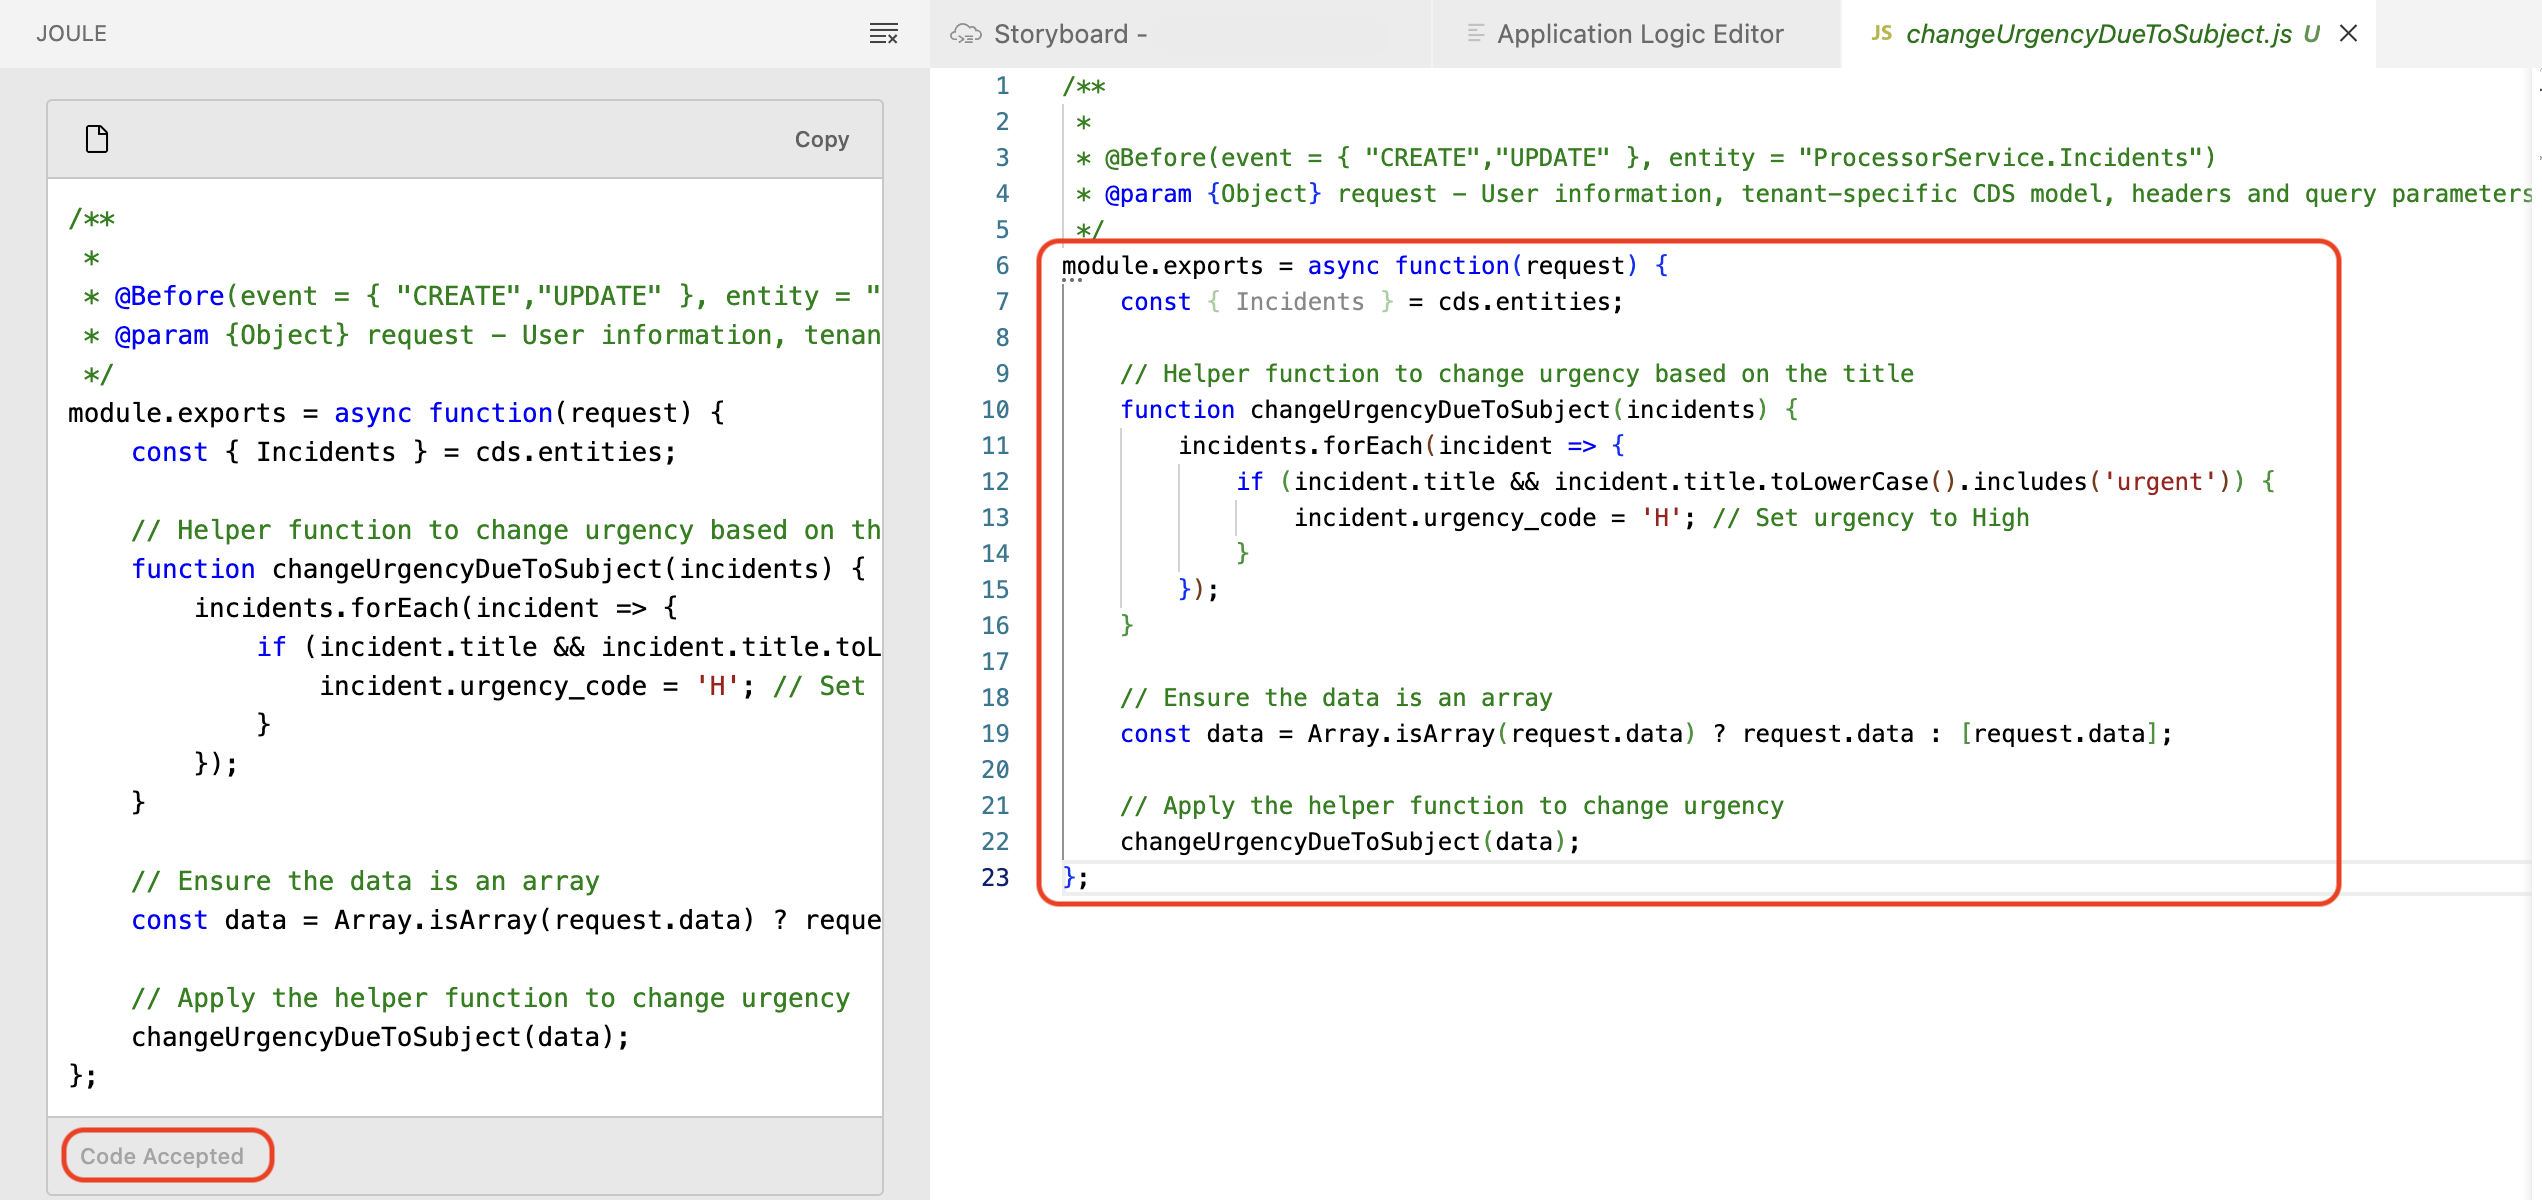
[!Note] Joule 为此后端逻辑生成的代码可能不同。请确保最终的
#srv/code/changeUrgencyDueToSubject.js文件如下所示:
module.exports = async function(request) {
    const { Incidents } = cds.entities;

    // 确保数据是数组,或将其包装为数组
    const data = Array.isArray(request.data) ? request.data : [request.data];

    for (const incident of data) {
        if (incident.title && incident.title.toLowerCase().includes('urgent')) {
        incident.urgency_code = 'H'; // 将紧急度设为 High(高)
        }
    }
}
2:阻止更新已关闭的事件
该事件处理程序阻止更新已关闭(status_code = 'C')的事件。此函数在对 ProcessorService.Incidents 执行 UPDATE 操作之前运行,确保校验发生在数据库更新之前。
返回 Application Logic Editor,选择 +。
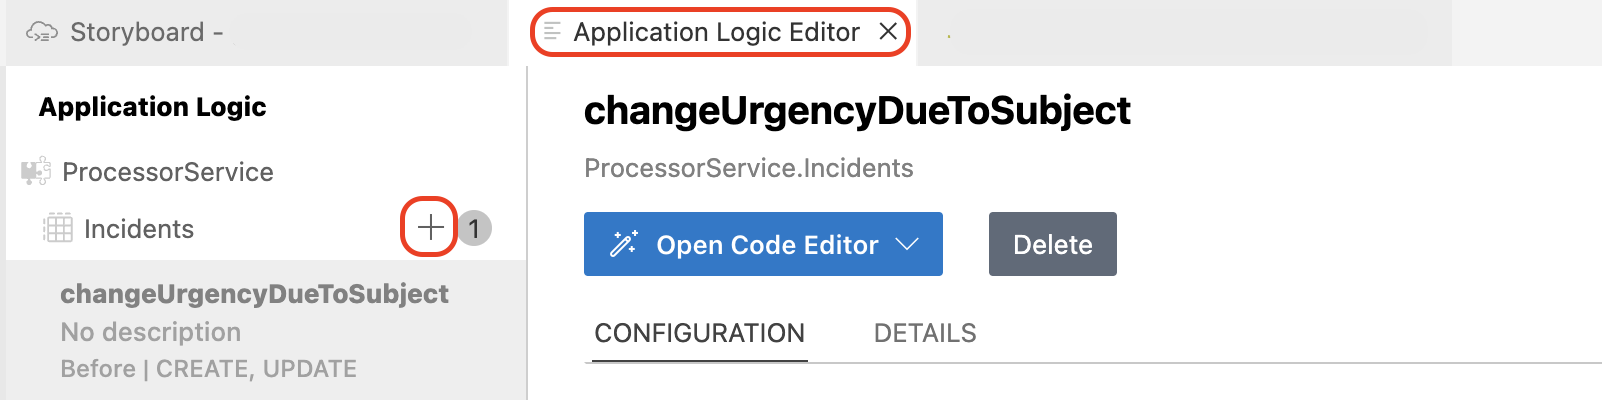
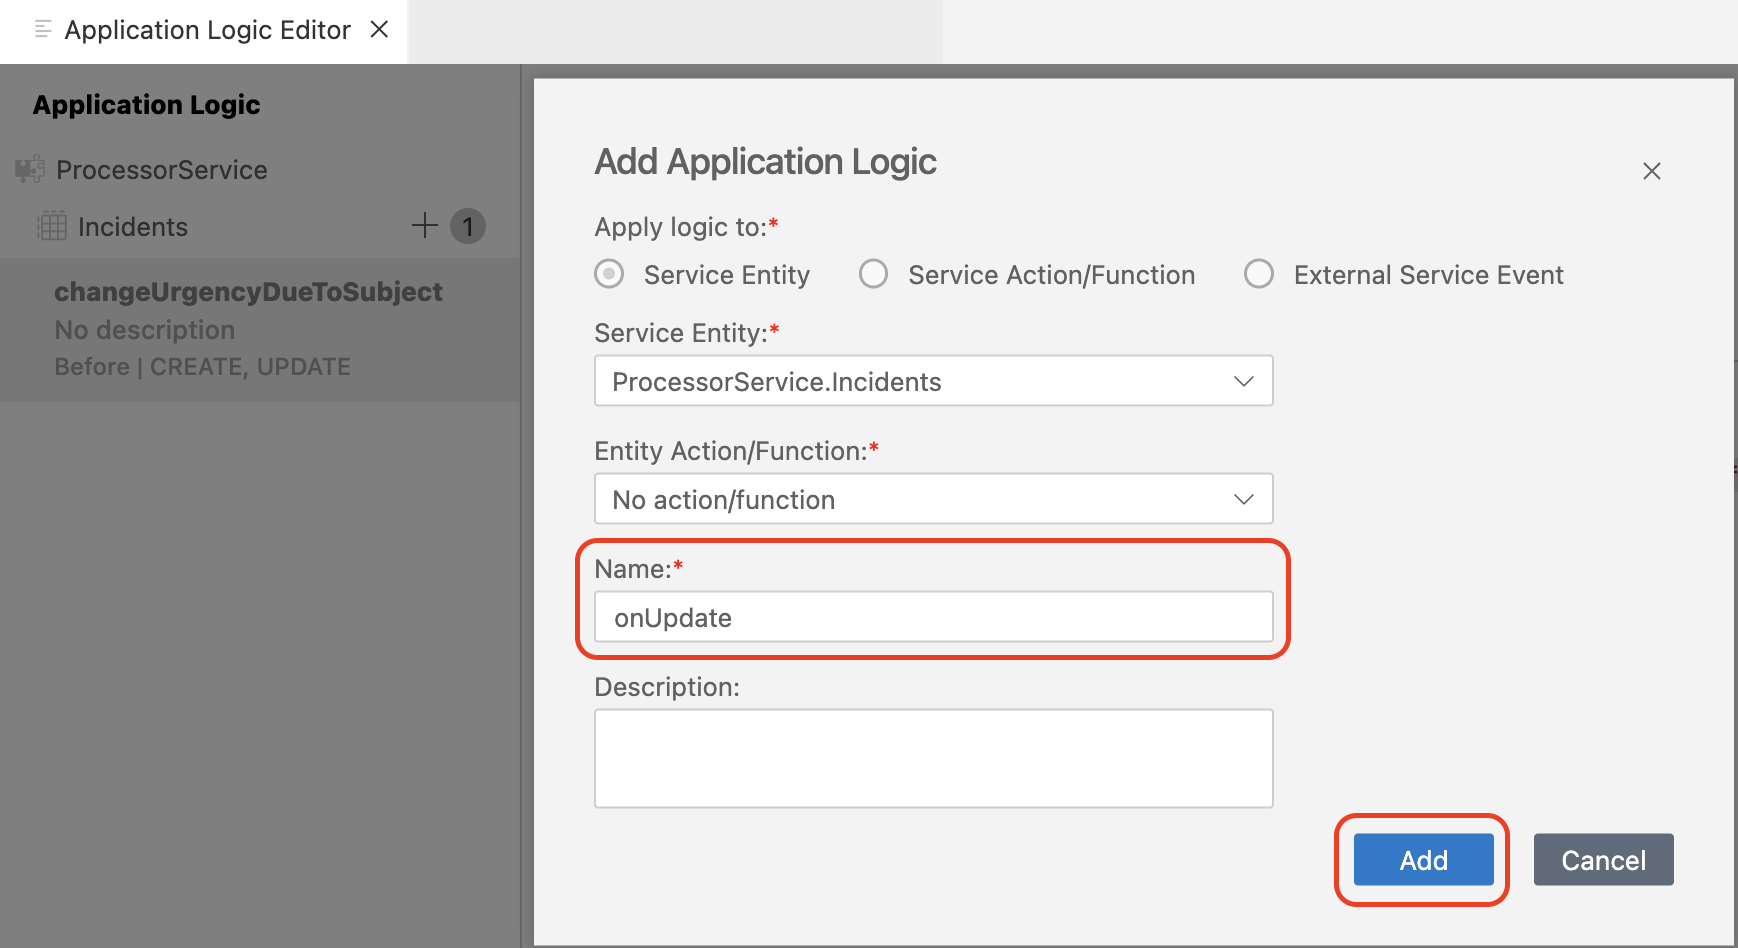
将 Name 字段的值改为 onUpdate,然后选择 Add。
在 Phase 区域中选择 Before,在 Standard Event 中选择 Update。
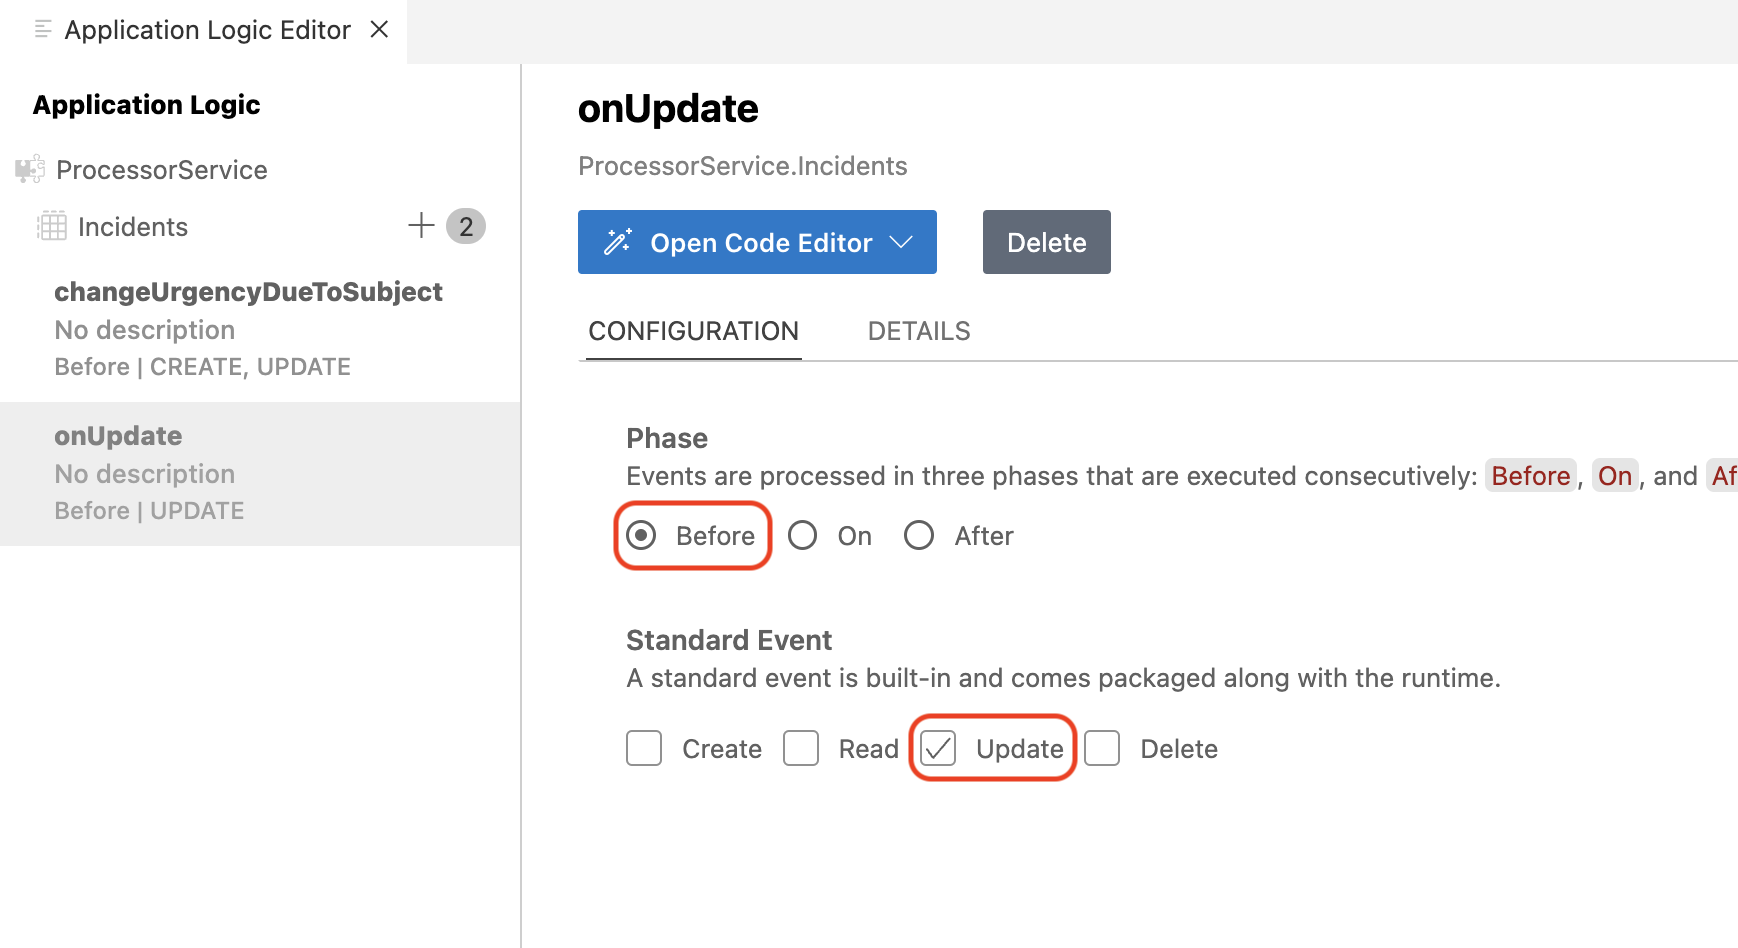
该逻辑会在更新特定事件之前自动执行。
选择 Open Code Editor > Application Logic。
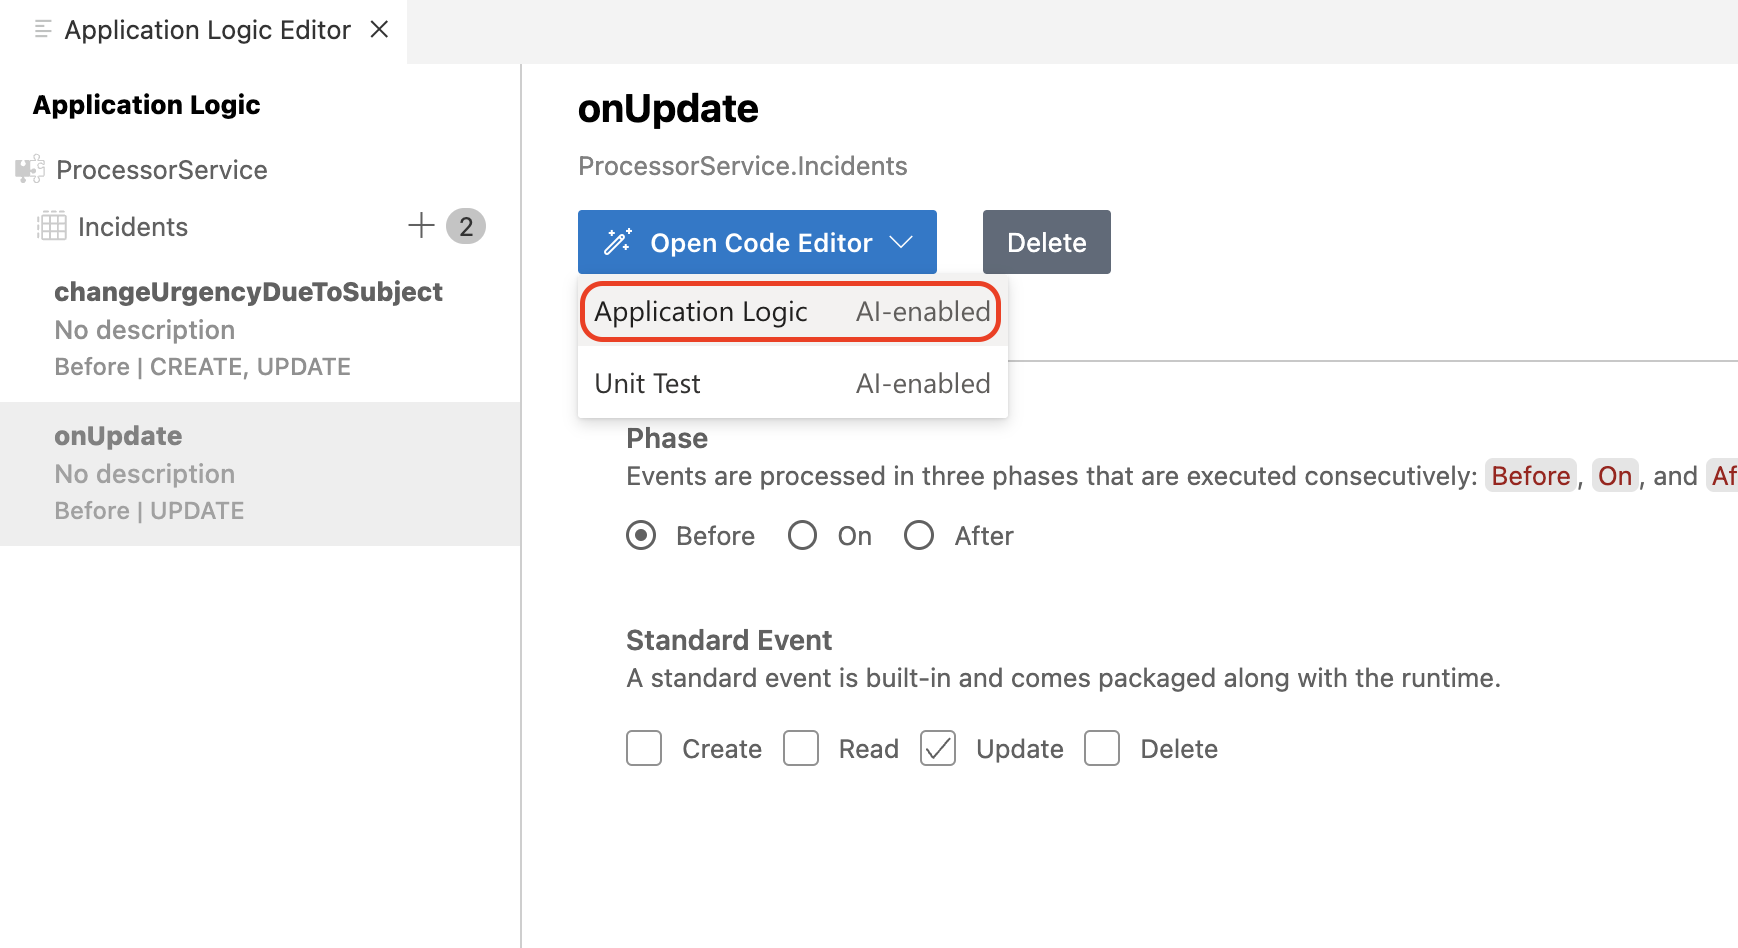
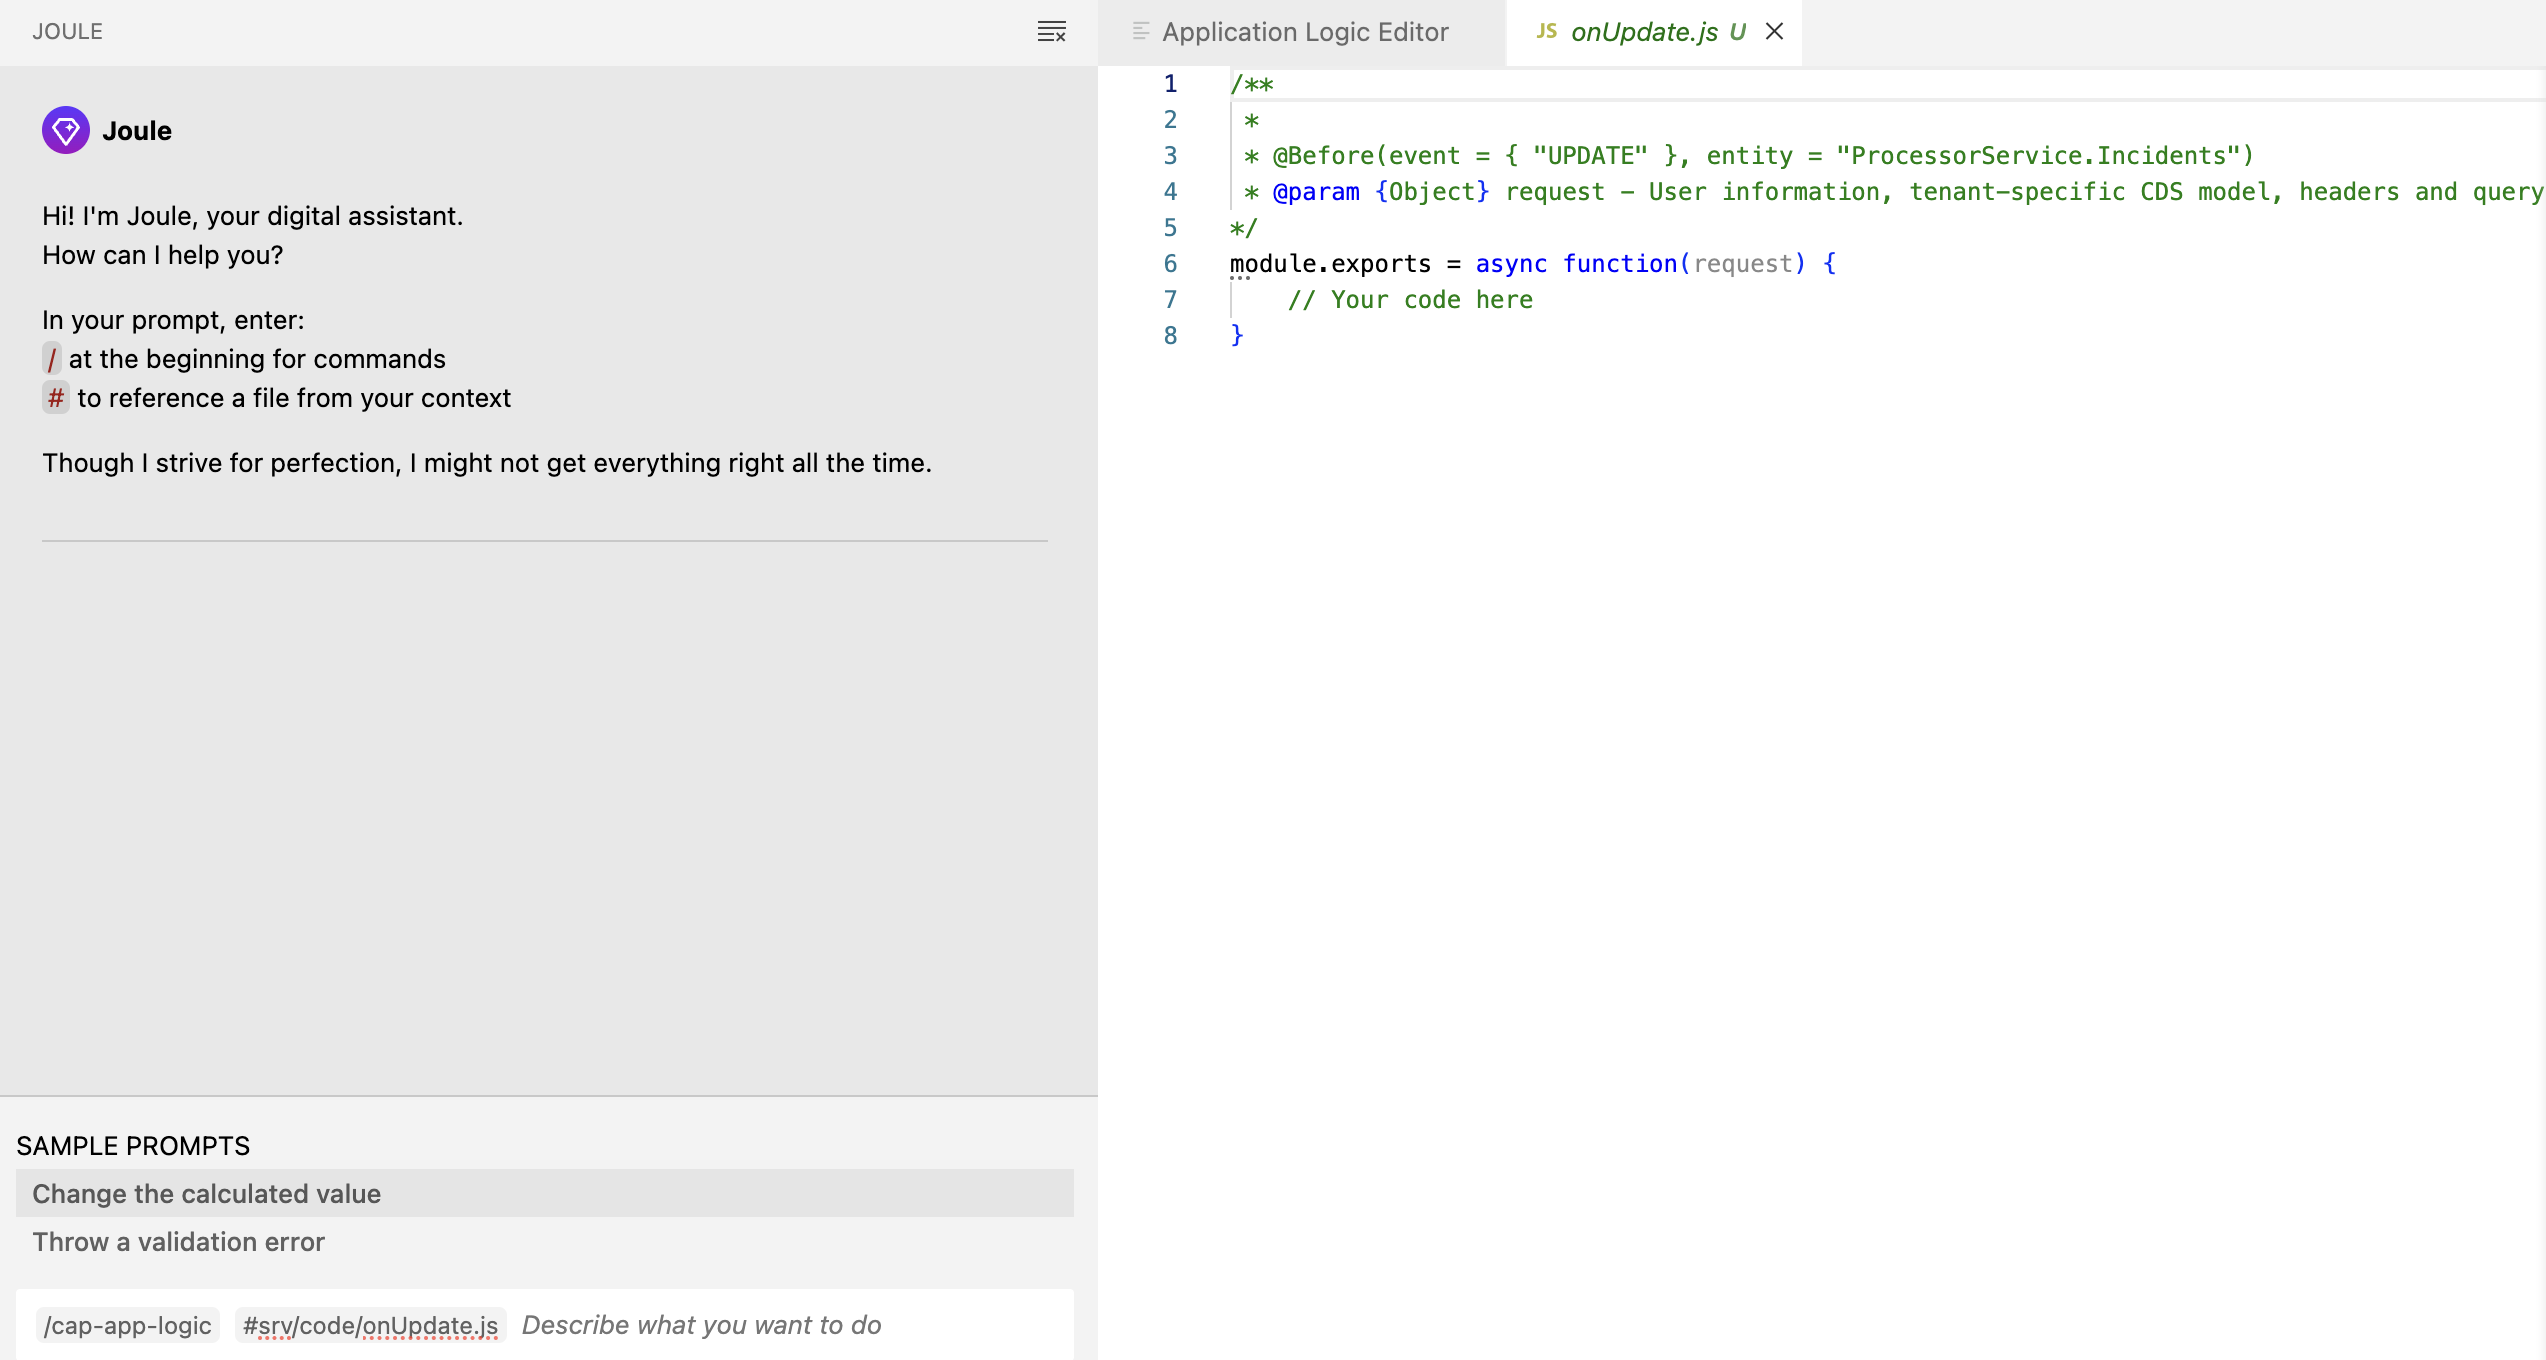
这会打开 Joule,为 onUpdate 创建逻辑。
在 Joule 提示词中,
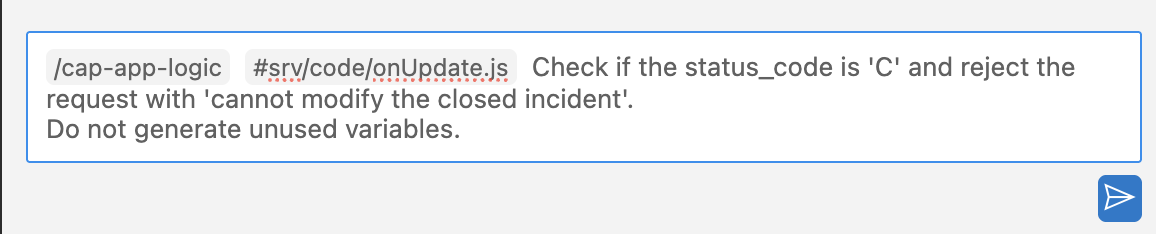
/cap-app-logic用于为已创建的服务生成自定义后端逻辑。Joule 生成代码后,#srv/code/onUpdate.js 指明生成的代码要填入哪个文件。Joule 提示词会预填为
/cap-app-logic #srv/code/onUpdate.js。在预填的命令之后,使用以下提示词创建业务逻辑。For already closed incident, check if the status_code is 'C' and reject the request with 'cannot modify the closed incident'. Do not generate unused variables.
选择 Send 图标。
Joule 返回代码后,检查实现并接受。
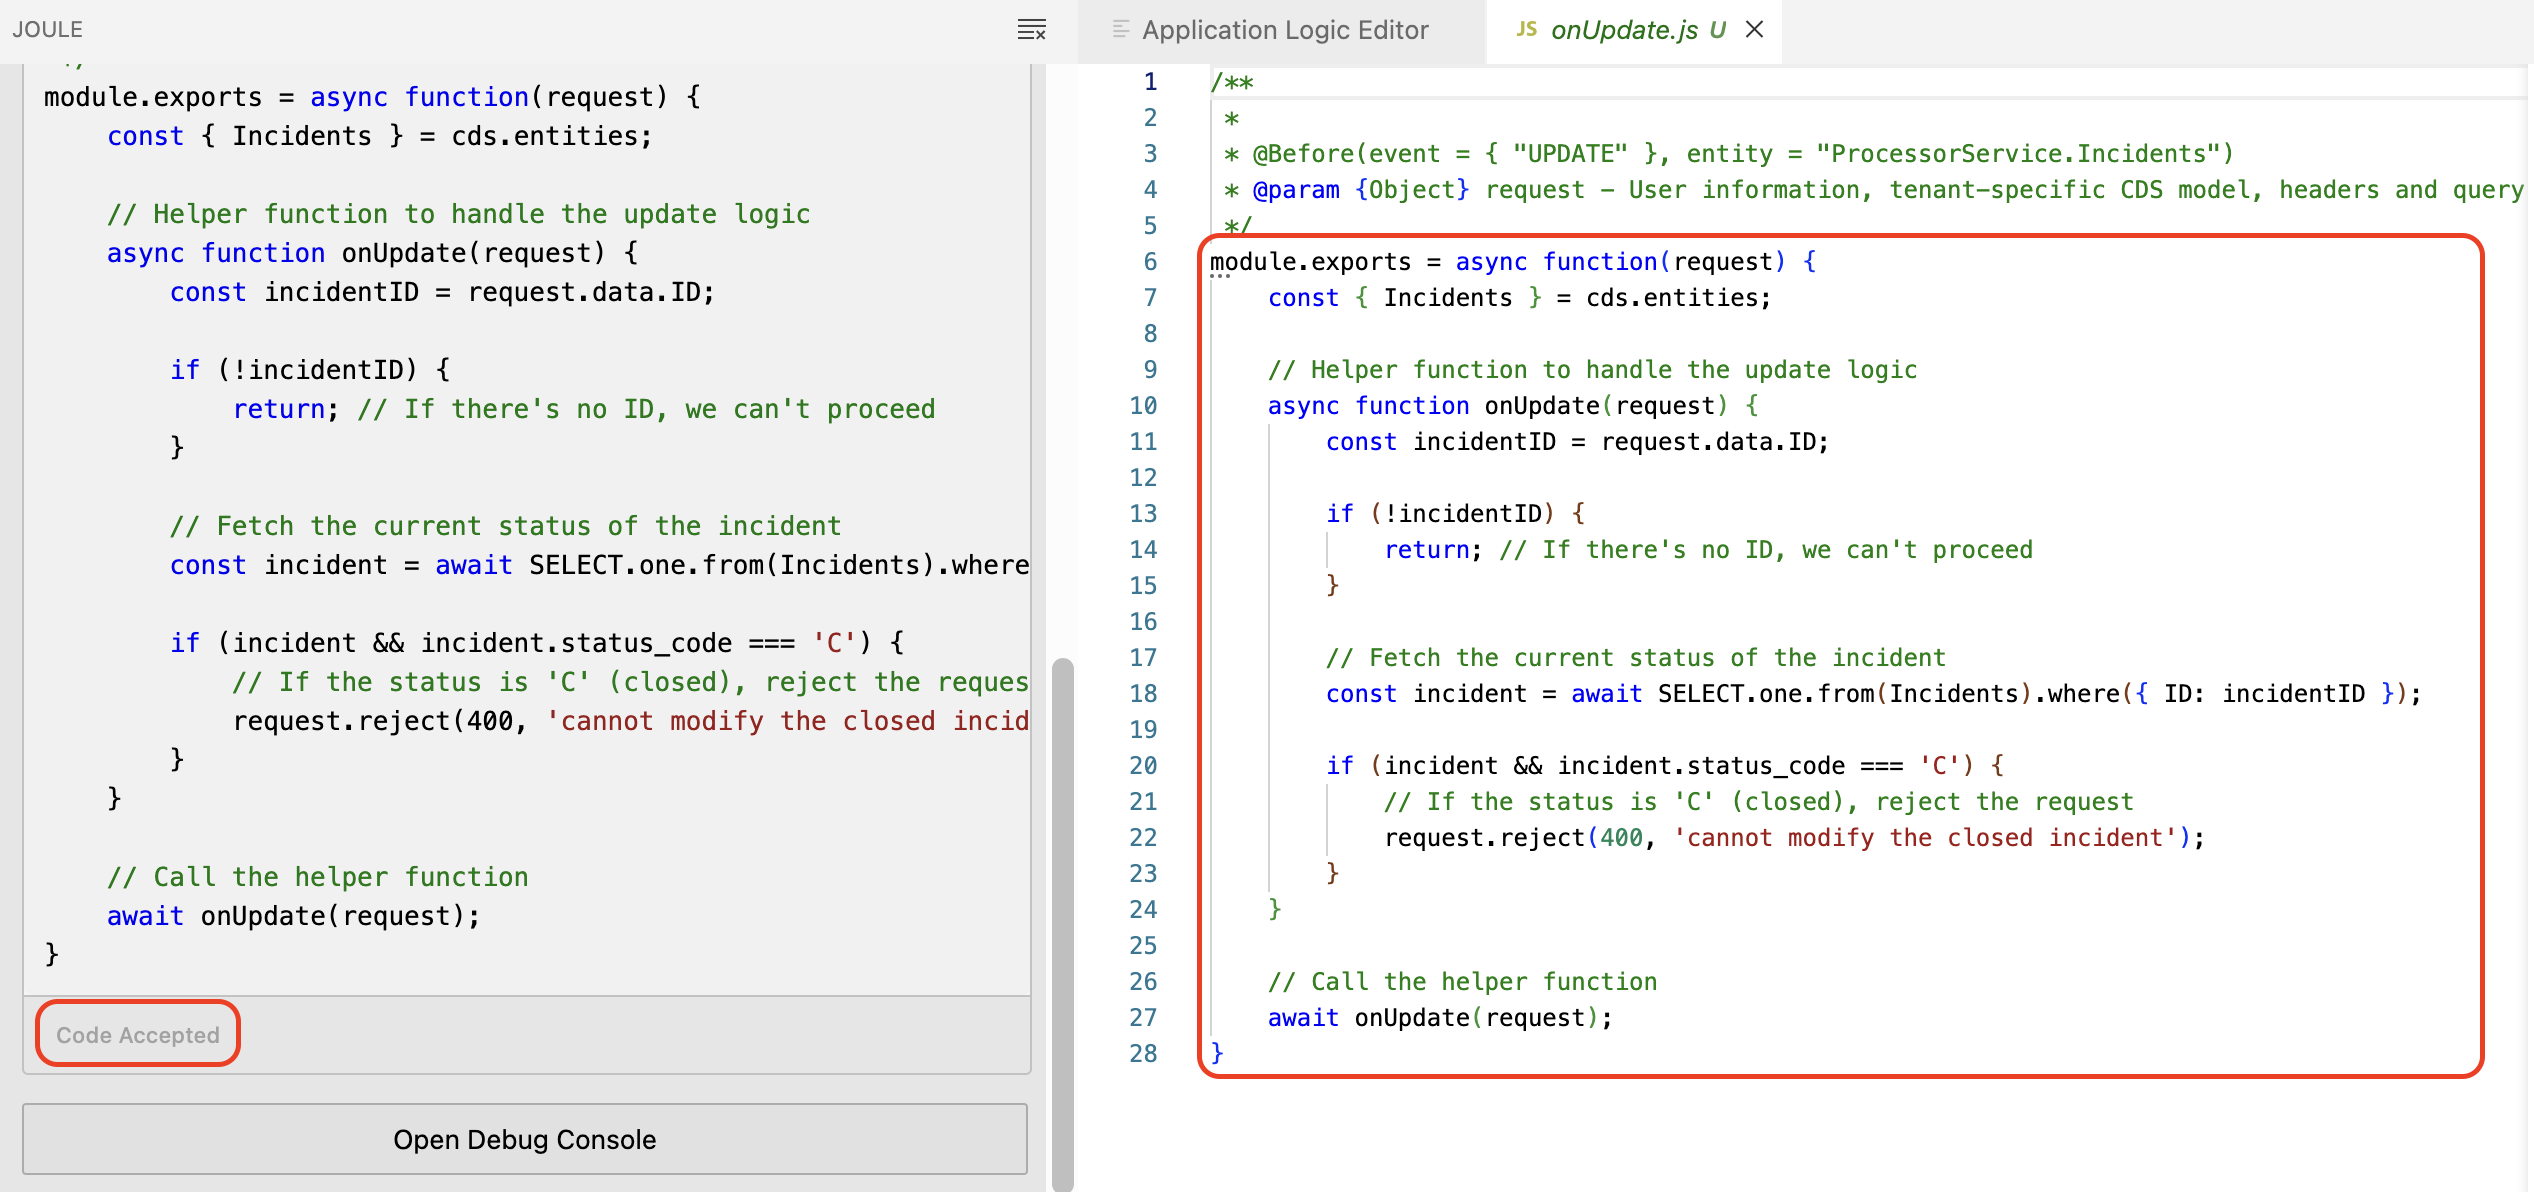
[!Note] Joule 为此后端逻辑生成的代码可能不同。请确保最终的
#srv/code/onUpdate.js文件如下所示:
module.exports = async function(request) {
    const { Incidents } = cds.entities;
    const { ID } = request.data;

    if (!ID) return; // Ensure ID is provided

    const incident = await SELECT.one.from(Incidents).where({ ID });

    if (incident && incident.status_code === 'C') {
        request.reject(400, 'Cannot modify the closed incident');
    }
}
下一步
使用 Joule 创建 SAP Fiori UI
将应用部署到 SAP BTP Cloud Foundry 运行时
本节介绍如何将应用部署到 SAP BTP Cloud Foundry 运行时。
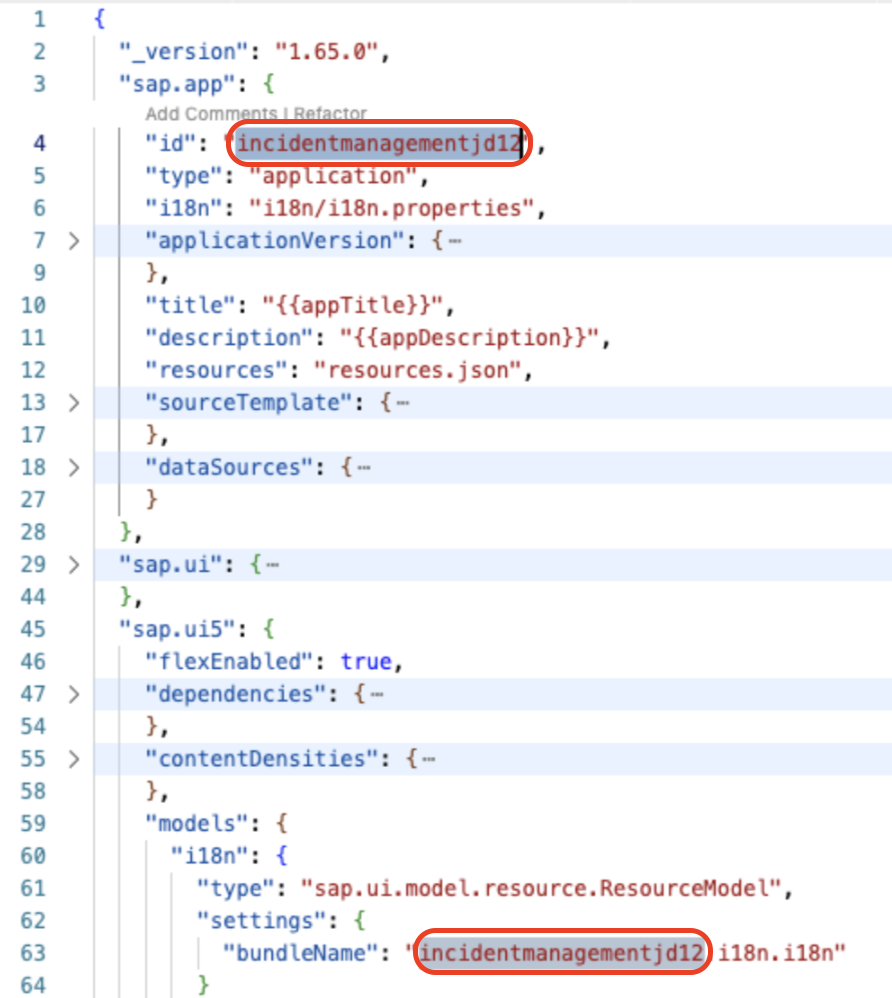
[!Note] 为了在 SAP BTP Cockpit 中唯一标识已部署的应用,请对应用的 UI 模块做以下修改。
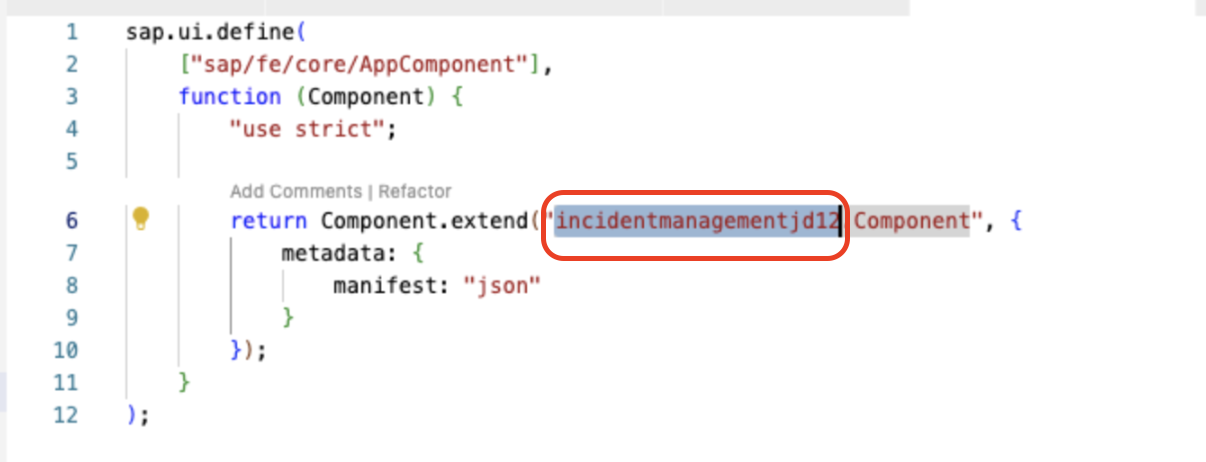
UI 应用名称可以是
incidentmanagement<your-initials><unique-random-number>。例如,如果你的名字是John Doe,项目名称可以是 incidentmanagementjd12(12 是某个随机数)。在 app -> incident-management -> webapp 下,在以下文件中将 incidentmanagement 替换为新名称。
Component.js
index.html
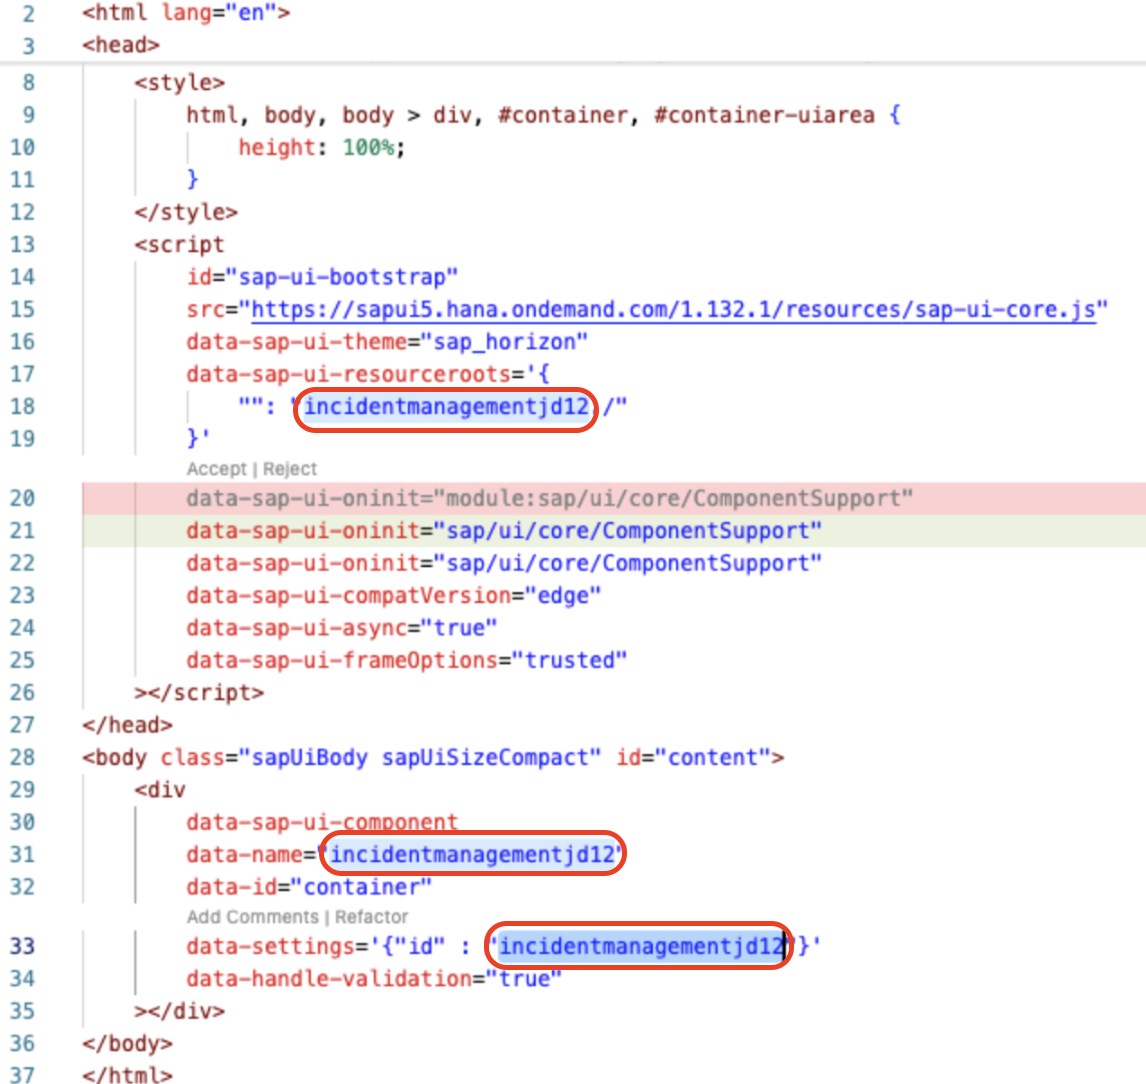
manifest.json
在 app -> incident-management -> ui5.yaml 下,将 incidentmanagement 替换为新名称。
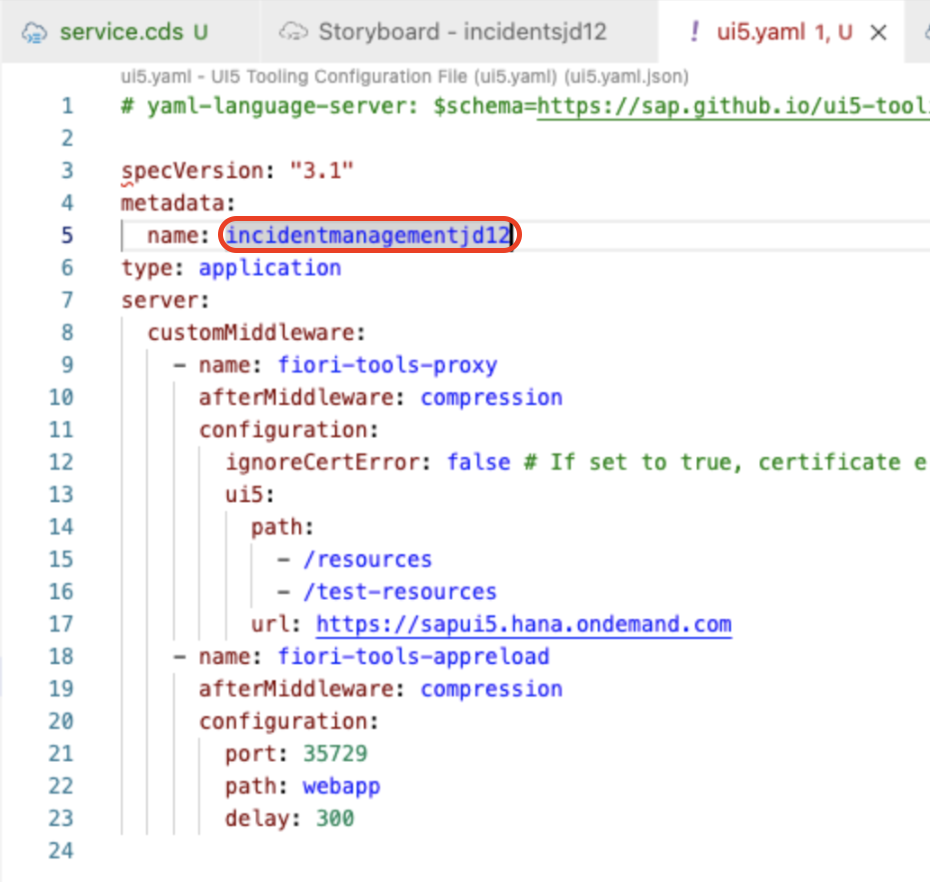
注意:执行全部查找替换,把 incidentmanagement 替换为 incidentmanagementjd12。
部署应用
SAP Build Code 的最后一步是将应用部署到 SAP BTP Cloud Foundry 运行时。该过程还会自动创建目标(Destination),使 OData 服务可以被 SAP Build Apps 等其他工具使用。
转到 Task Explorer,运行名为 Deploy 的项目任务。
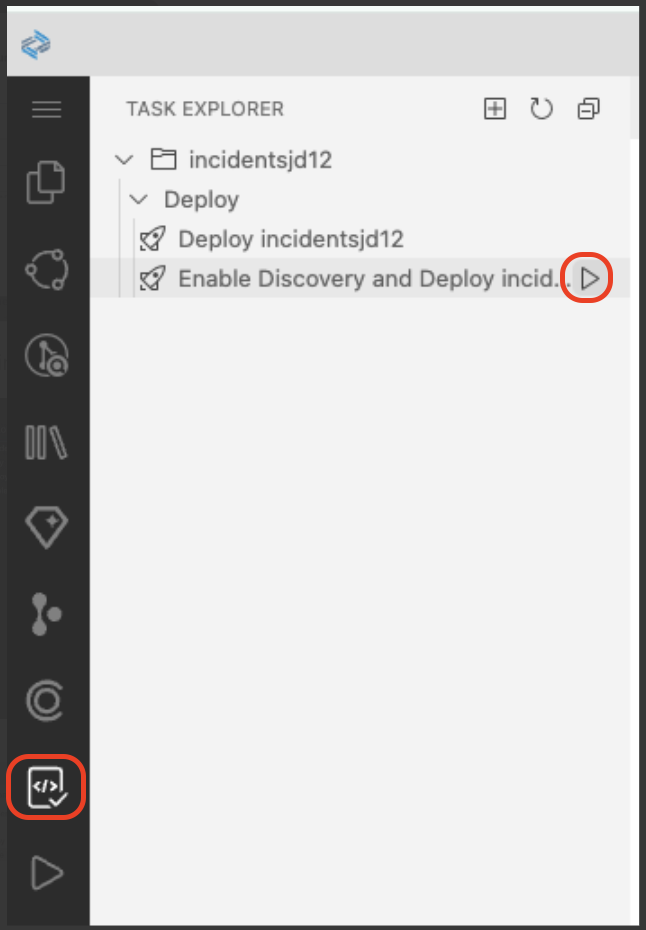
检查任务是否已在终端中启动。
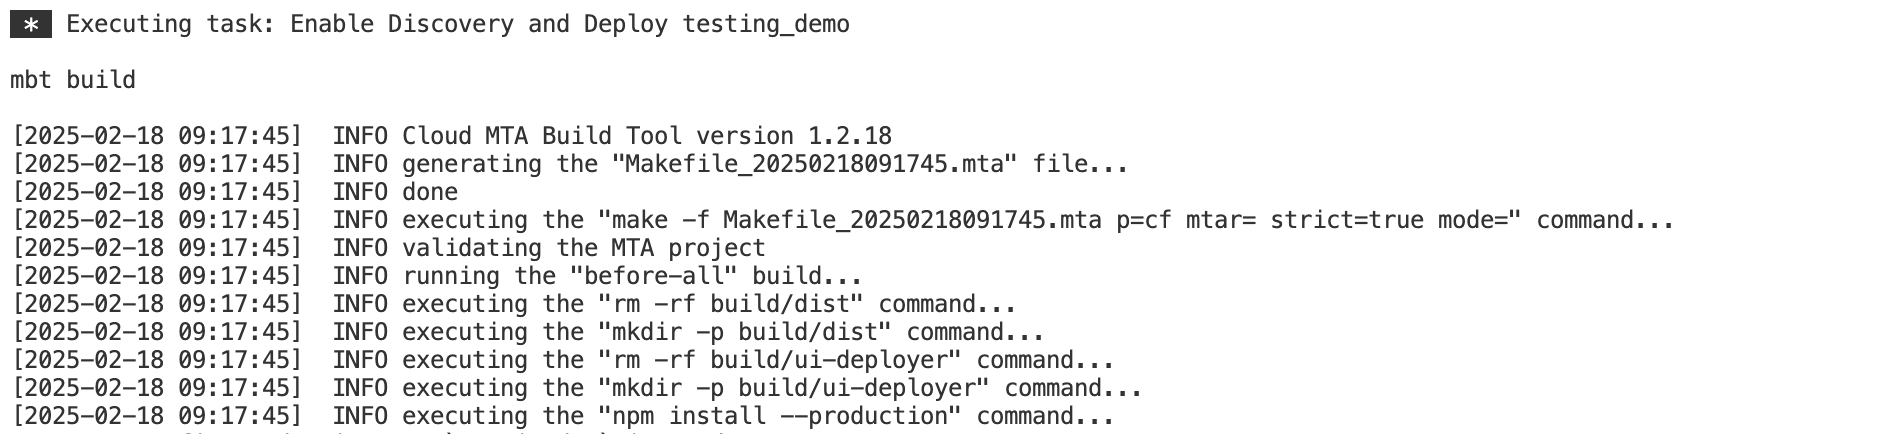
[!Note] 部署过程中,如果弹出新页面要求登录 Cloud Foundry 运行时,请执行第 3~6 步。否则,部署完成后直接进行 Assign the User Roles。
在 Cloud Foundry Sign in 弹窗中,执行以下操作:
在 Enter Cloud Foundry Endpoint 字段中,输入 SAP BTP Cockpit 中的 API Endpoint。
注意:Cloud Foundry Endpoint 可从 SAP BTP Cockpit 获取。
选择 SSO Passcode 作为身份验证方式。
选择 Open a new browser page to generate your SSO passcode,在 SAP BTP 中登录你的子账户,浏览器会打开一个新页面。
找到 Enter the origin key 文本框,单击 Sign in with alternative identity provider。
注意:origin key 请向讲师索取。
注意:选择 Sign in with alternative identity provider 时,如果提示登录,请输入用户名和密码。
选择 Copy 图标,获取临时身份验证码。
将复制的验证码粘贴到 Cloud Foundry 登录页面的 Enter your SSO Passcode 字段中。
选择 Sign In。
在 Cloud Foundry Target 区域中,执行以下操作:
在 Select Cloud Foundry Organization 下拉菜单中选择相应的 Org 名称。
在 Select Cloud Foundry Space 下拉菜单中,选择前提条件步骤中创建的 dev space。
选择 Apply。
在终端中查看部署进度。
部署完成后,日志显示应用已启动,你可以看到 Overview URL。

分配用户角色
创建角色集合并添加角色
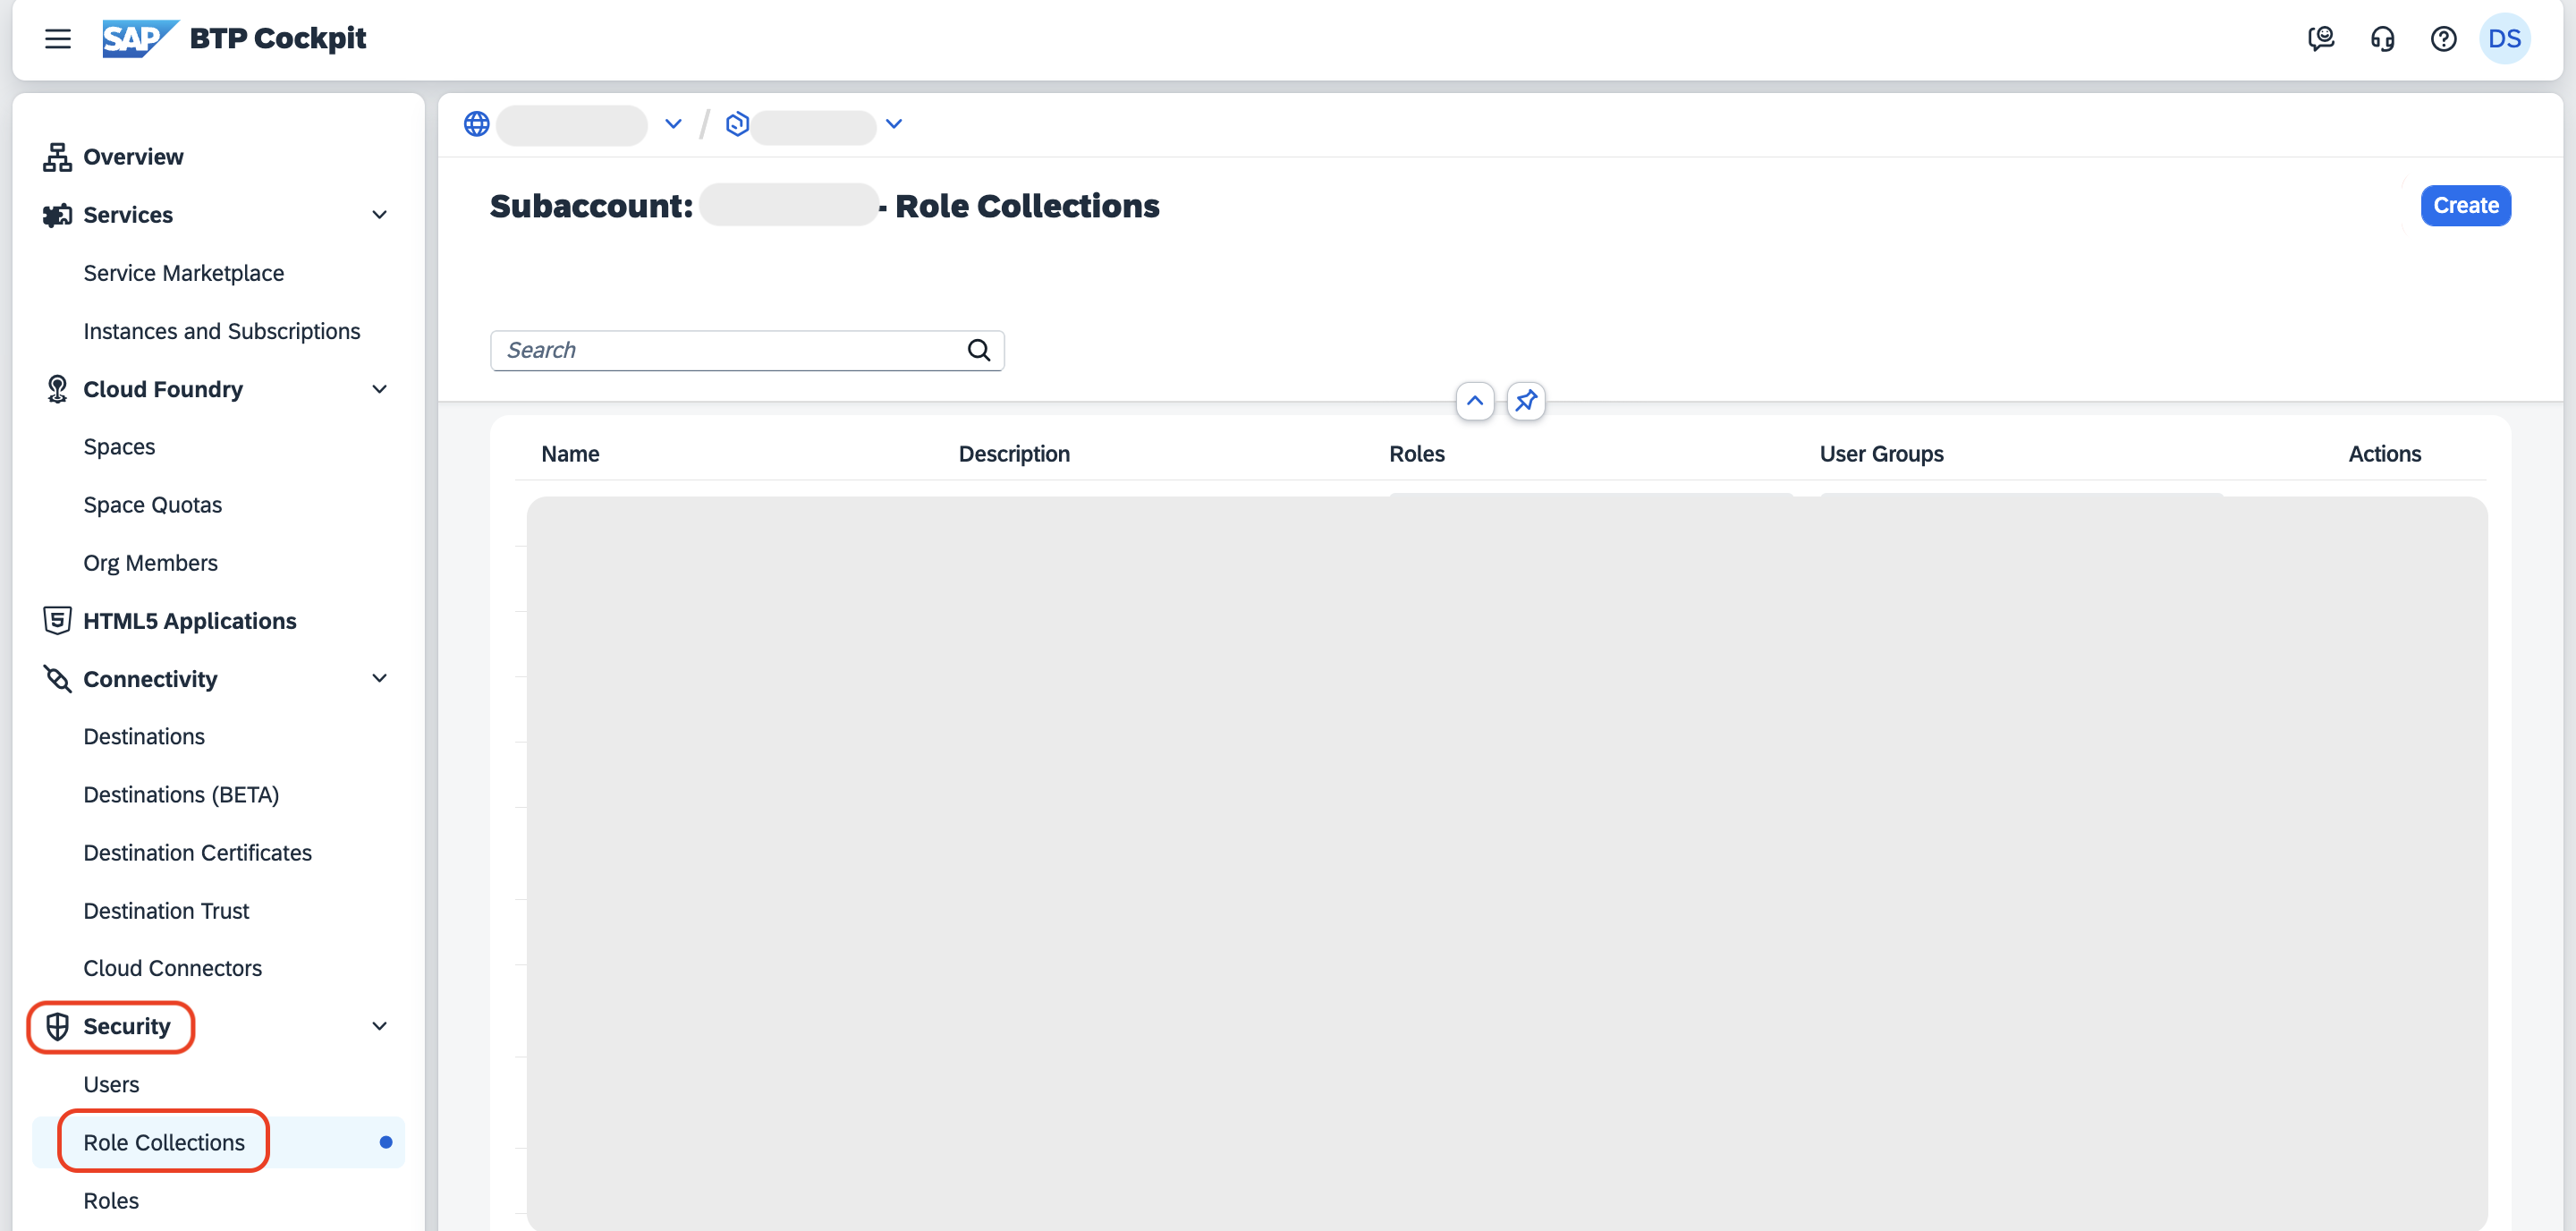
打开 SAP BTP Cockpit,导航到你的子账户。
选择 Security > Role Collections。
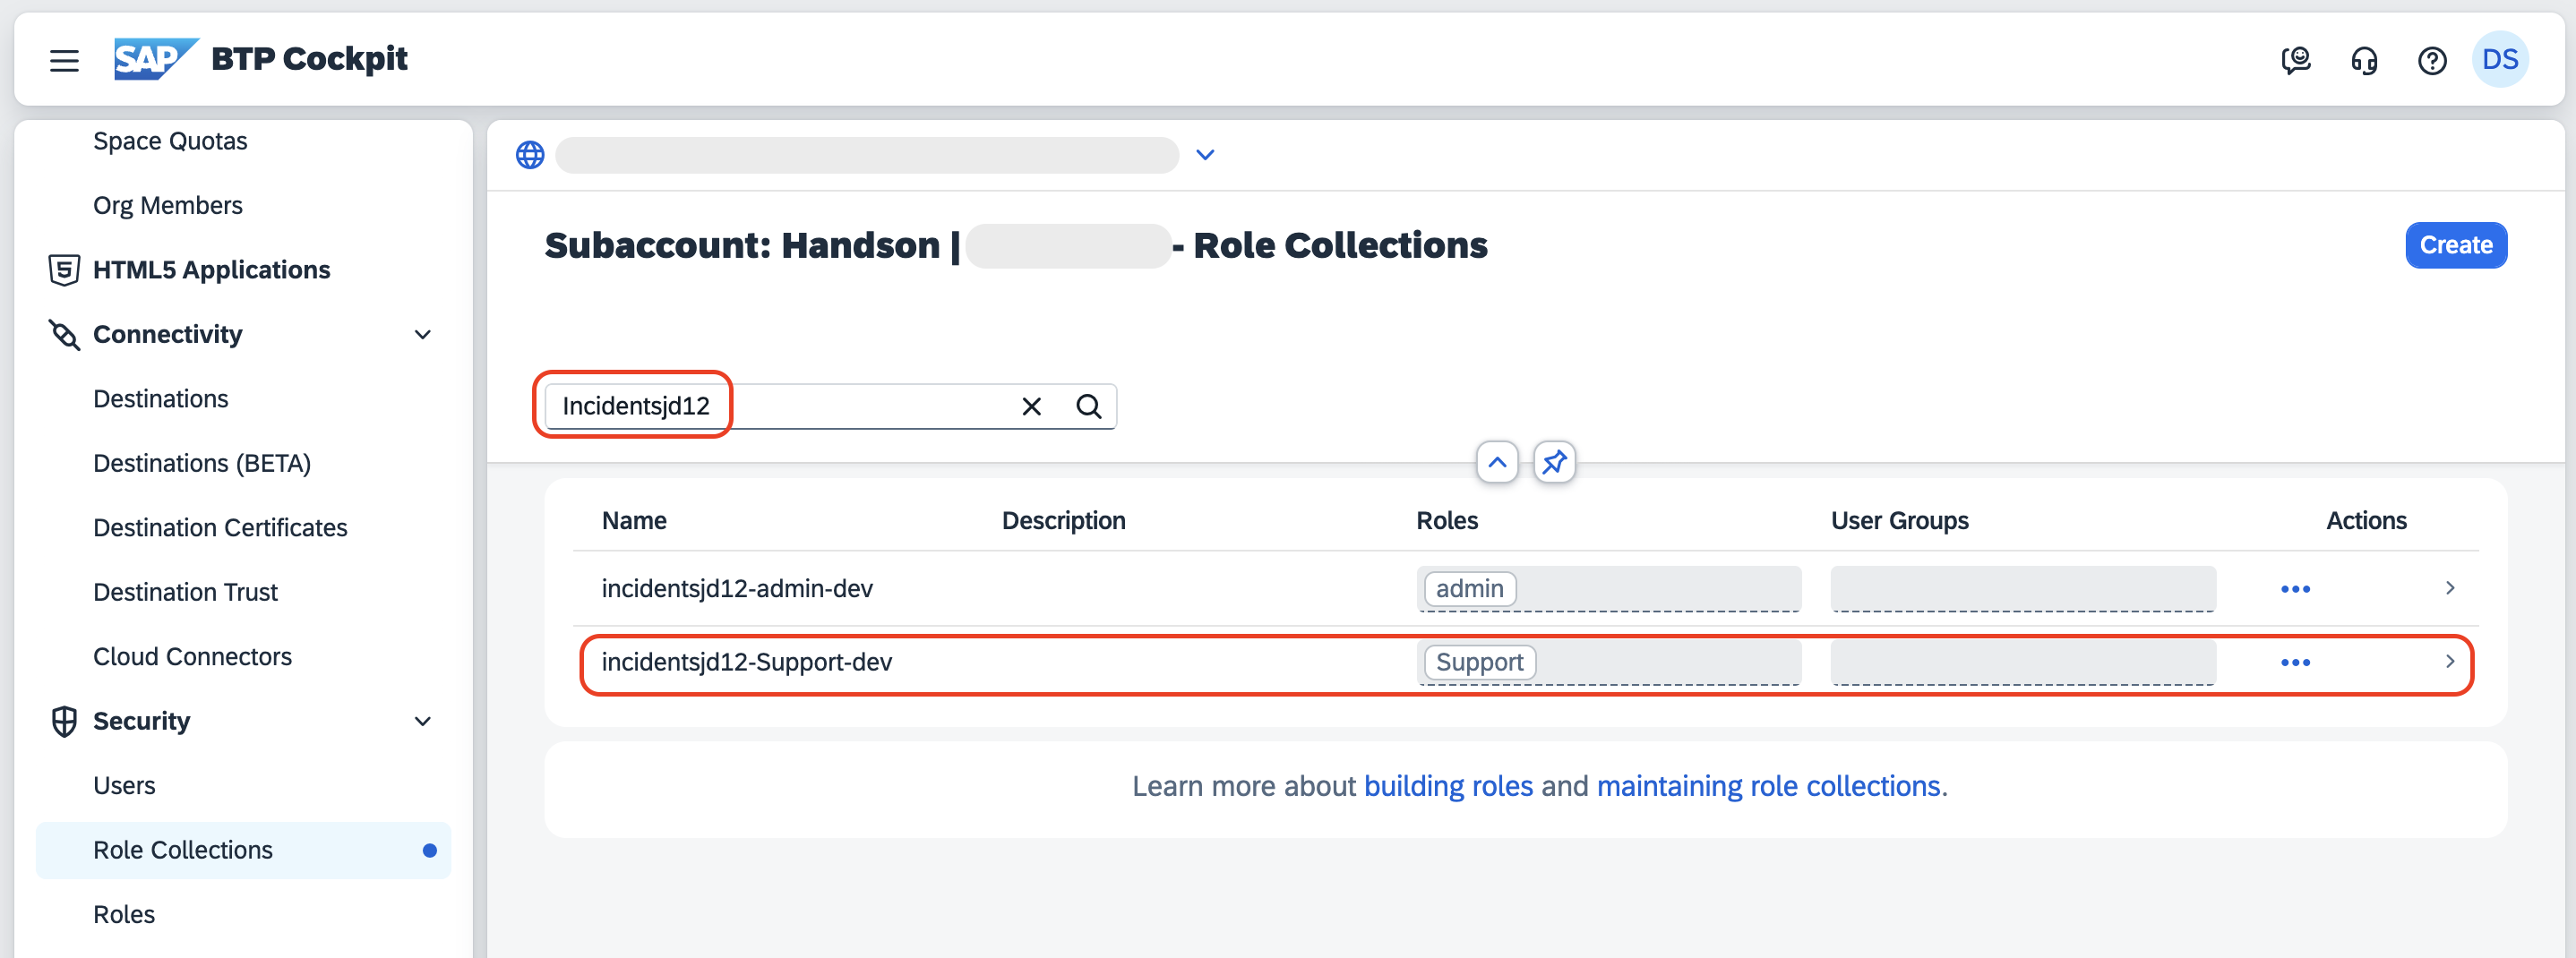
在 Search 字段中输入项目名称。例如项目名称为 Incidentsjd12,然后选择 incidentsjd12-Support-dev。
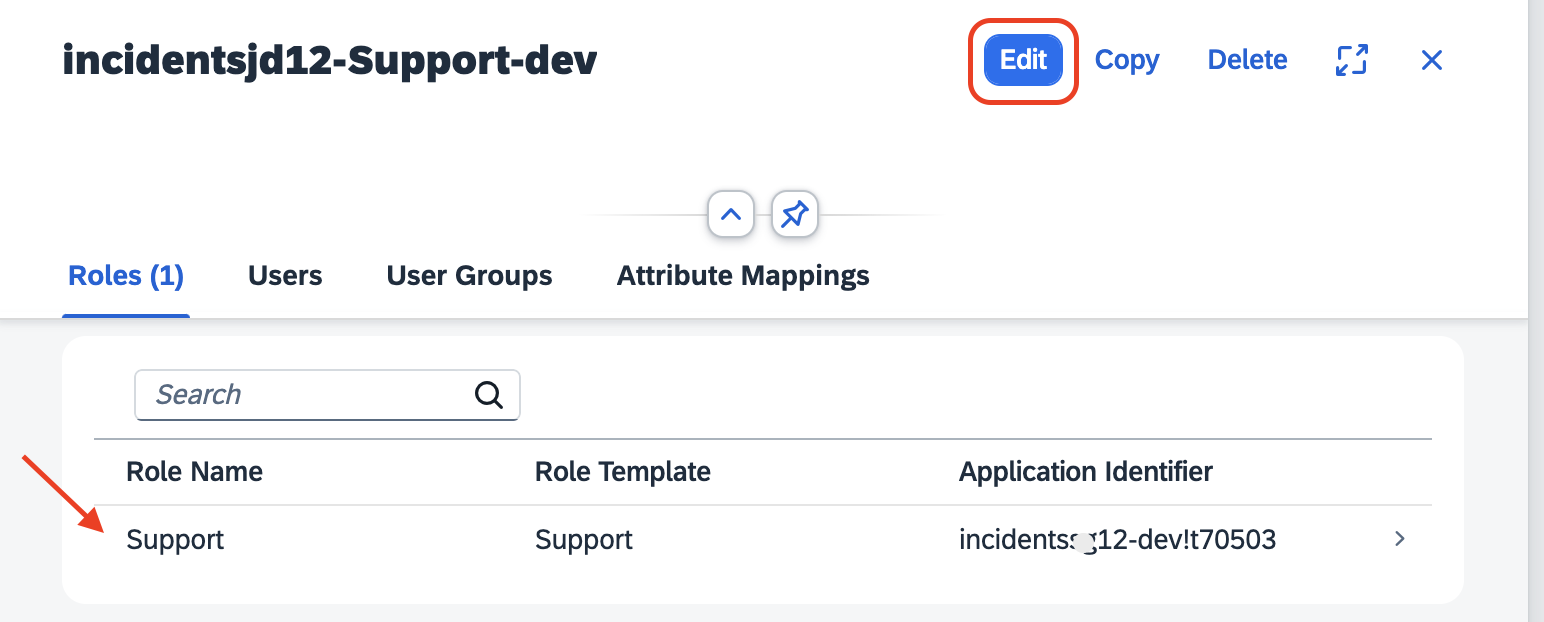
选择 Edit。
确保 Support 角色已列在 Roles 选项卡中。
在 Users 选项卡中:
在 ID 字段中输入用户名,然后从建议列表中选择你的用户名。
在 Identity Provider 下拉菜单中选择 ...accounts.ondemand.com(business users)。
注意: 确保选择带 (business users) 的身份提供方。
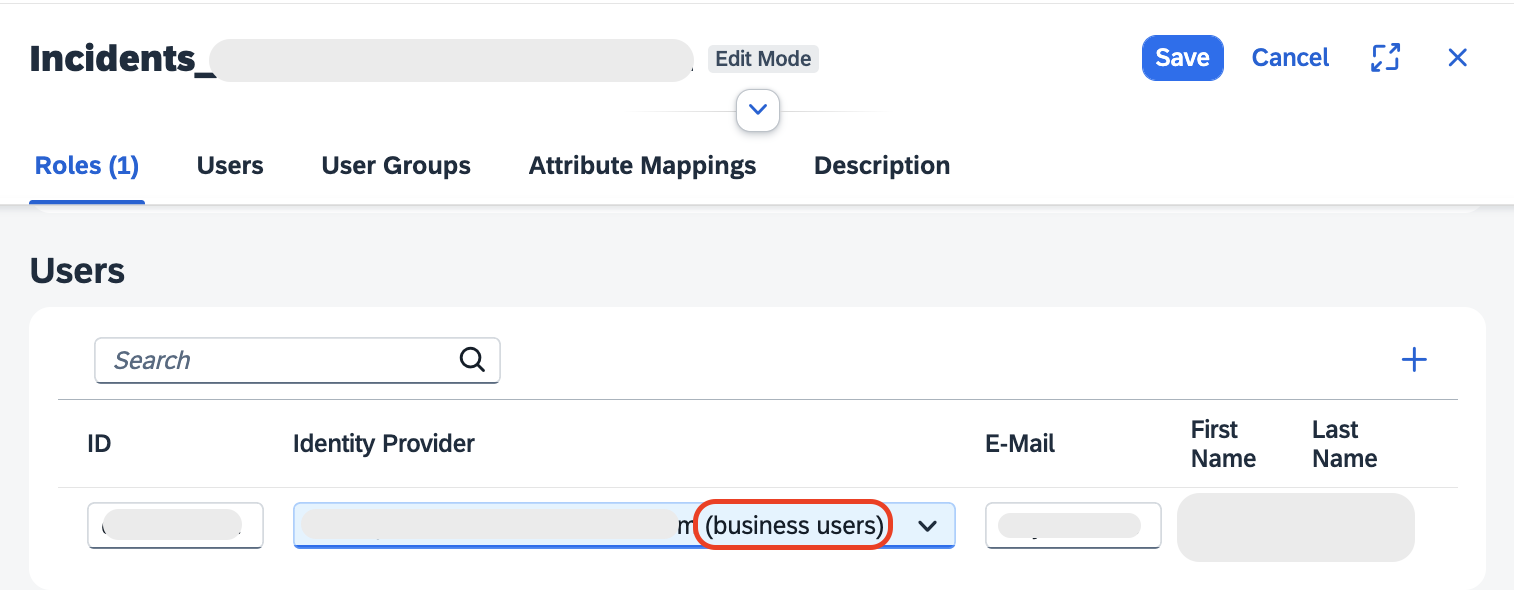
选择 Save。
下一步
端到端测试
端到端测试:Cloud Foundry 运行时(e2e-testing-cf)
测试 Incident Management 应用
前提条件
部署到 Cloud Foundry 运行时
访问应用
打开 SAP BTP Cockpit。
在左侧导航栏中单击 HTML5 Applications。
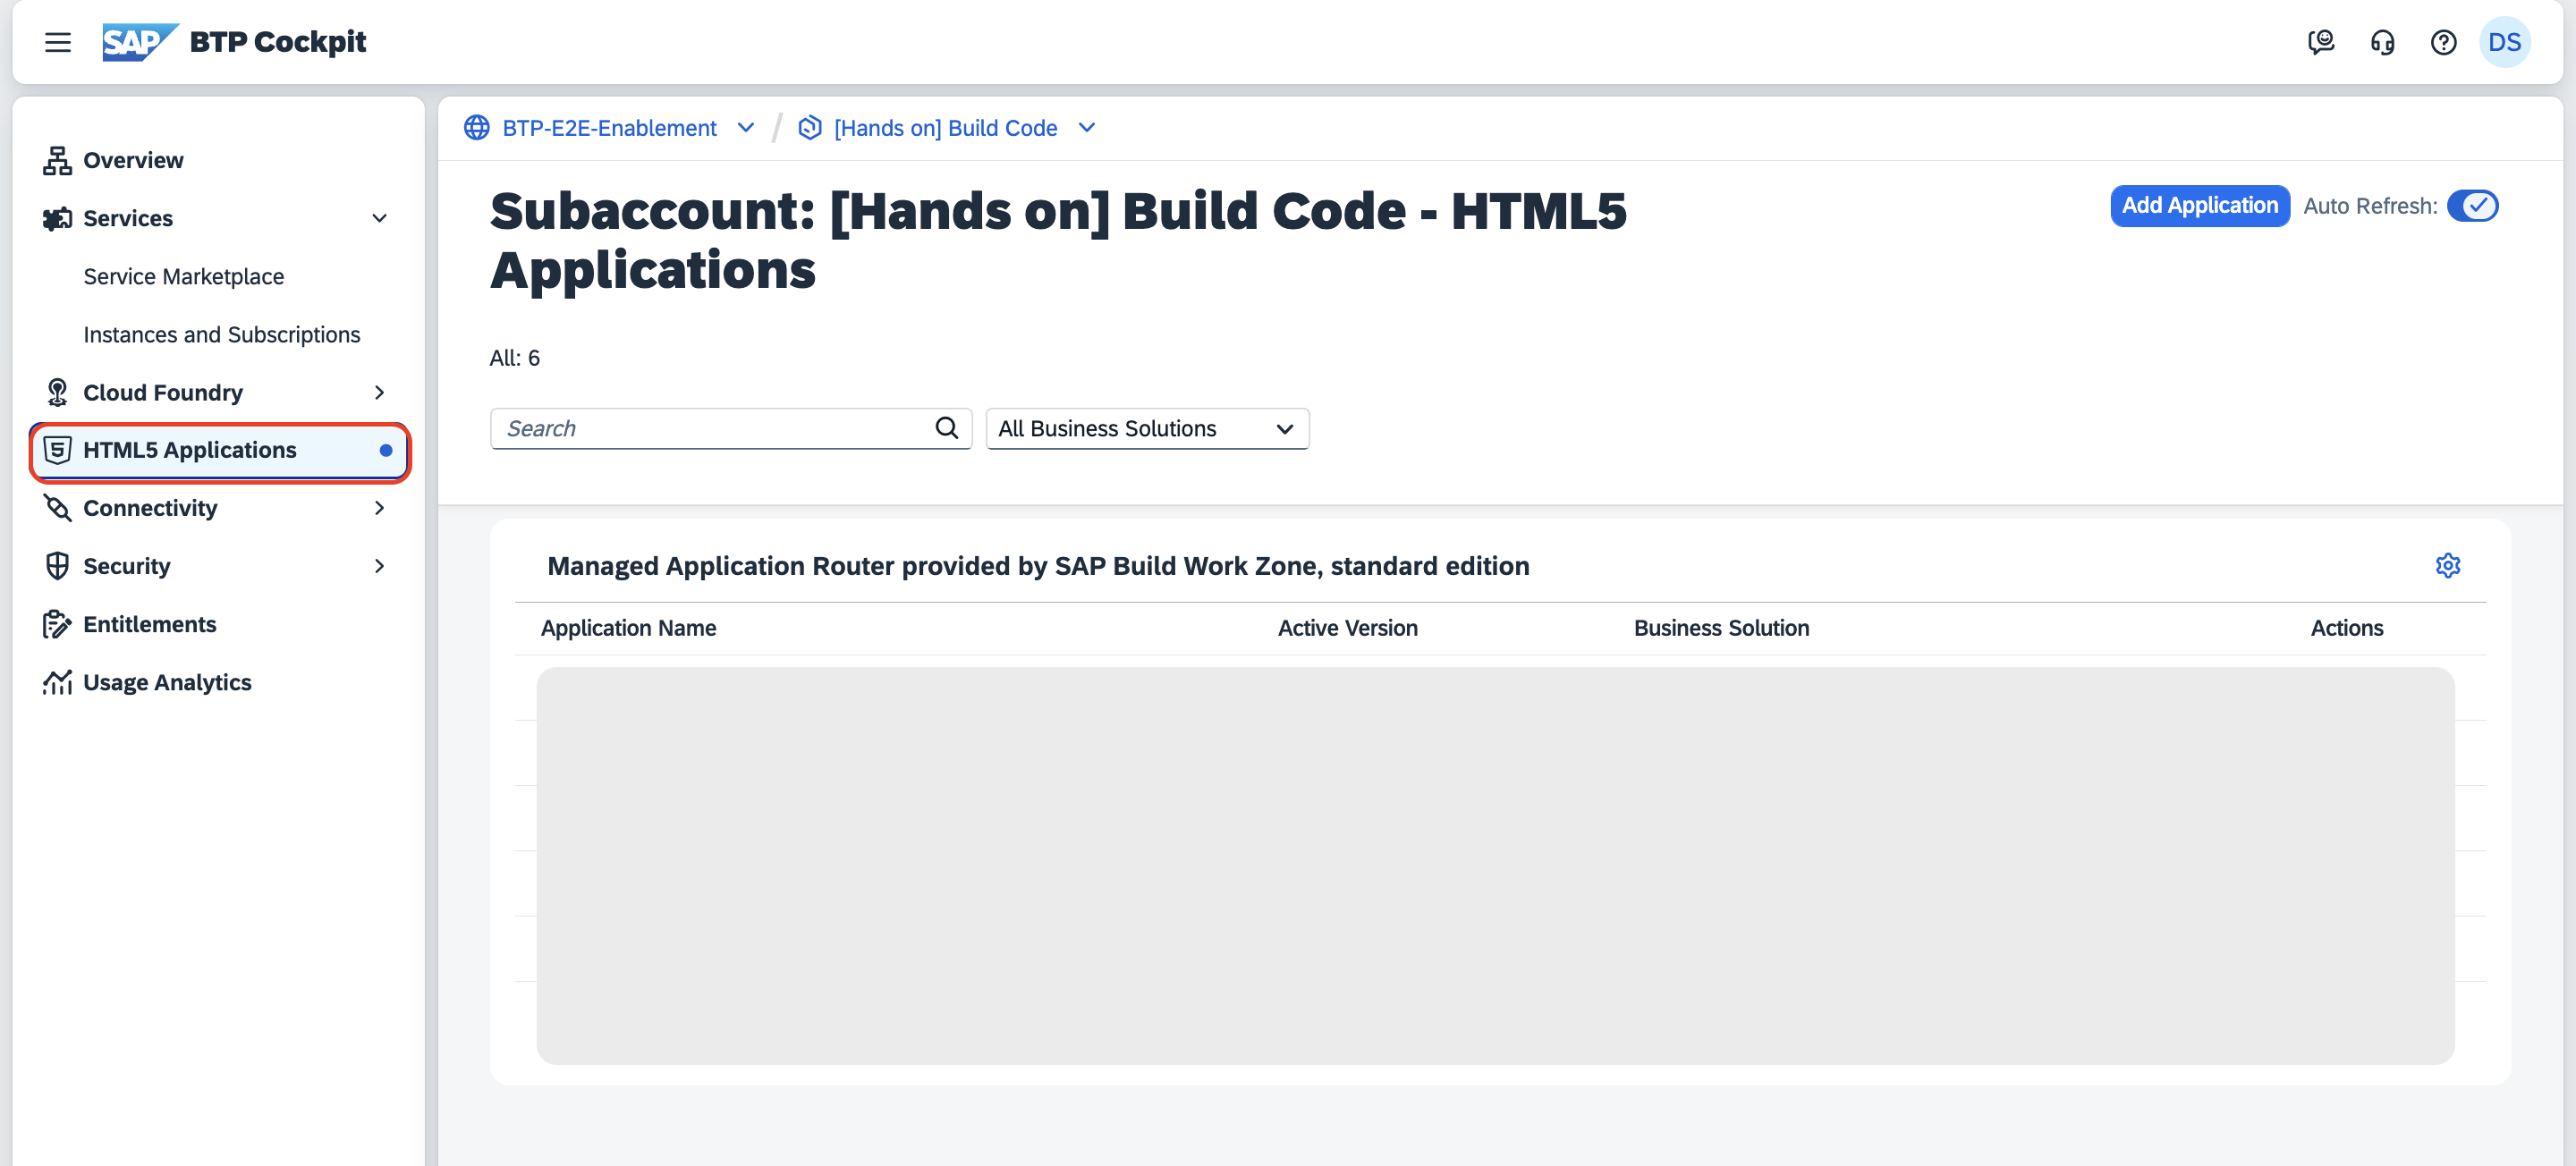
单击包含你的 Business Solution 的应用。
端到端测试
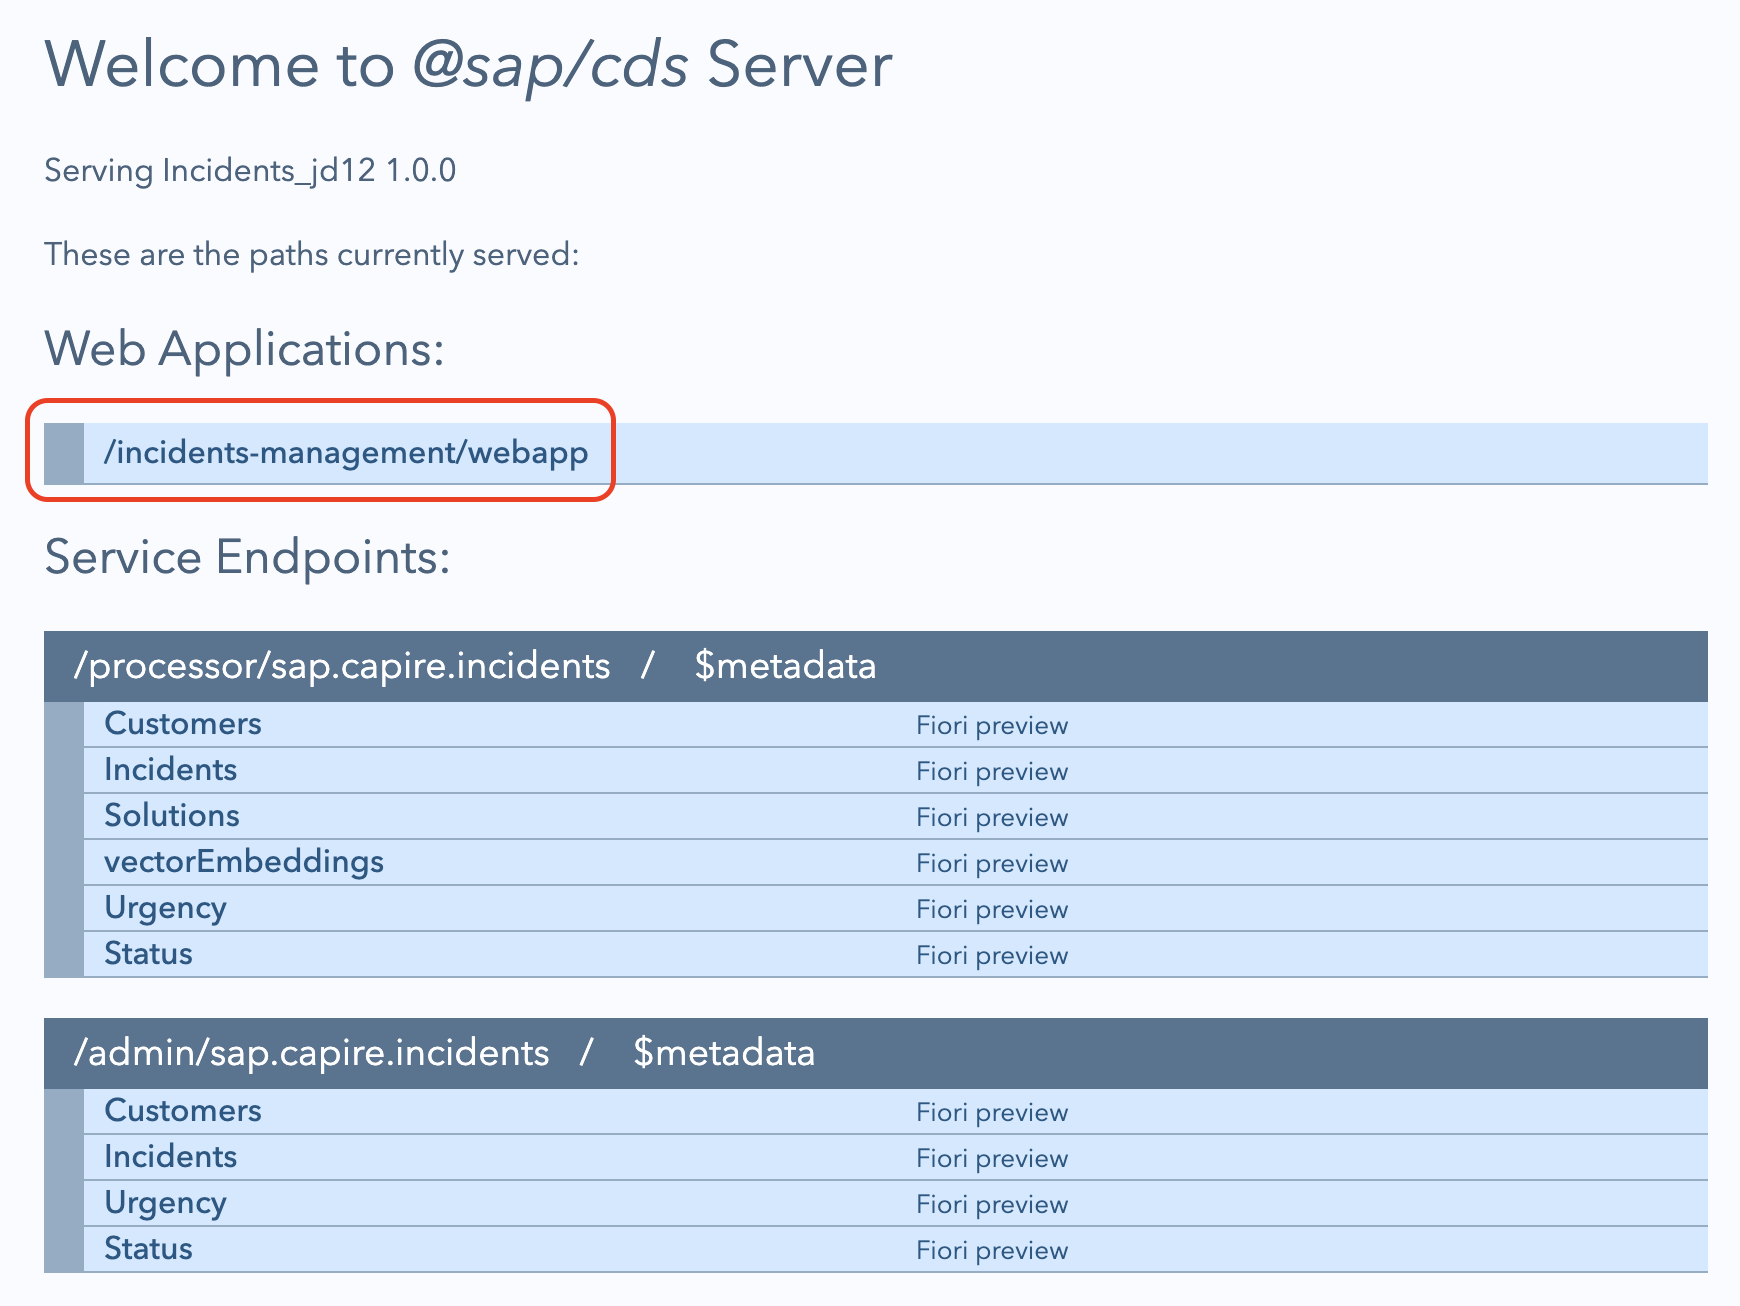
打开应用后,单击 Web Applications 下的 URL。
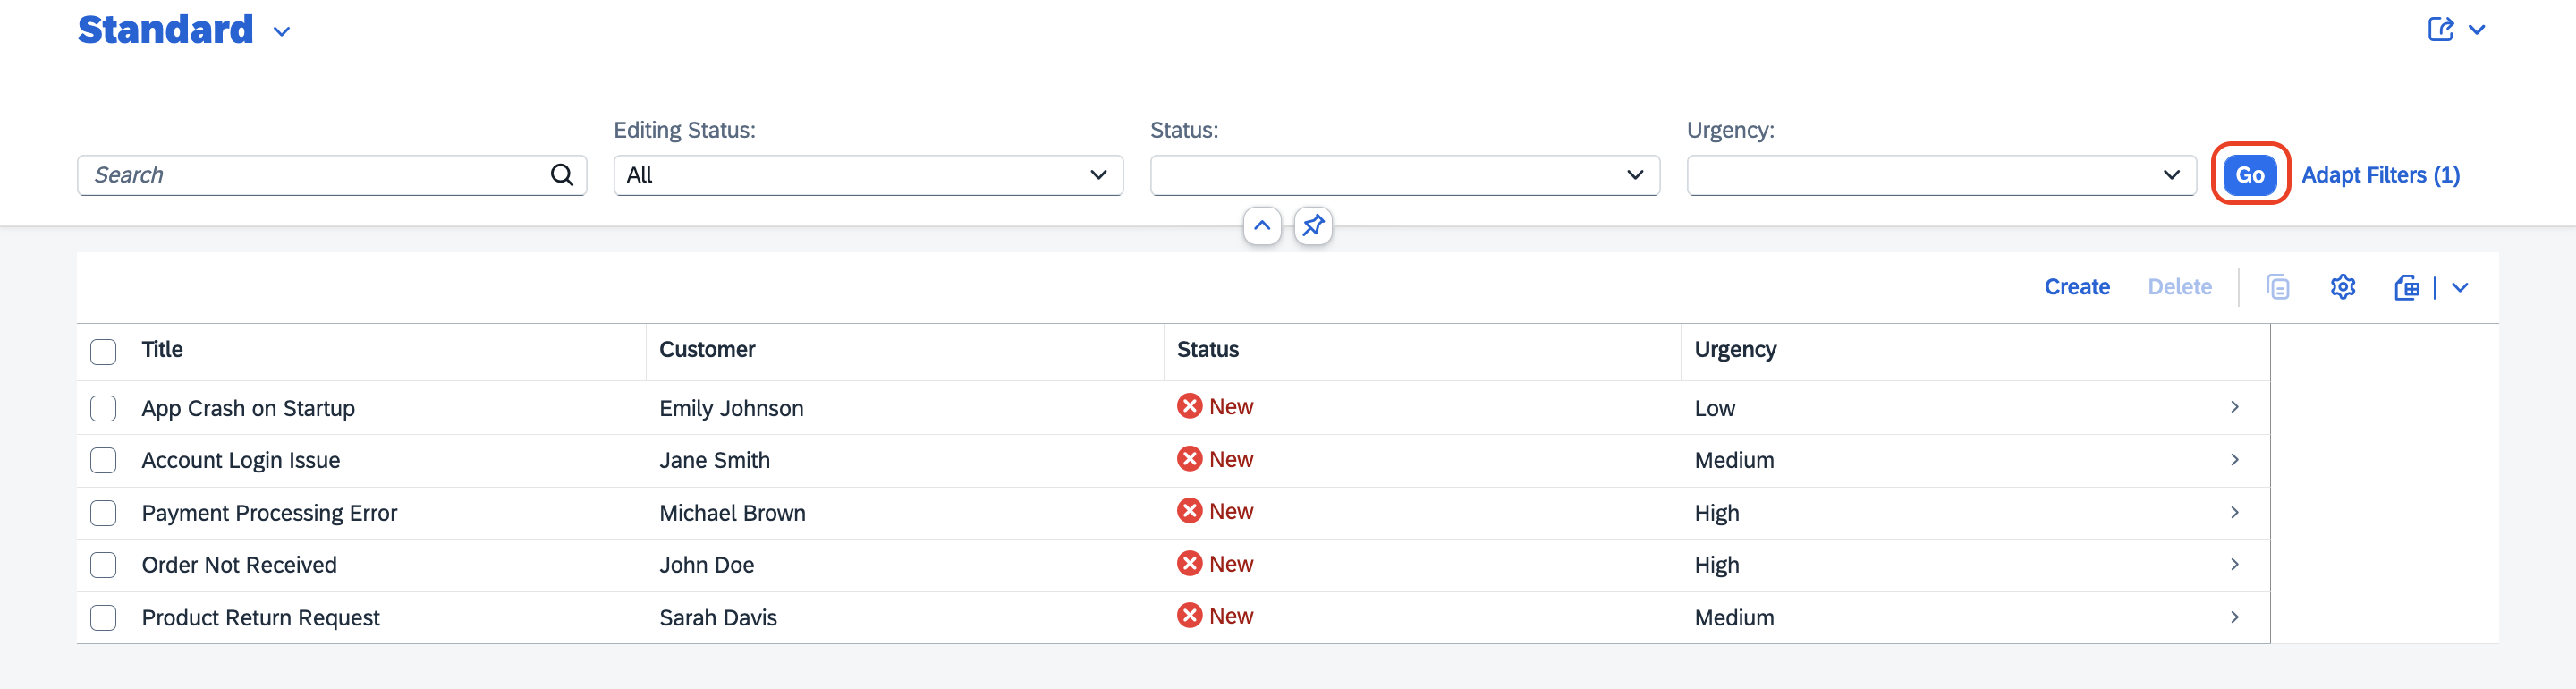
单击 Go,加载所有事件。
单击 Create。
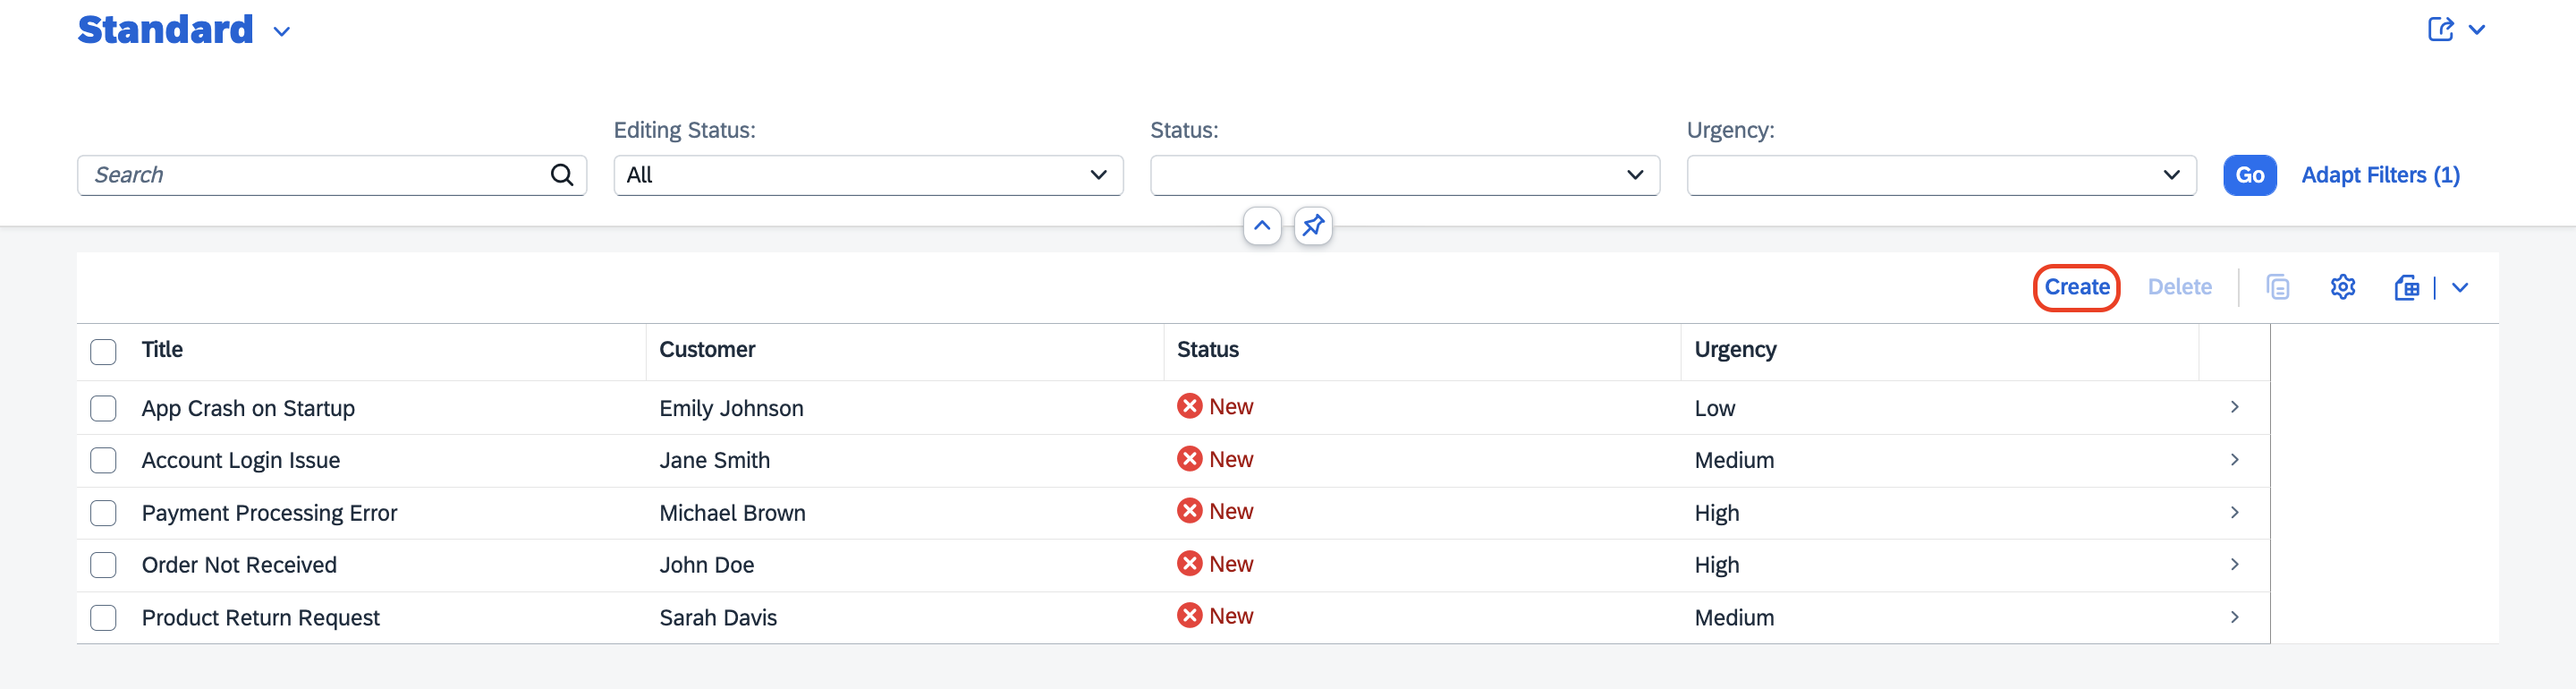
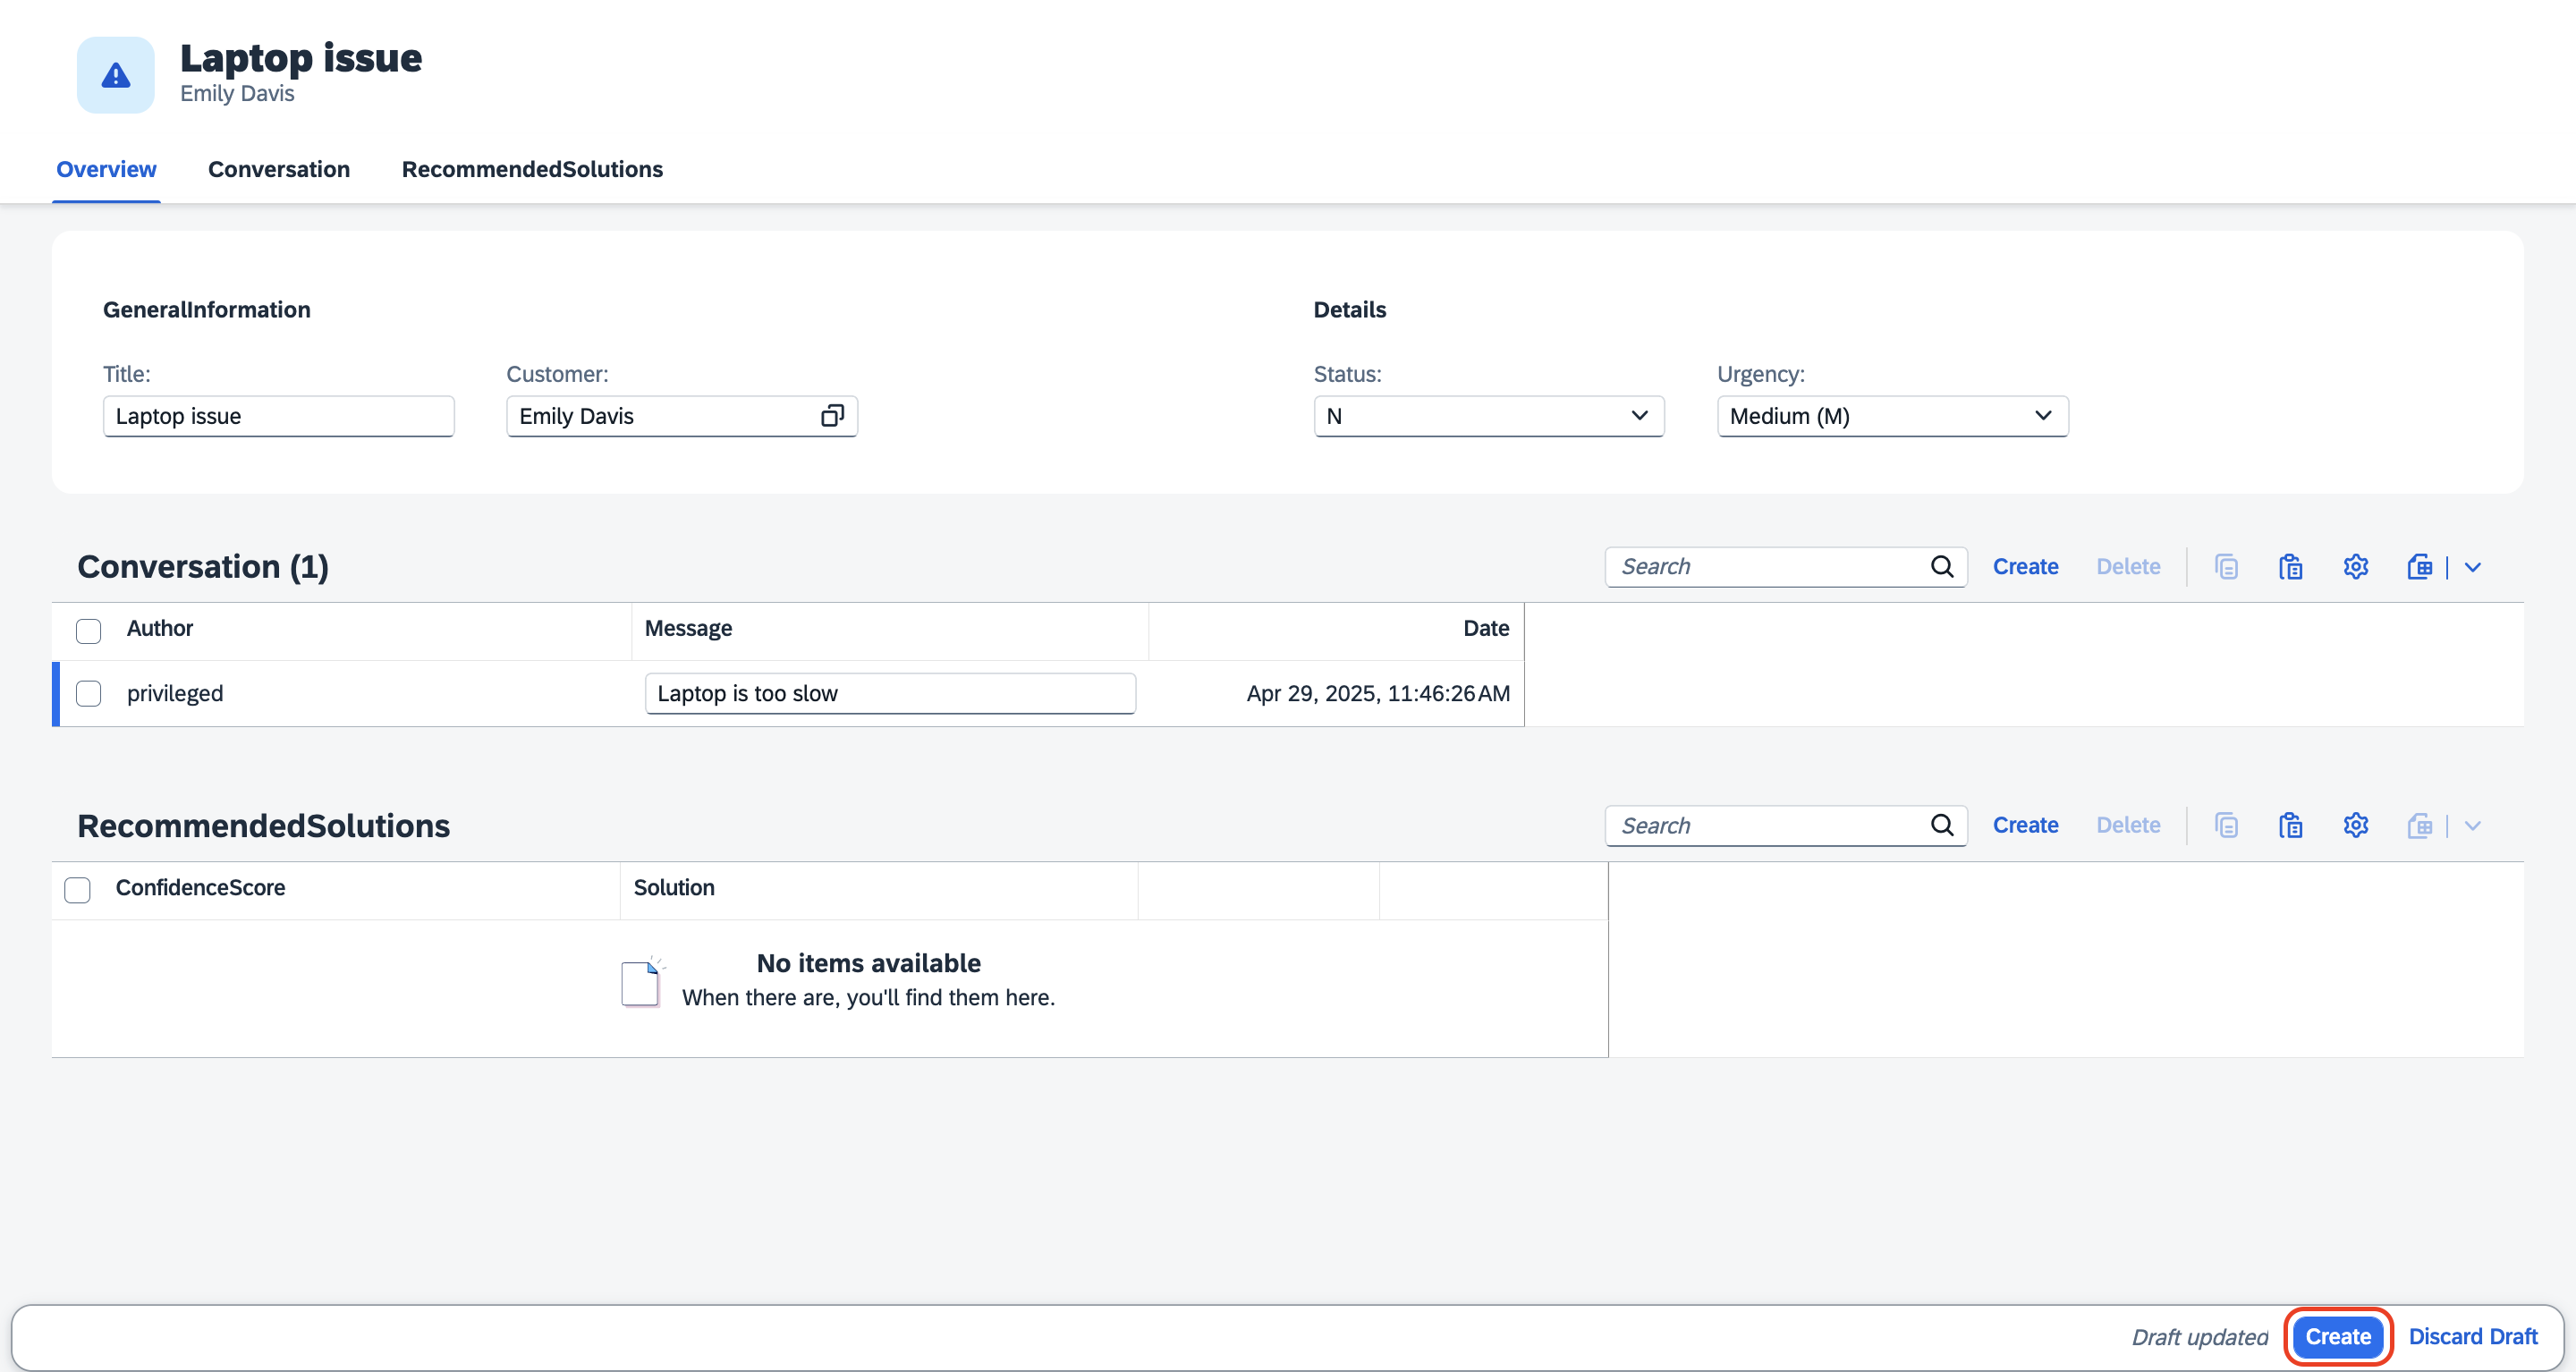
填写事件详细信息:
在 Title 字段中输入 Laptop issue。
在 Customer 下拉菜单中选择一个客户。

Status 和 Urgency 字段保留默认值。
在 Conversation 下单击 Create。

将 Message 输入为 Laptop is too slow。
单击 Create。
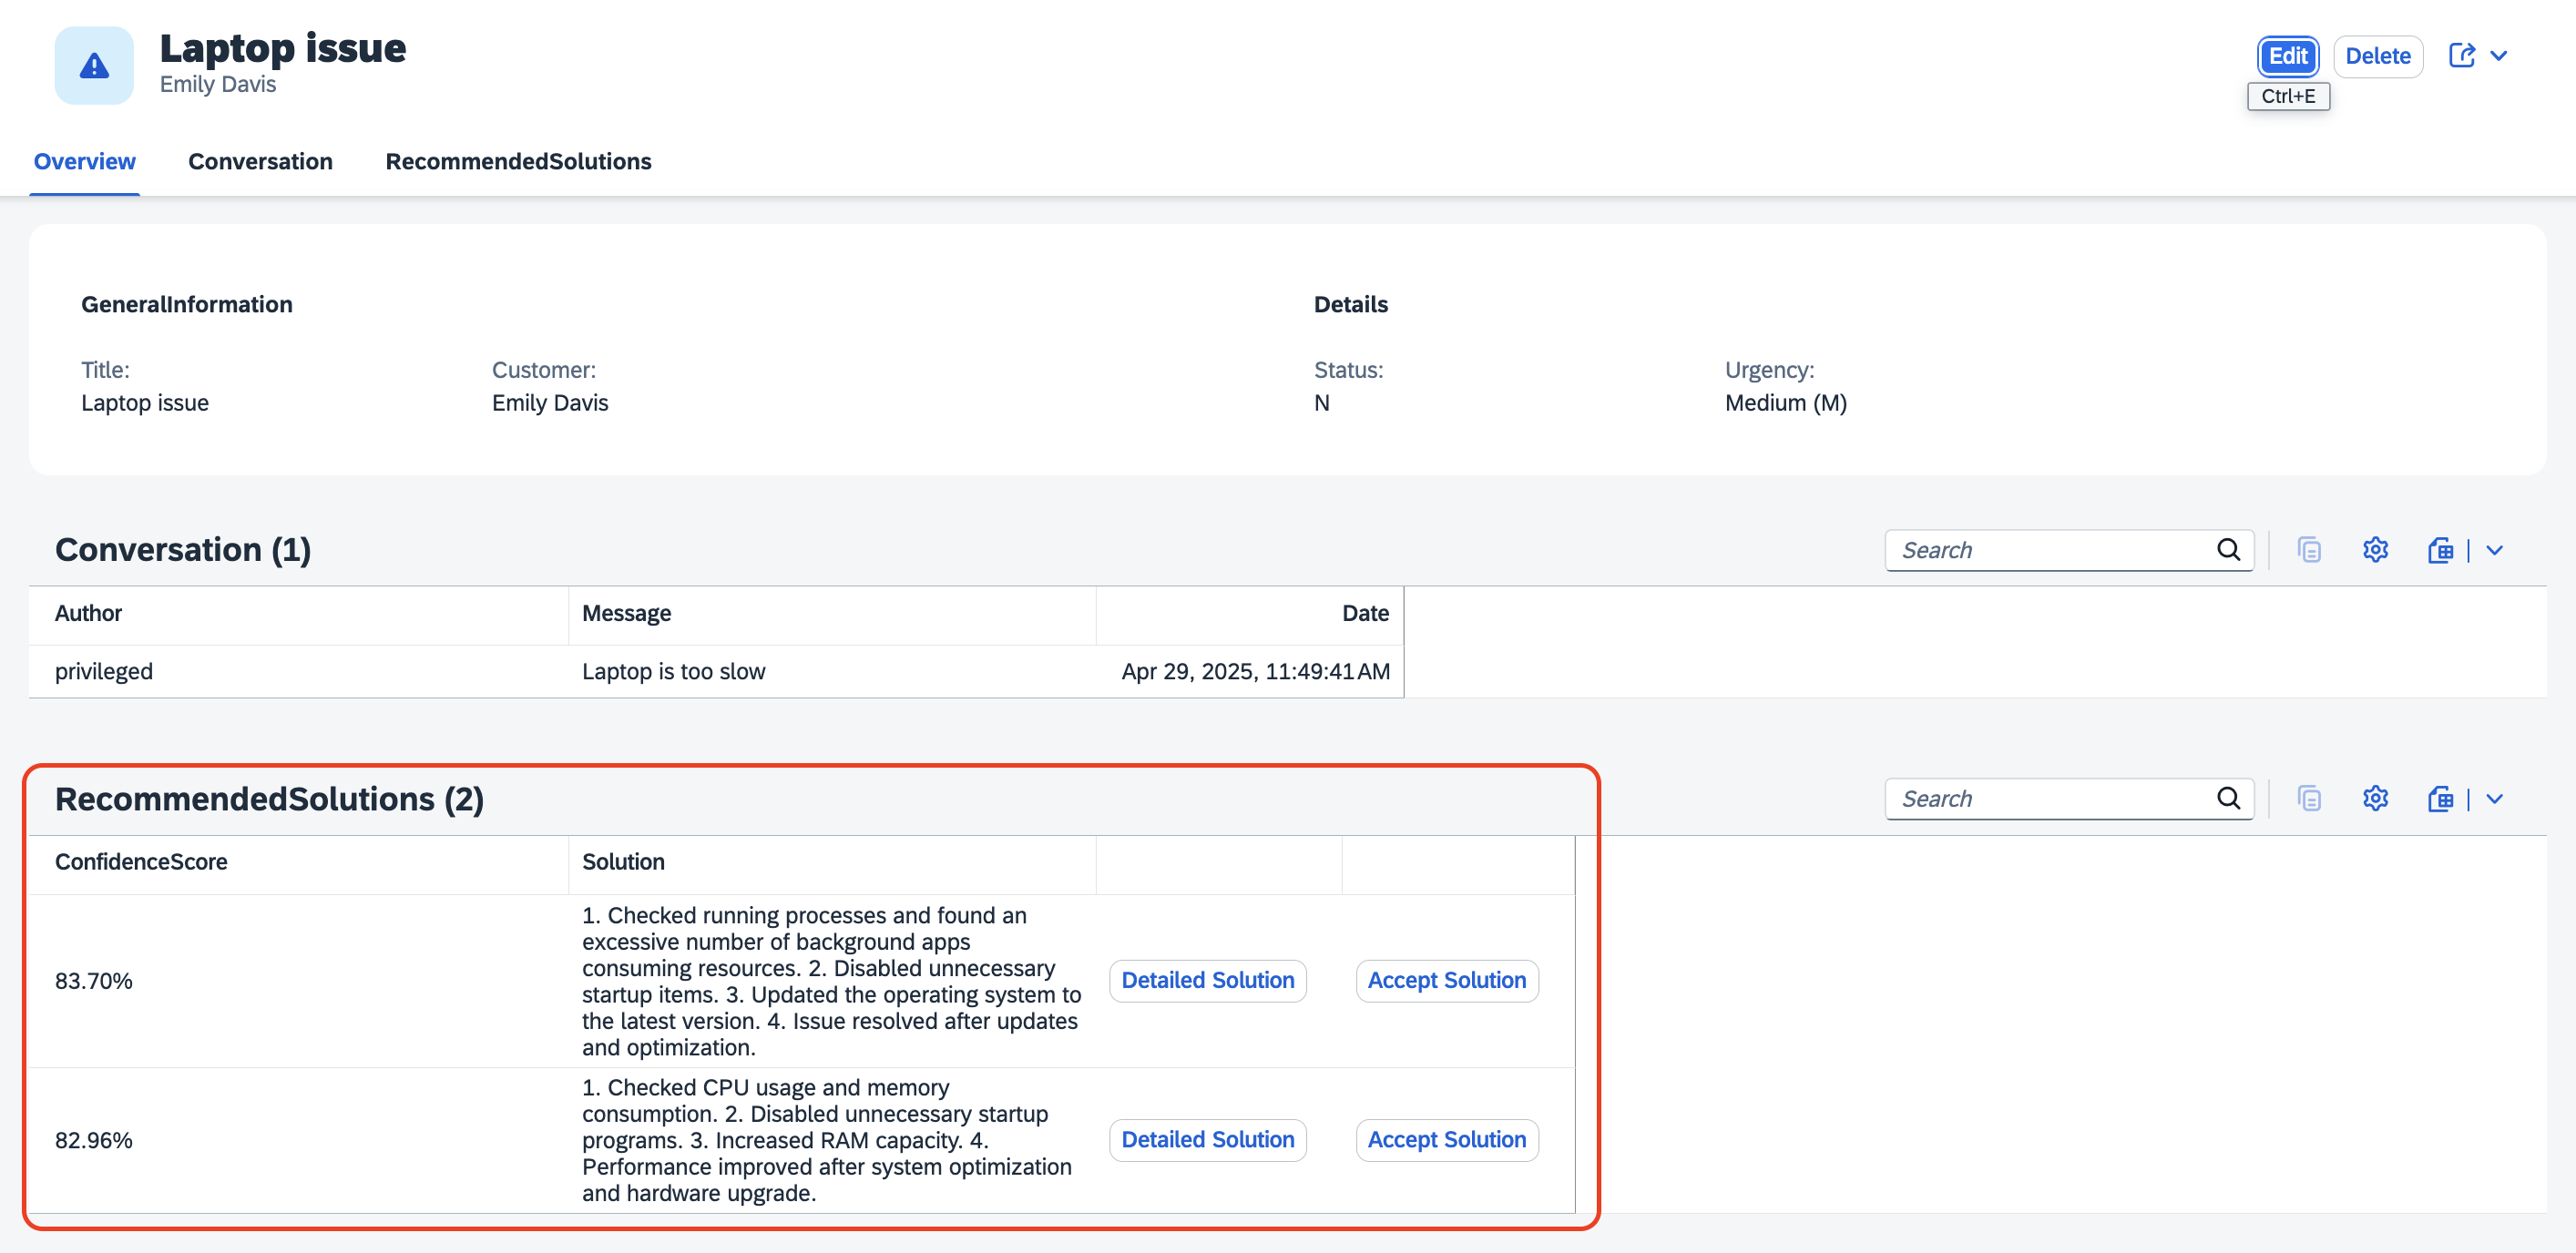
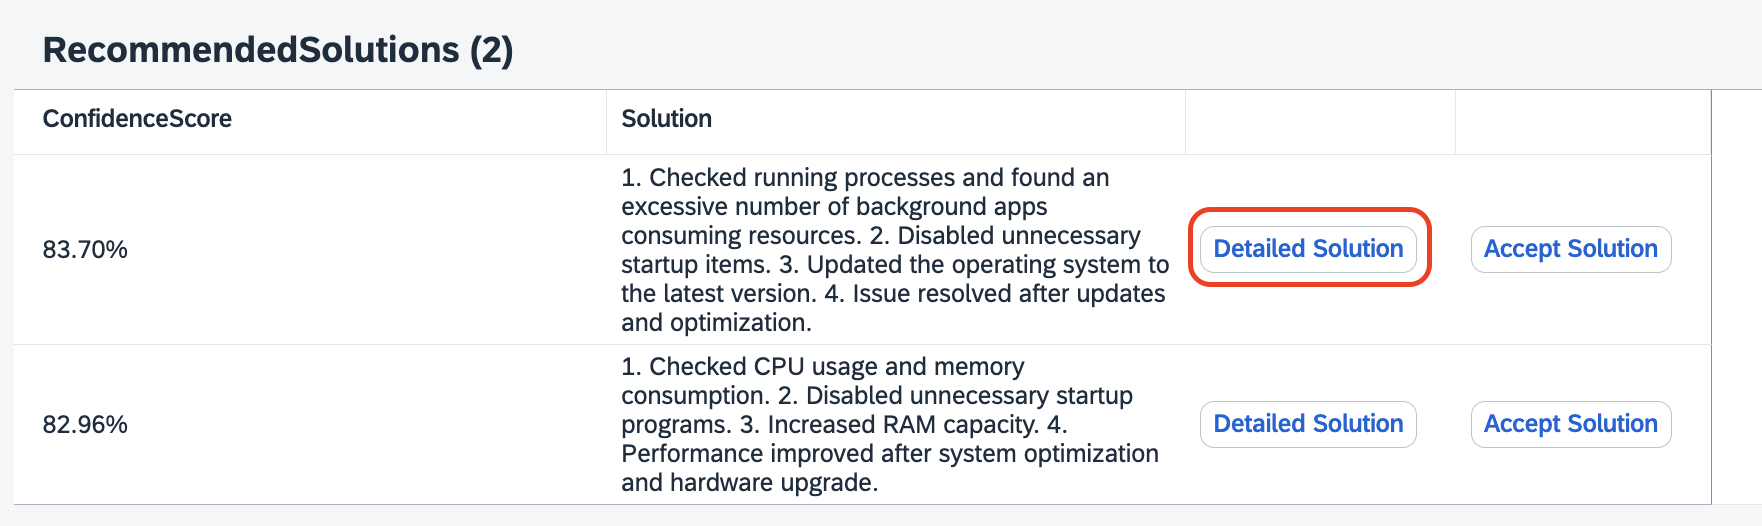
在 Recommended Solutions 下,可以看到带有置信度分数的解决方案。
单击你认为有意义且置信度分数最高的 Accept Solution。
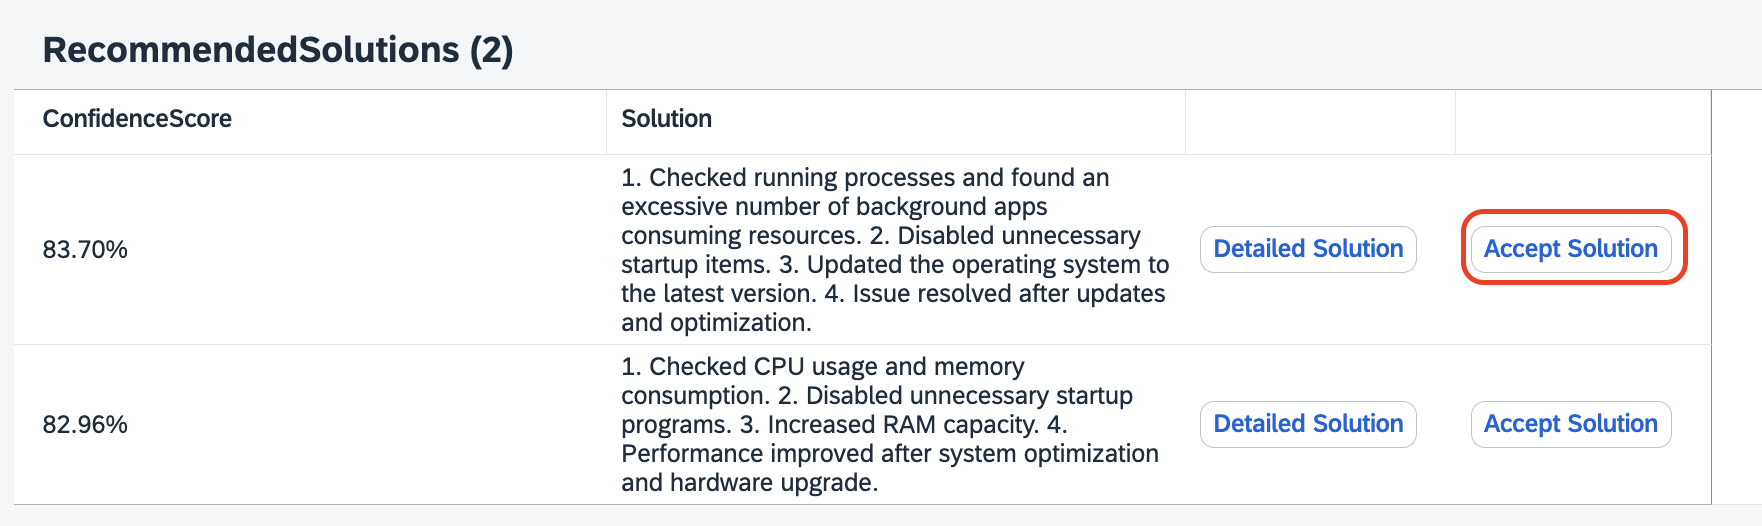
如果推荐的解决方案有效,在下拉菜单中单击 Yes,然后再次单击 Accept Solution。
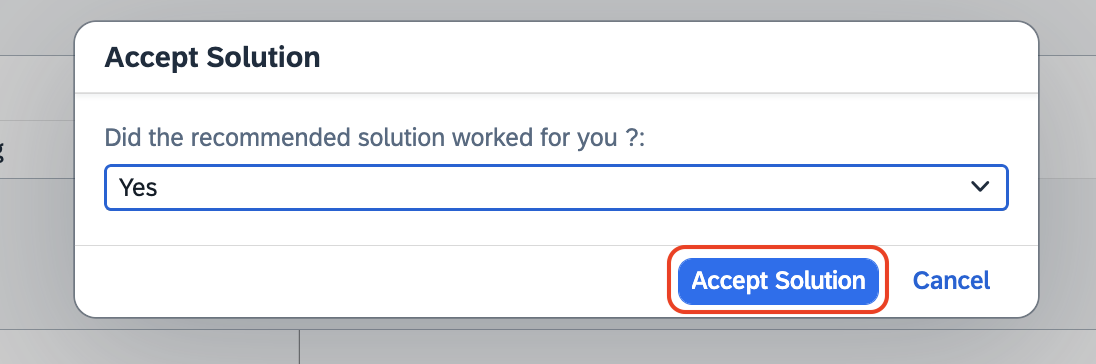
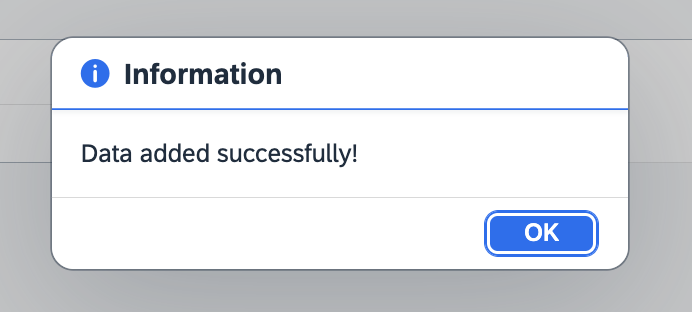
你会收到 Data added successfully! 的通知。
如果想查看详细解决方案,单击 Detailed Solution,它会给出该问题的详细分步解决方案。
端到端测试:本地运行(e2e-testing)
测试 Incident Management 应用
前提条件
扩展 Incident Management 应用
[!Note] 如果存在 app/index.html 和 app/launchpadPage.html 文件,请删除它们。
导入数据
打开终端,使用以下命令启动应用:
npm install
cds watch --profile hybrid
打开
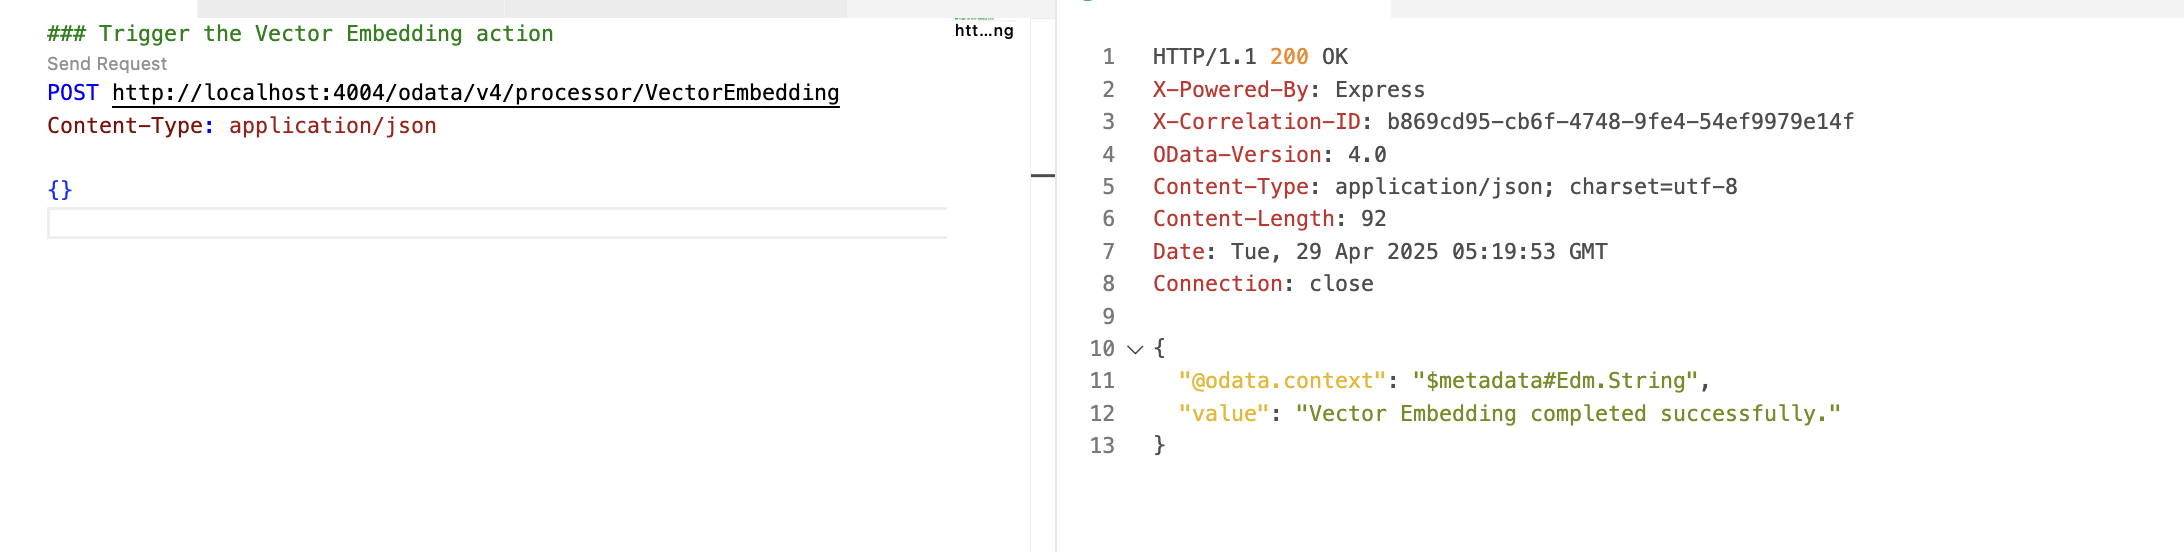
request.http文件,单击 Send Request。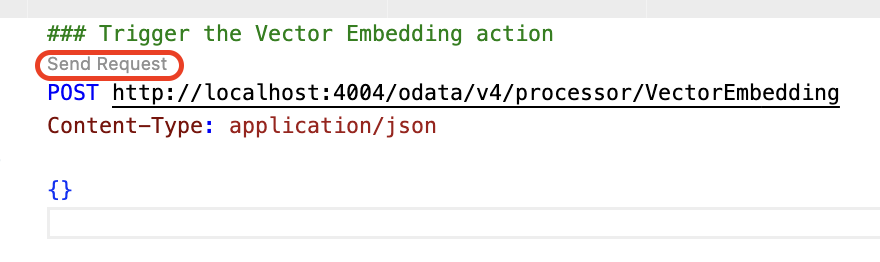
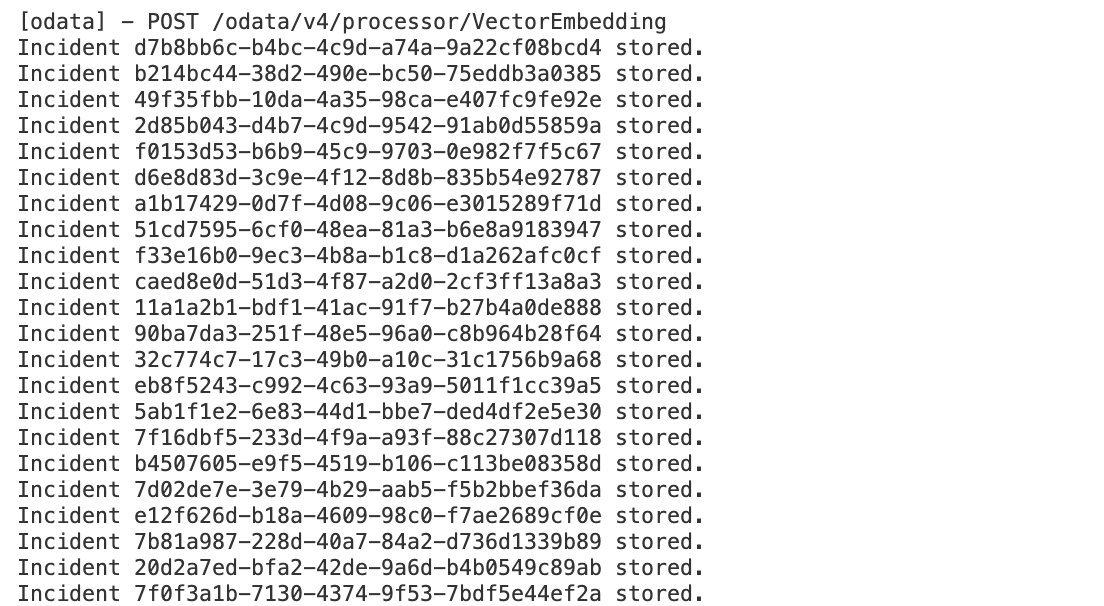
在终端中,可以看到
Incidents.csv文件中的数据正在写入。请稍等片刻,直到所有数据写入完成。
完成后会收到 200 的响应。
在终端中向上滚动,找到应用运行信息。单击 localhost 运行所在的 URL 以访问应用。

[!Tip] 按以下方式在浏览器中打开 URL:
Windows:Ctrl + 单击 URL
Mac:command + 单击 URL
端到端测试
打开应用后,单击 Web Applications 下的 URL。
单击 Go,加载所有事件。
单击 Create。
填写事件详细信息:
在 Title 字段中输入 Laptop issue。
在 Customer 下拉菜单中选择一个客户。
Status 和 Urgency 字段保留默认值。
在 Conversation 下单击 Create。
将 Message 输入为 Laptop is too slow。
单击 Create。
在 Recommended Solutions 下,可以看到带有置信度分数的解决方案。
单击你认为有意义且置信度分数最高的 Accept Solution。
如果推荐的解决方案有效,在下拉菜单中单击 Yes,然后再次单击 Accept Solution。
你会收到 Data added successfully! 的通知。
如果想查看详细解决方案,单击 Detailed Solution,它会给出该问题的详细分步解决方案。
返回主页,以便部署到 Cloud Foundry 运行时
使用 Joule 添加示例数据
前提条件
你已按照 Create Entities 中的步骤创建了数据模型。
添加示例数据
上一步已定义数据实体。接下来使用 Joule 创建一些示例数据,用于应用的本地测试。
选择 Joule 图标。在文本框中开始输入
/cap,然后选择 /cap-gen-data。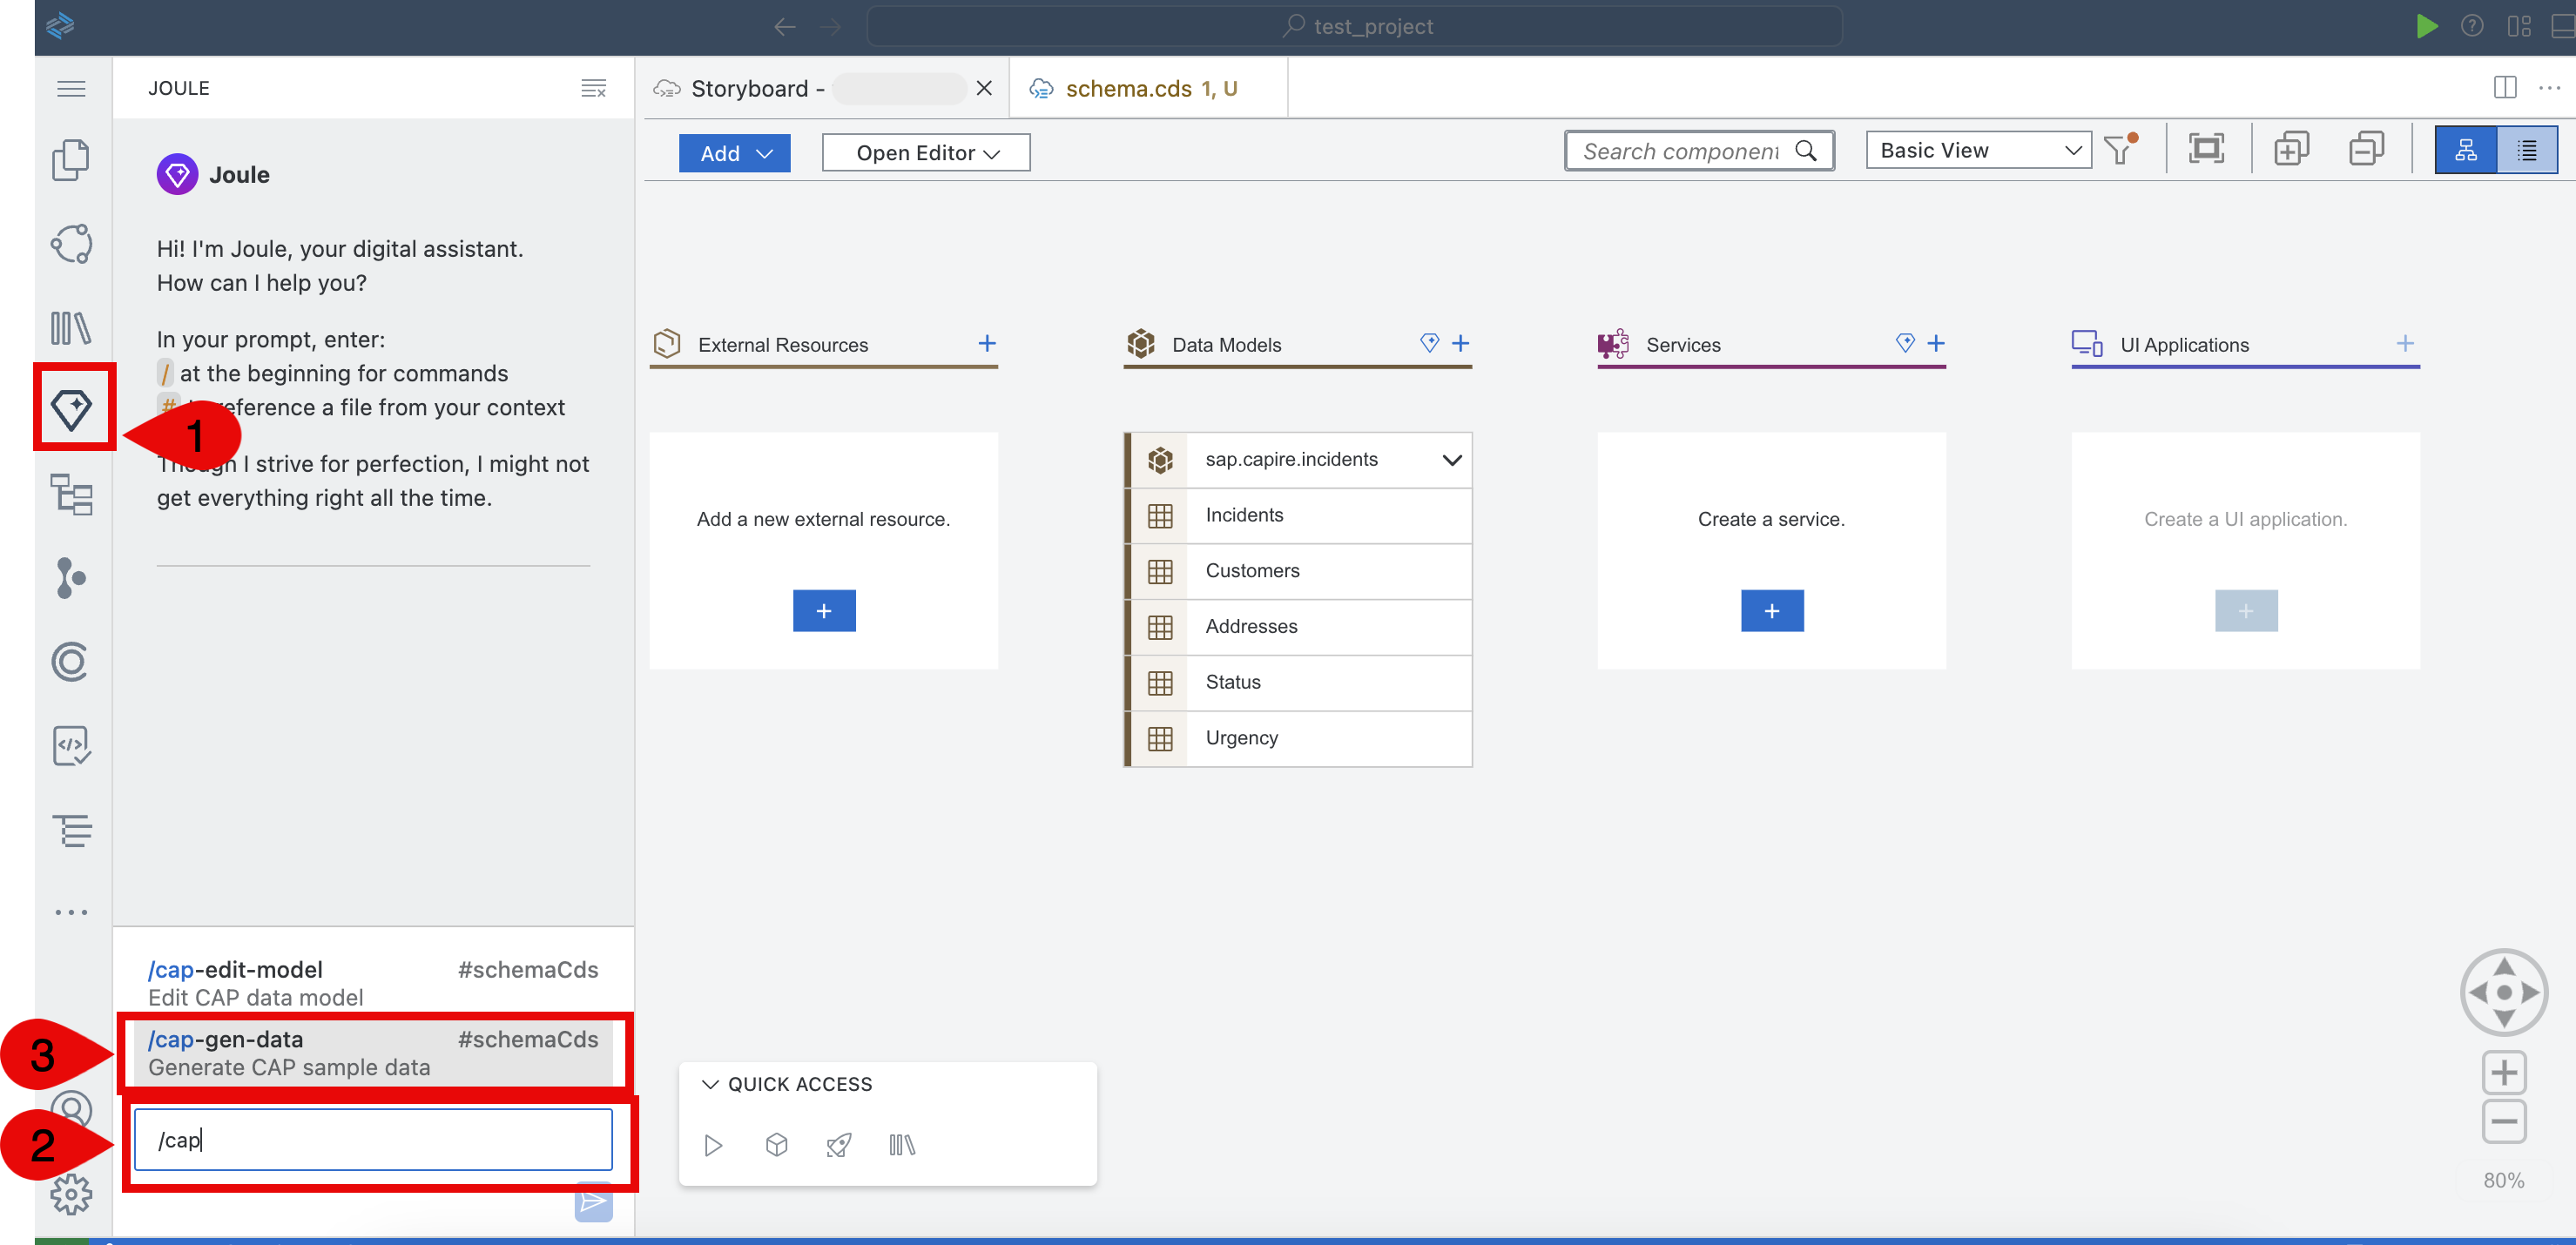
注意: 默认情况下,文本框中应显示 /cap-gen-data #db/schema.cds。
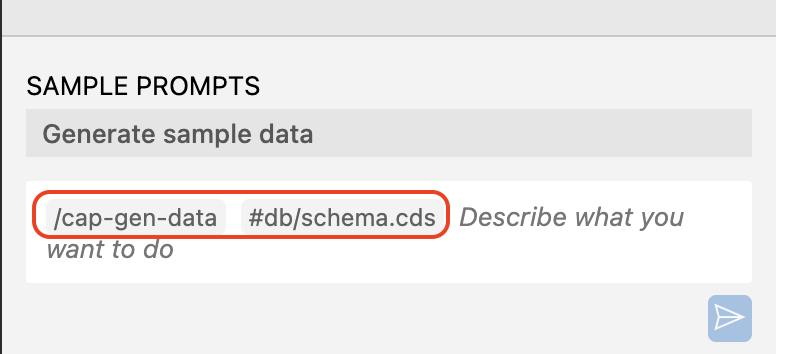
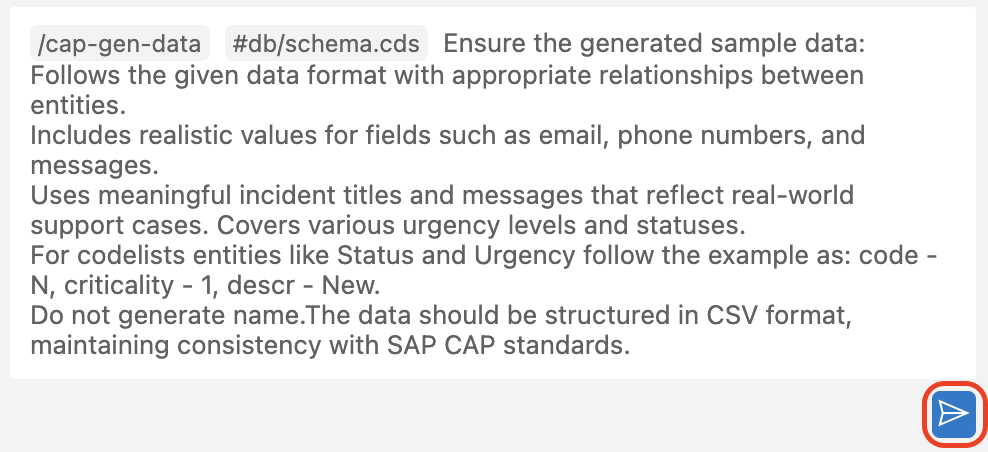
Joule 提示词会预填为 /cap-gen-data #db/schema.cds。粘贴以下提示词以生成示例数据。
Ensure the generated sample data: Follows the given data format with appropriate relationships between entities.
Includes realistic values for fields such as email, phone numbers, and messages.
Uses meaningful incident titles and messages that reflect real-world support cases. Covers various urgency levels and statuses.
For codelists entities like Status and Urgency follow the example as: code - N, criticality - 1, descr - New.
Do not generate name column.The data should be structured in CSV format, maintaining consistency with SAP CAP standards.
选择 Send 图标。
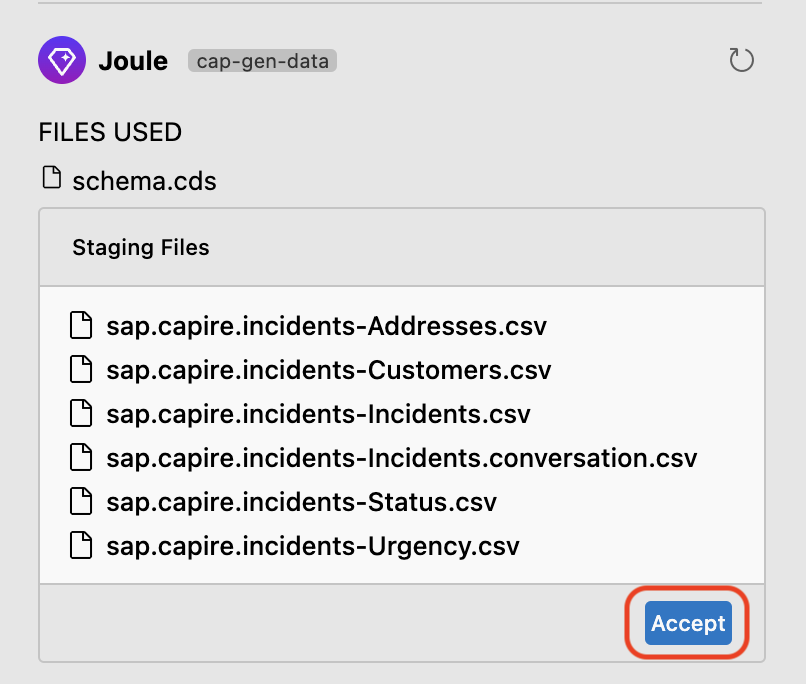
Joule 会按提供的 schema 创建一组包含示例数据的 .csv 文件。选择 Accept。
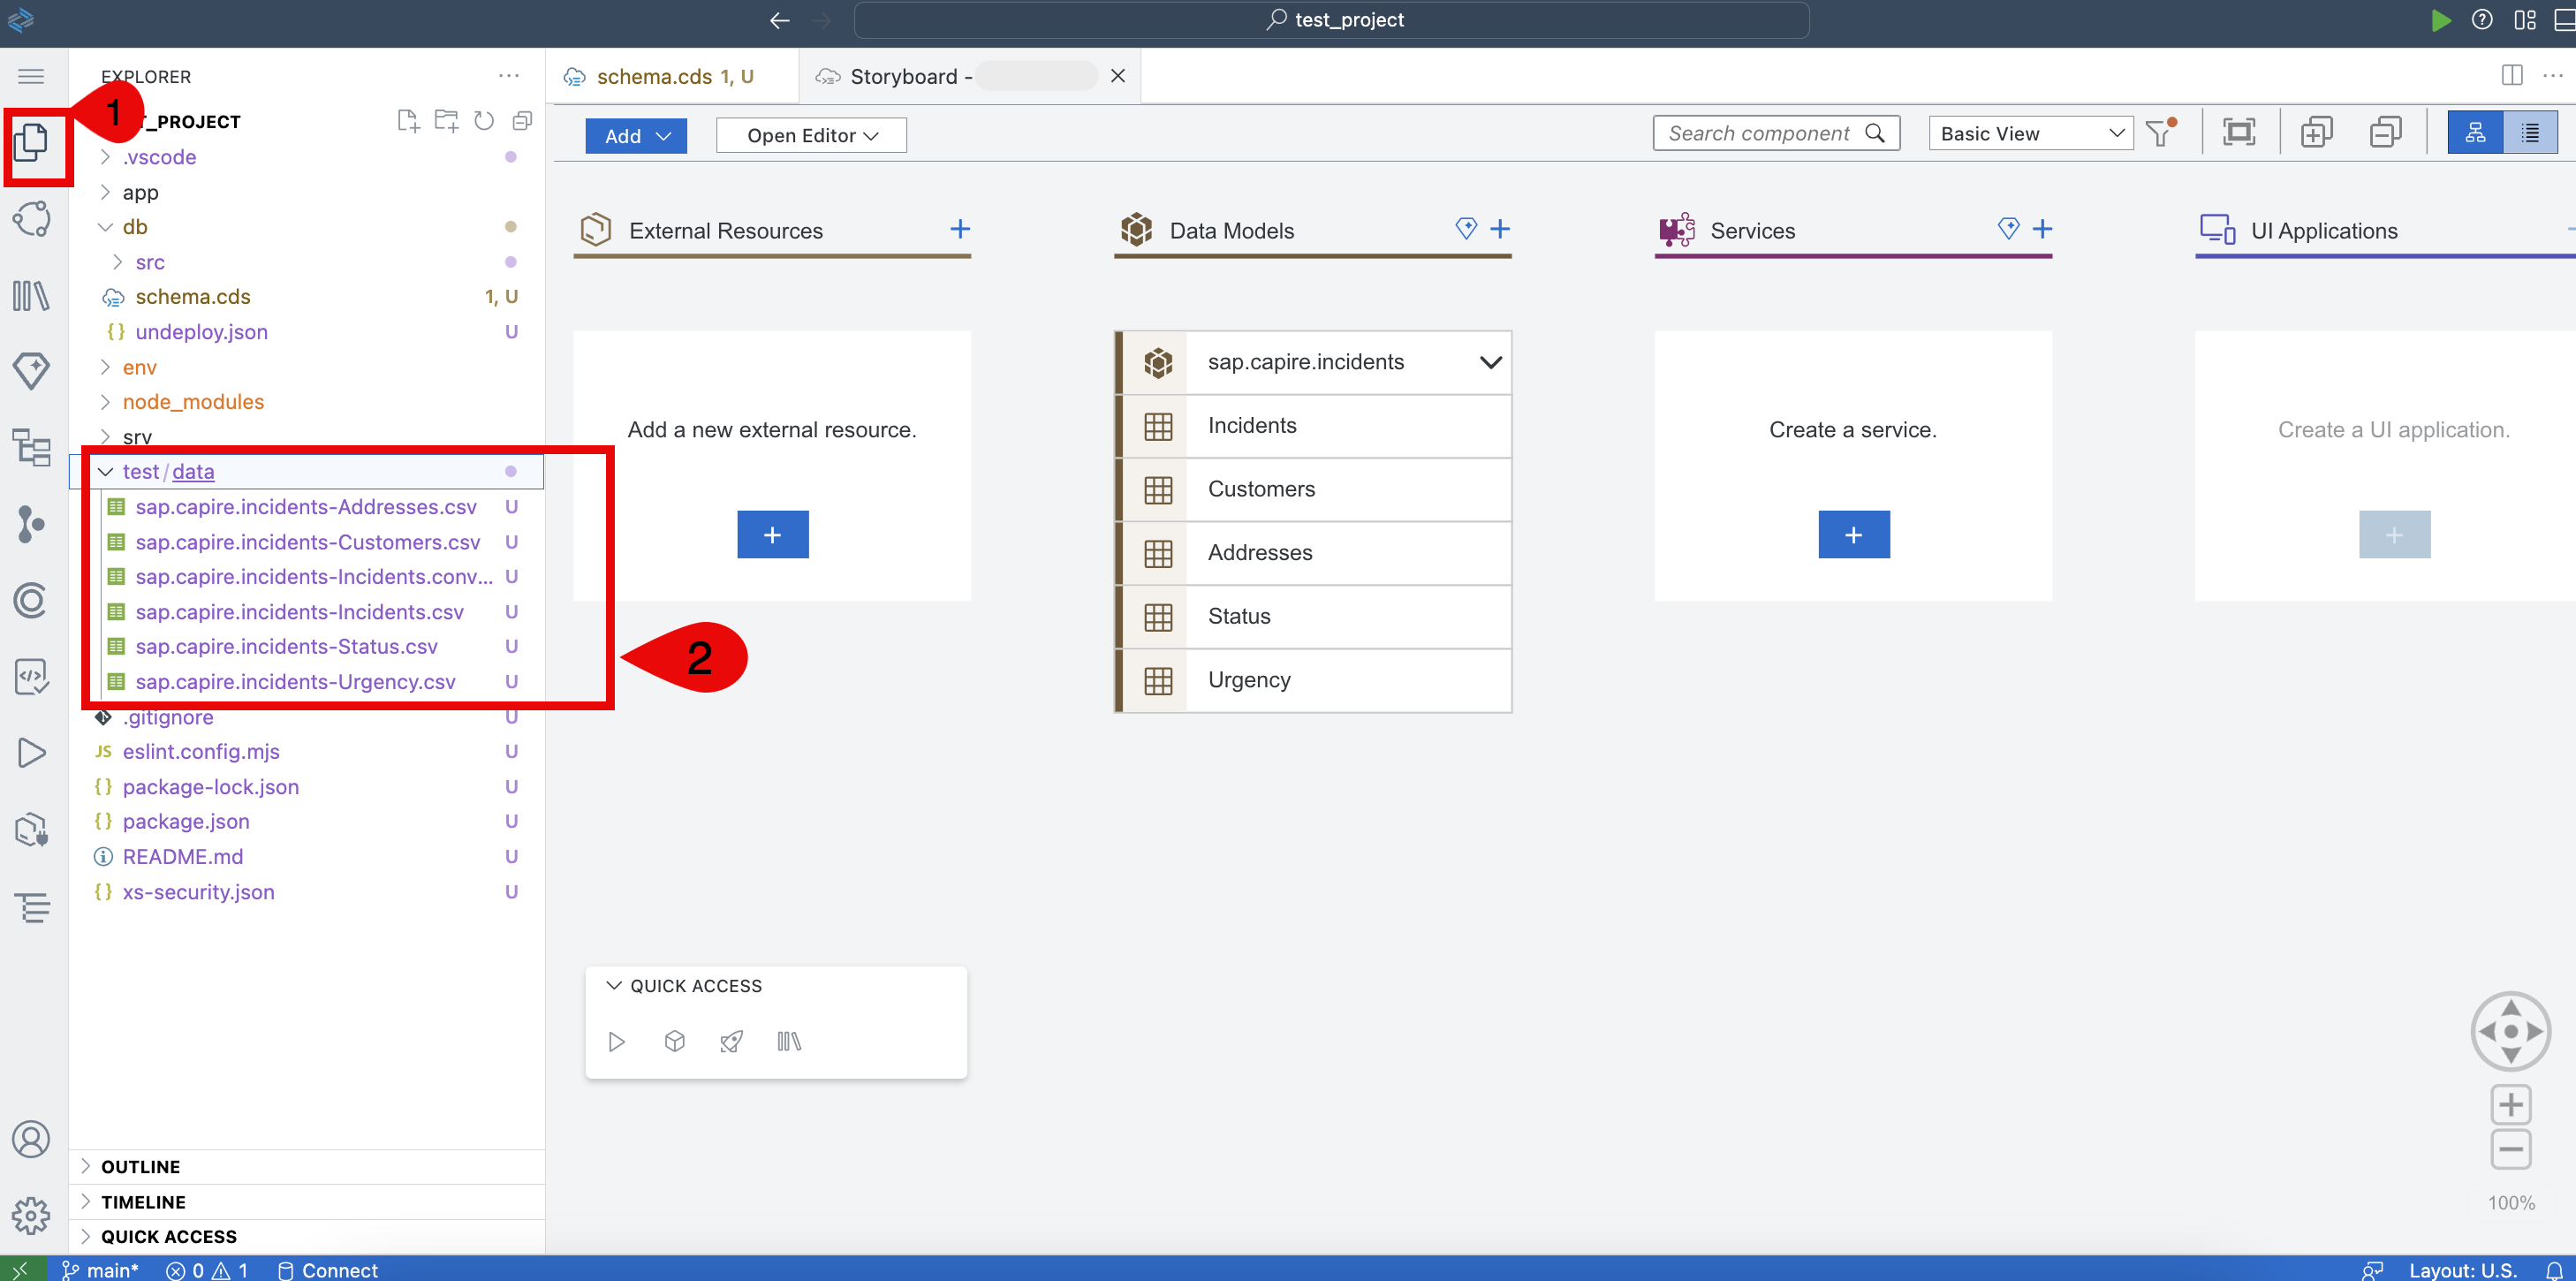
所有生成的 .csv 文件都会保存在项目的 test/data 文件夹中。
[!Note] 如果想了解如何手工配置数据,请参考 Add Initial Data
下一步
添加 CDS 服务
扩展 Incident Management 应用
前提条件
按照 Add dependencies for SAP Cloud SDK for AI 添加 SAP Cloud SDK for AI 所需的依赖,并为生产用途准备好数据。
扩展 Incident Management 应用
本节中,你将上传数据、为其生成文本嵌入,并将嵌入存储到向量数据库中。
在
srv下新建名为incidents.csv的文件,从 incidents.csv 复制内容。在
srv下新建名为vector-embedding.js的文件,粘贴以下内容。
const fs = require("fs");
const csv = require("csv-parser");
const resourceGroup = 'default';
const embeddingModelName = 'text-embedding-ada-002';

async function loadCSV(filePath) {
  return new Promise((resolve, reject) => {
    const results = [];
    fs.createReadStream(filePath)
      .pipe(csv())
      .on("data", data => results.push(data))
      .on("end", () => resolve(results))
      .on("error", err => reject(err));
  });
}

async function vectorEmbedding() {
  try {
    const { AzureOpenAiEmbeddingClient } = await import('@sap-ai-sdk/langchain');
    const db = await cds.connect.to("db");
    const { vectorEmbeddings } = db.entities;
    const incidents = await loadCSV(__dirname + "/incidents.csv");
    const embeddingClient = new AzureOpenAiEmbeddingClient({
      modelName: embeddingModelName,
      resourceGroup: resourceGroup
    },{
      destinationName: 'generative_ai_hub'
    });

    for (const incident of incidents) {
      const { ID, Title, Description, Resolution } = incident;
      const text = `${Title}. ${Description}. ${Resolution}`.trim();
      if (!text) continue;

      const embeddingResult = await embeddingClient.embedDocuments(text);
      const embedding = embeddingResult[0];
      if (!Array.isArray(embedding)) continue;
      await new Promise(res => setTimeout(res, 500));

     await INSERT.into(vectorEmbeddings).entries({
        metadata: ID,
        text_chunk: text,
        embedding: JSON.stringify(embedding),
        solution: Resolution
      });

      console.log(`Incident ${ID} stored.`);
    }

    return "Vector Embedding completed successfully.";
  } catch (e) {
    console.error("Embedding error:", e);
    return `Error: ${e.message}`;
  }
}

module.exports = { vectorEmbedding };
[!Tip] vectorEmbedding 函数从 CSV 文件读取事件数据,使用 Azure OpenAI 为每个事件生成文本嵌入,并将结果(包括嵌入向量)存储到名为 vectorEmbeddings 的数据库表中。
打开
srv/service.cds文件,用下面的代码片段替换 ProcessorService 服务。
using { sap.capire.incidents as my } from '../db/schema.cds';

@requires: 'Support'
service ProcessorService {
    @odata.draft.enabled
    entity Incidents as projection on my.Incidents;
        entity Solutions as projection on my.Incidents.solutions actions {
            action details() returns String;
            action acceptSolution(input1: Boolean @title : 'Did the recommended solution work for you? ?') returns String;
    };
    entity vectorEmbeddings as projection on my.vectorEmbeddings  excluding {
        embedding
    };

    @readonly
    entity Customers as projection on my.Customers;
    action VectorEmbedding() returns String;
}
[!Tip] ProcessorService 正在更新,以纳入解决方案和向量嵌入相关实体。同时定义了一个名为 VectorEmbedding 的 action,用于检索解决方案详情。
在
srv下打开service.js,用以下代码片段替换现有内容。
const cds = require('@sap/cds');
const { vectorEmbedding } = require("./vector-embedding");
const natural = require('natural');
const tokenizer = new natural.WordTokenizer();
const {vectorEmbeddings} = cds.entities;
const resourceGroup = 'default';
const embeddingModelName = 'text-embedding-ada-002';
const stopWords = new Set(["a", "an", "the", "is", "in", "on", "of", "and", "to", "with", "for", "this", "that", "it", "by", "at"]);

class ProcessorService extends cds.ApplicationService {
  /** Registering custom event handlers */
  async init() {
    this.after("CREATE", "Incidents", (req) => this.getRagResponse(req));
    this.on("VectorEmbedding", vectorEmbedding);

    this.on('acceptSolution', async (req) => {
      if (!req.data.input1) return req.reject(400, "Solution acceptance is required.");
      let result = await cds.run(SELECT.from("Incidents.solutions").where({ ID: req.params[1].ID }));
      if (!result.length) return req.reject(404, "No solutions found for the given incident.");
      await cds.run(UPDATE('Incidents').set({ status_code: 'R' }).where({ ID: req.params[0].ID }));
      await this.generateAndStoreEmbeddings(req.params[0].ID, result[0].solution);
      req.info("Data added successfully!");
    });

    this.on('details', async (req) => {
      let result = await cds.run(SELECT.from("Incidents.solutions").where({ ID: req.params[1].ID }));
      const aioutput = await this.getDetails(result[0].solution);
      req.info(aioutput);
    });

    return super.init();
  }

  async preprocessInput(issueTitle) {
    if (!issueTitle) return "";
    let processedTitle = issueTitle.toLowerCase().trim();
    processedTitle = processedTitle.replace(/[^a-zA-Z0-9 ]/g, '');

    let words = tokenizer.tokenize(processedTitle);
    words = words.filter(word => !stopWords.has(word));
    const stemmedWords = words.map(word => natural.PorterStemmer.stem(word));
    return stemmedWords.join(" ");
  }

  /** Generate and store embeddings */
  async generateAndStoreEmbeddings(IncidentId, solution) {
    try {
      const { AzureOpenAiEmbeddingClient } = await import('@sap-ai-sdk/langchain');
      const db = await cds.connect.to("db");
      const { Incidents } = db.entities;
      const [incident] = await db.read("Incidents").where({ ID: IncidentId }).columns("title");
      if (!incident) throw new Error("Incident not found");

      const conversation = await db.read("Incidents.conversation").where({ up__ID: IncidentId }).columns("message");
      const messages = conversation.map(c => c.message).join(' ').trim();

      const textData = `${incident.title} ${messages}`.trim();
      if (!textData) throw new Error("No valid text data found for embedding.");
      let textSplits = ["this is test data"];
      const embeddingClient = new AzureOpenAiEmbeddingClient({
        modelName: embeddingModelName,
        resourceGroup: resourceGroup
      },{
        destinationName: 'generative_ai_hub'
      });

      const embeddingResult = await embeddingClient.embedDocuments(textData);
      const embedding = embeddingResult[0];
      if (!Array.isArray(embedding)) throw new Error("Invalid embedding generated");

      await INSERT.into("vectorEmbeddings").entries({
        metadata: `Incident ID: ${IncidentId}`,
        text_chunk: textData,
        embedding: JSON.stringify(embedding),
        solution
      });

      console.log("Embedding stored successfully!");
    } catch (error) {
      console.error("Error storing embedding:", error);
    }
  }

  /** RAG-based Response Retrieval */
  async getRagResponse(req) {
    try {
      const { AzureOpenAiEmbeddingClient } = await import('@sap-ai-sdk/langchain');
      const db = await cds.connect.to("db");
      const [incident] = await db.read("Incidents").where({ ID: req.ID }).columns("title");
      if (!incident) throw new Error("Incident not found");

      const conversation = await db.read("Incidents.conversation").where({ up__ID: req.ID }).columns("message");
      const messages = conversation.map(c => c.message).join(' ').trim();
      let userQuery = `${incident.title} ${messages}`.trim();
      userQuery = await this.preprocessInput(userQuery);

      const embeddingClient = new AzureOpenAiEmbeddingClient({
        modelName: embeddingModelName,
        maxRetries: 0,
        resourceGroup: resourceGroup
      },{
        destinationName: 'generative_ai_hub'
      });

      let embedding = await embeddingClient.embedQuery(userQuery);

      const embedding_str = `'[${embedding.toString()}]'`
      const selectStmt = `SELECT TOP 3 *,TO_NVARCHAR(solution) as PAGE_CONTENT,COSINE_SIMILARITY(embedding, TO_REAL_VECTOR(${embedding_str})) as SCORE FROM ${vectorEmbeddings} ORDER BY SCORE DESC`;
      const ragResponse = await db.run(selectStmt);

      let solutionsMap = new Map();
      ragResponse.forEach((item) => {
        if (item.PAGE_CONTENT) {
          solutionsMap.set(item.PAGE_CONTENT, Math.max(solutionsMap.get(item.PAGE_CONTENT) || 0, item.SCORE));
        }
      });

      let solutions = Array.from(solutionsMap, ([content, score]) => ({ content, score }))
        .filter((item) => item.score > 0.70)
        .sort((a, b) => b.score - a.score);

      const solutionEntries = solutions.map((s) => ({
        up__ID: req.ID,
        solution: s.content,
        confidence: `${(s.score * 100).toFixed(2)}%`
      }));

      await INSERT.into("Incidents.solutions").entries(solutionEntries);
      return solutionEntries;
    } catch (error) {
      console.error("Error retrieving RAG response:", error);
      throw error;
    }
  }
    async getDetails(userQuery){
    try{
        const { OrchestrationClient } = await import ('@sap-ai-sdk/orchestration');
        const orchestrationClient = new OrchestrationClient({
        llm: {
            model_name: 'gpt-4o'
        },
        templating: {
            template: [
            {
                role: 'user',
                content: `In about 100 words, describe the following recommended solution: '${userQuery}'. Start by briefly stating the problem this solution addresses. Then, present the solution in a step-by-step format using numbered bullet points (1., 2., 3., etc.). Each step should be clear and action-oriented. End with any important considerations the user should keep in mind. Keep the description professional, concise, and easy to follow.`
            }
            ]
        }
        }, resourceGroup,
        {
        destinationName: 'generative_ai_hub'
        });
        const response = await orchestrationClient.chatCompletion();
        return response.getContent();
    } catch (error) {
      throw new Error("No response received from orchestration client.");
    }
  }
}

module.exports = { ProcessorService };
[!Tip] preprocessInput 会对问题标题进行清洗、分词、去停用词、词干提取和规范化,输出处理后的字符串。
generateAndStoreEmbeddings 函数为事件数据(标题和对话)生成 AI 嵌入,并将其与解决方案一起存储到 vectorEmbeddings 表中。
getRagResponse 函数基于嵌入的相似度搜索,使用 RAG(Retrieval-Augmented Generation,检索增强生成)为事件获取最相关的解决方案。
getDetails 函数接收用户查询作为输入,通过 Orchestration Client 调用 SAP 的 Generative AI Hub,生成结构化的解决方案摘要。
在项目根目录下新建名为
request.http的文件,粘贴以下内容。
### Trigger the Vector Embedding action
POST http://localhost:4004/odata/v4/processor/VectorEmbedding
Content-Type: application/json

{}
添加注解以增强 Fiori UI
打开
app/incident-management/annotation.cds文件,用以下代码替换。
using ProcessorService as service from '../../srv/service';
using from '../../db/schema';

annotate service.Incidents with @(
    UI.FieldGroup #GeneratedGroup : {
        $Type : 'UI.FieldGroupType',
        Data : [
            {
                $Type : 'UI.DataField',
                Value : title,
            },
            {
                $Type : 'UI.DataField',
                Label : '{i18n>Customer}',
                Value : customer_ID,
            },
        ],
    },
    UI.Facets : [
        {
            $Type : 'UI.CollectionFacet',
            Label : '{i18n>Overview}',
            ID : 'i18nOverview',
            Facets : [
                {
            $Type : 'UI.ReferenceFacet',
            ID : 'GeneratedFacet1',
            Label : '{i18n>GeneralInformation}',
            Target : '@UI.FieldGroup#GeneratedGroup',
        },
                {
                    $Type : 'UI.ReferenceFacet',
                    Label : '{i18n>Details}',
                    ID : 'i18nDetails',
                    Target : '@UI.FieldGroup#i18nDetails',
                },],
        },
        {
            $Type : 'UI.ReferenceFacet',
            Label : '{i18n>Conversation}',
            ID : 'i18nConversations',
            Target : 'conversation/@UI.LineItem#i18nConversations',
        },
        {
            $Type : 'UI.ReferenceFacet',
            Label : '{i18n>RecommendedSolutions}',
            ID : 'i18nRecommendedSolutions',
            Target : 'solutions/@UI.LineItem#i18nRecommendedSolutions',
        },
    ],
    UI.LineItem : [
        {
            $Type : 'UI.DataField',
            Value : title,
            Label : '{i18n>Title}',
        },
        {
            $Type : 'UI.DataField',
            Value : customer.name,
            Label : '{i18n>Customer}',
        },
        {
            $Type : 'UI.DataField',
            Value : status.descr,
            Label : '{i18n>Status}',
            Criticality : status.criticality,
        },
        {
            $Type : 'UI.DataField',
            Value : urgency.descr,
            Label : '{i18n>Urgency}',
        },


    ],
);

annotate service.Incidents with {
    customer @Common.ValueList : {
        $Type : 'Common.ValueListType',
        CollectionPath : 'Customers',
        Parameters : [
            {
                $Type : 'Common.ValueListParameterInOut',
                LocalDataProperty : customer_ID,
                ValueListProperty : 'ID',
            },
            {
                $Type : 'Common.ValueListParameterDisplayOnly',
                ValueListProperty : 'firstName',
            },
            {
                $Type : 'Common.ValueListParameterDisplayOnly',
                ValueListProperty : 'lastName',
            },
            {
                $Type : 'Common.ValueListParameterDisplayOnly',
                ValueListProperty : 'email',
            },
            {
                $Type : 'Common.ValueListParameterDisplayOnly',
                ValueListProperty : 'phone',
            },
        ],
    }
};

annotate service.Incidents with @(
    UI.SelectionFields : [
        status_code,
        urgency_code,
    ]
);
annotate service.Incidents with {
    status @Common.Label : '{i18n>Status}'
};
annotate service.Incidents with {
    urgency @Common.Label : '{i18n>Urgency}'
};
annotate service.Incidents with {
    urgency @Common.ValueListWithFixedValues : true
};
annotate service.Urgency with {
    code @Common.Text : descr
};
annotate service.Incidents with {
    status @Common.ValueListWithFixedValues : true
};
annotate service.Status with {
    code @Common.Text : descr
};
annotate service.Incidents with @(
    UI.HeaderInfo : {
        Title : {
            $Type : 'UI.DataField',
            Value : title,
        },
        TypeName : '',
        TypeNamePlural : '',
        Description : {
            $Type : 'UI.DataField',
            Value : customer.name,
        },
        TypeImageUrl : 'sap-icon://alert',
    },

);
annotate service.Incidents with @(
    UI.FieldGroup #i18nDetails : {
        $Type : 'UI.FieldGroupType',
        Data : [
            {
                $Type : 'UI.DataField',
                Value : status_code,
            },{
                $Type : 'UI.DataField',
                Value : urgency_code,
            },],
    }
);
annotate service.Incidents with {
    customer @Common.Text : {
            $value : customer.name,
            ![@UI.TextArrangement] : #TextOnly,
        }
};
annotate service.Incidents with {
    customer @Common.ValueListWithFixedValues : false
};


annotate service.Incidents with {
    urgency @Common.Text : urgency.descr
};
annotate service.Incidents.conversation with @(
    UI.LineItem #i18nConversations : [
        {
            $Type : 'UI.DataField',
            Value : author,
            Label : '{i18n>Author}',
        },{
            $Type : 'UI.DataField',
            Value : message,
            Label : '{i18n>Message}',
        },{
            $Type : 'UI.DataField',
            Value : timestamp,
            Label : '{i18n>Date}',
        },]
);
annotate service.Incidents with @Common.SemanticKey: [ID]{
    ID @Core.Computed
};

annotate service.Solutions with @(
    UI.LineItem #i18nRecommendedSolutions : [
        {
            $Type : 'UI.DataField',
            Value : confidence,
            Label : '{i18n>ConfidenceScore}',
        },
        {
            $Type : 'UI.DataField',
            Value : solution,
            Label : '{i18n>Solution}',
        },
        {
            $Type : 'UI.DataFieldForAction',
            Action : 'ProcessorService.details',
            Label : 'Detailed Solution',
            Inline : true,
        },
        {
            $Type : 'UI.DataFieldForAction',
            Action : 'ProcessorService.acceptSolution',
            Label : 'Accept Solution',
            Inline : true,
        },
    ]
);
下一步
端到端测试
SAP Fiori UI(fiori-ui)
使用 Joule 创建 SAP Fiori UI
本节介绍如何使用 Joule 提示词创建 UI 应用。
前提条件
你已按照 Create Backend Logic with Joule 中的步骤创建了自定义逻辑。
生成 SAP Fiori UI
在 Joule 中开始输入
/fiori,然后从建议中选择 /fiori-gen-cap-ui。
[!Note] 如果找不到
/fiori-gen-cap-ui,请刷新页面。
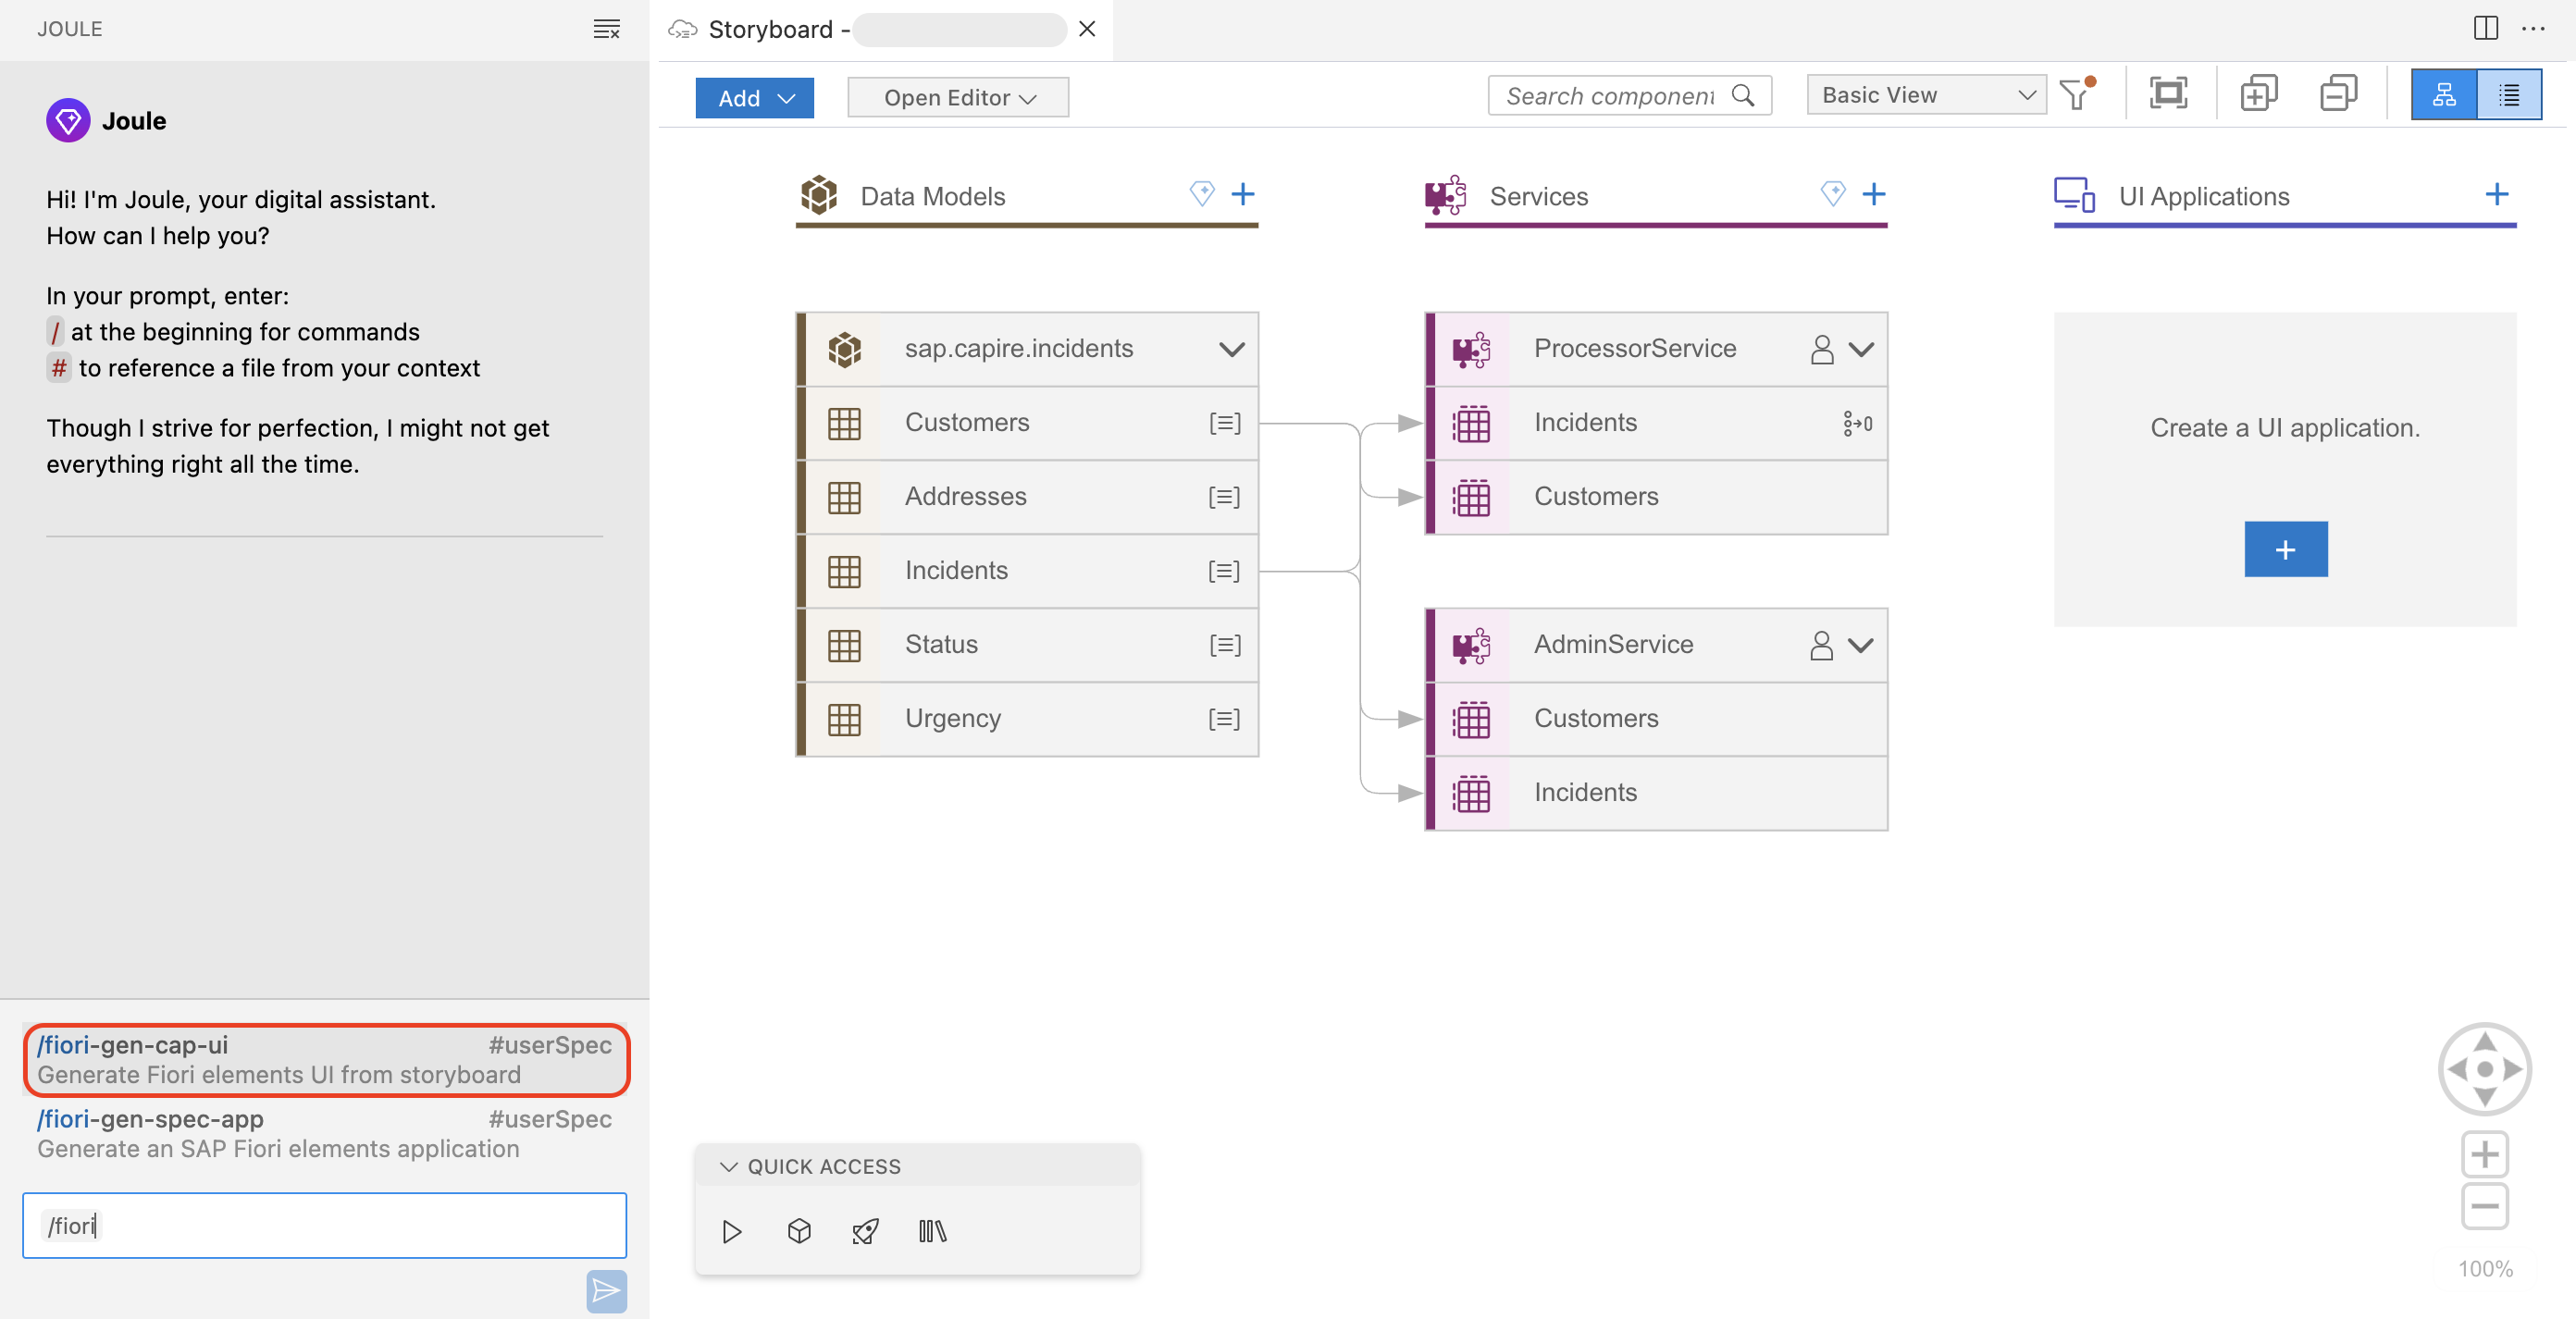
使用以下提示词创建用户界面。
Create an SAP Fiori application named incidents with List report page as the template.
Data source is local CAP application and use incidents entity of ProcessorService as the main odata Service.
Table should be responsive.
该提示词要求 Joule 使用 List report 作为 SAP Fiori 模板创建 SAP Fiori 应用。由于可能存在多个服务,需要说明希望 UI 应用映射到哪个服务。在本例中,ProcessorService 是 OData 服务,incidents 是其主实体。
Joule 返回
files generated successfully。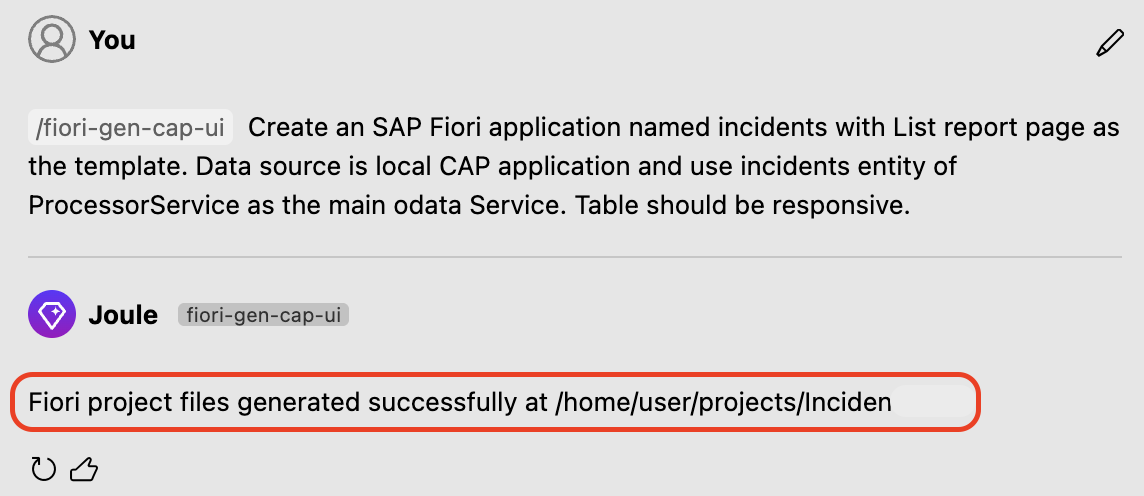
[!Note] 如果想使用 SAP Fiori Elements 模板手工创建 SAP Fiori 应用, 请参考 Generate the UI with an SAP Fiori Elements Template
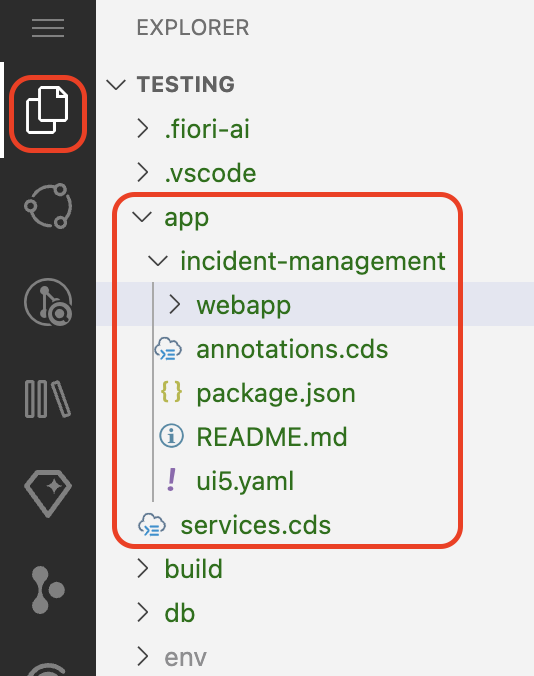
Joule 使用 SAP Fiori Elements 中的 List Report 模板创建一个 SAP Fiori 应用,数据源为本地 CAP 服务。
转到 Explorer。在 app 文件夹中确认生成了以下文件夹结构。
在项目根目录下,选择汉堡菜单,然后选择 Terminal → New Terminal。
在终端中运行
cds watch。单击 localhost 运行所在的 URL 以访问应用。
[!Tip] 按以下方式在浏览器中打开 URL:
Windows:Ctrl + 单击 URL
Mac:command + 单击 URL
打开应用后,单击 Web Applications 下的 URL。
单击 Go,加载所有事件。
[!Note] 如果想停止应用,请按
Ctrl + C。
返回主页,继续练习 2:使用 SAP AI SDK 添加 AI 能力
使用 Joule 添加 CDS 服务
本节介绍如何使用 Joule 生成 CDS 服务。
前提条件
你已按照 Enhance Sample Data 中的步骤完善了示例数据。
添加服务
选择 Joule 图标。在 Joule 提示词中开始输入
/cap-edit,然后从建议中选择 /cap-edit-model 以创建服务。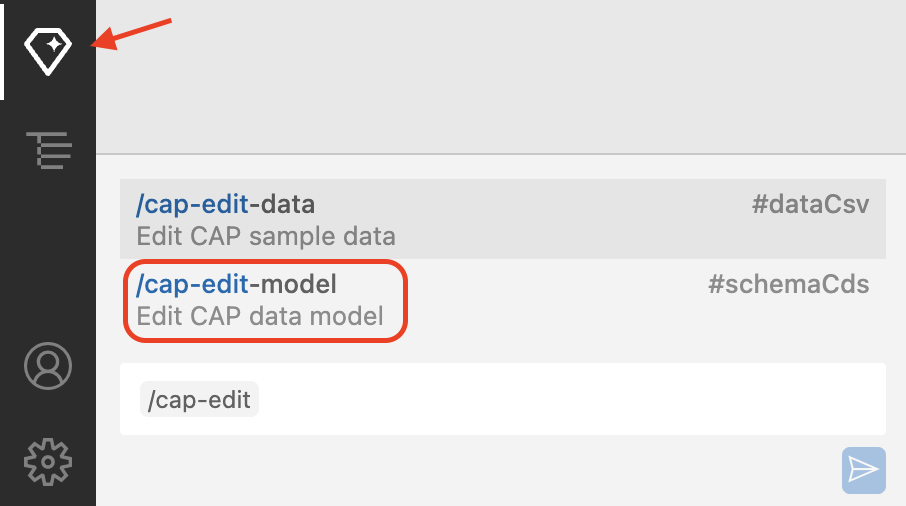
注意: 默认情况下,文本框中应显示 /cap-edit-model。
Joule 提示词会预填为 /cap-edit-model。粘贴以下提示词以生成服务:
Add 1 service named 'ProcessorService' with projection on the entities 'Incidents' and 'Customers'.
Add additional service named 'AdminService' with projection on the entities 'Incidents' and 'Customers'.
Make ProcessorService only accessible by the user with 'Support' role.
Similarly, make AdminService to be only accessible by the user with 'Admin' role.
Remove path parameters and remove other services.
Enable draft editing for Incidents entity of ProcessorService using annotation.
Make Customers entity of ProcessorService as readonly.
选择 Send 图标。
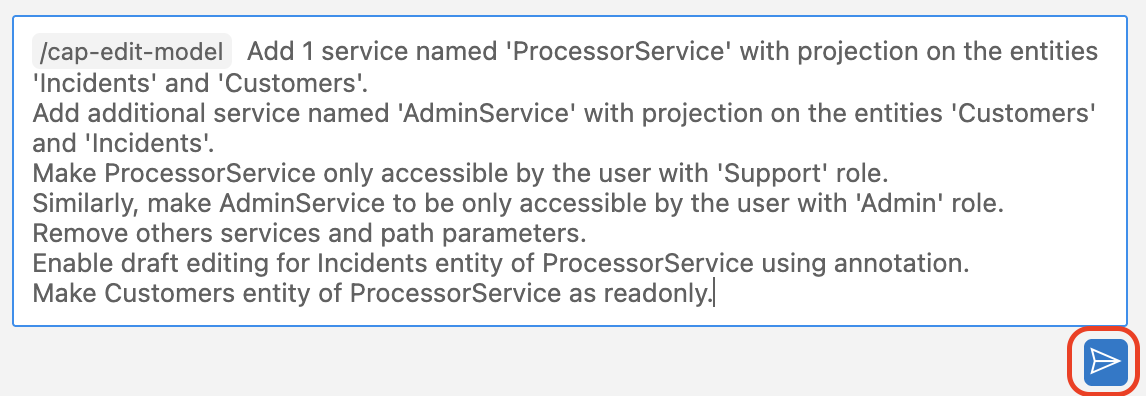
选择 Accept。
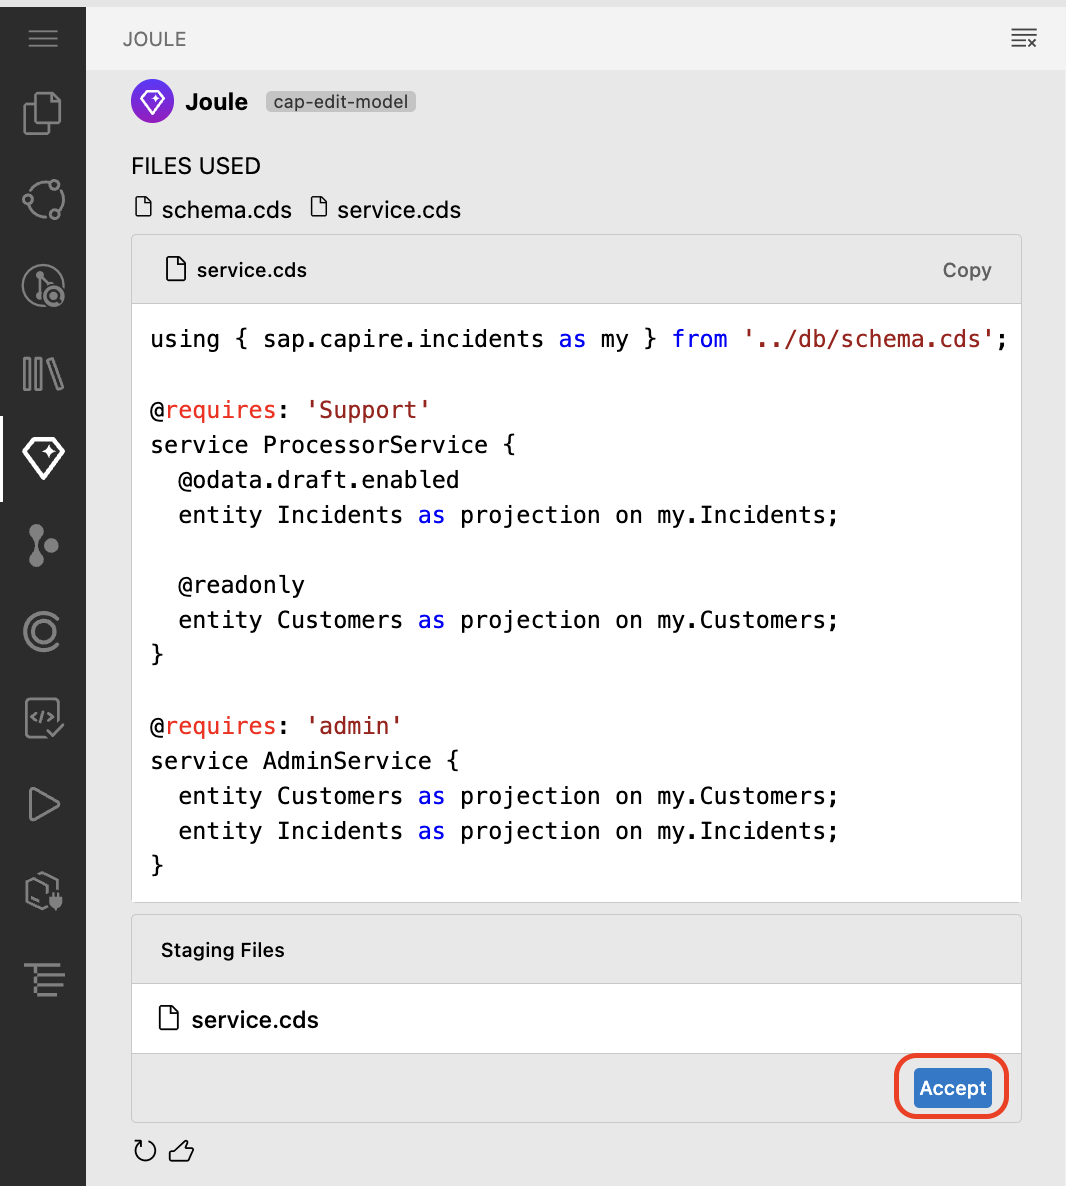
[!Tip]
CDS 服务定义把数据库 schema(schema.cds)中的实体作为服务层的一部分对外暴露,并按角色控制对服务的访问。
模块化服务定义 —— 服务(ProcessorService 与 AdminService)允许对数据进行受控访问。
基于角色的访问
ProcessorService → Support 人员可以管理事件和客户。
AdminService → Admin 用户拥有完全访问权限。
实体投影 —— 原始数据库实体不会直接暴露,只暴露投影版本。这样便于定制、过滤,或在将来需要时限制对某些字段的访问。 CAP 中的 OData draft 支持让用户在最终提交前保存进行中的数据。这在 SAP Fiori 应用中尤其有用:用户可能分多步输入数据,并希望避免丢失更改。
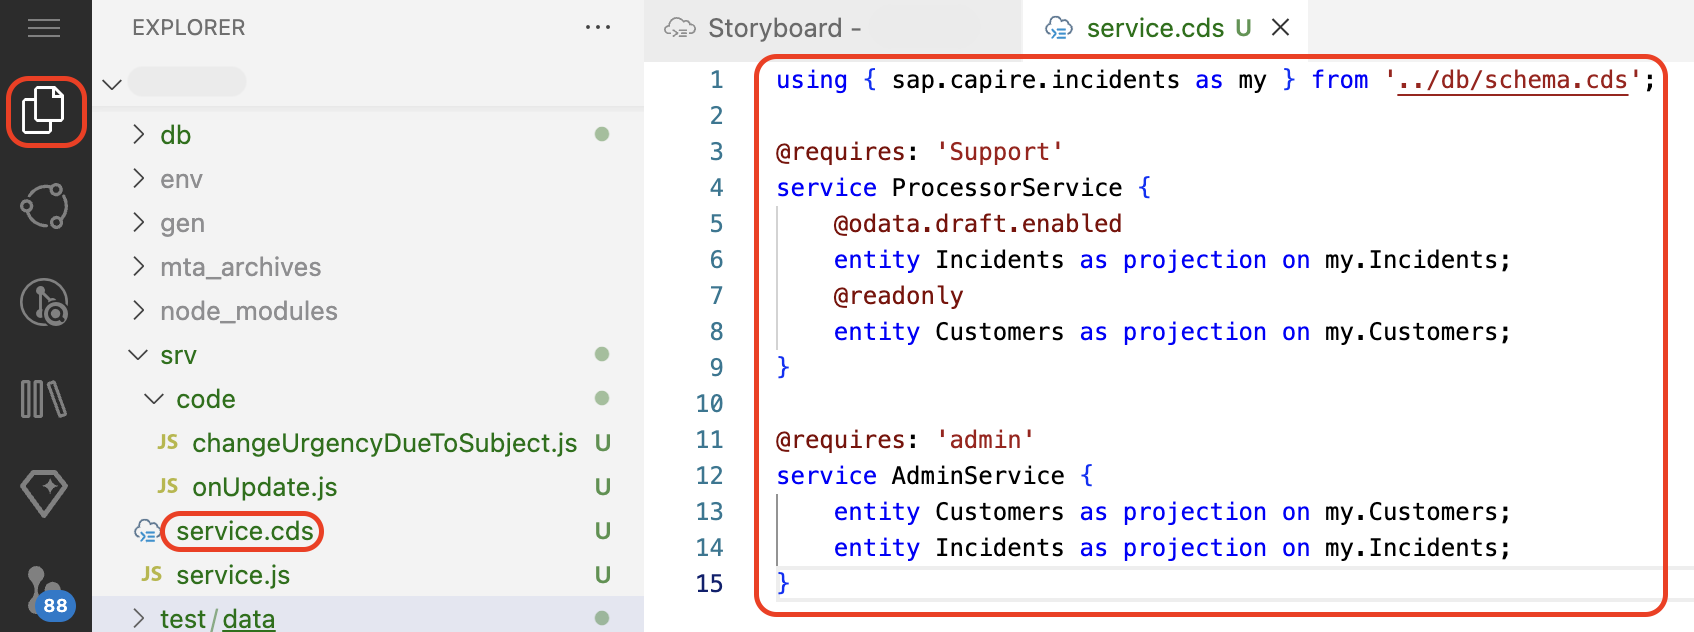
在项目资源管理器中打开 service.cds,验证生成的服务。
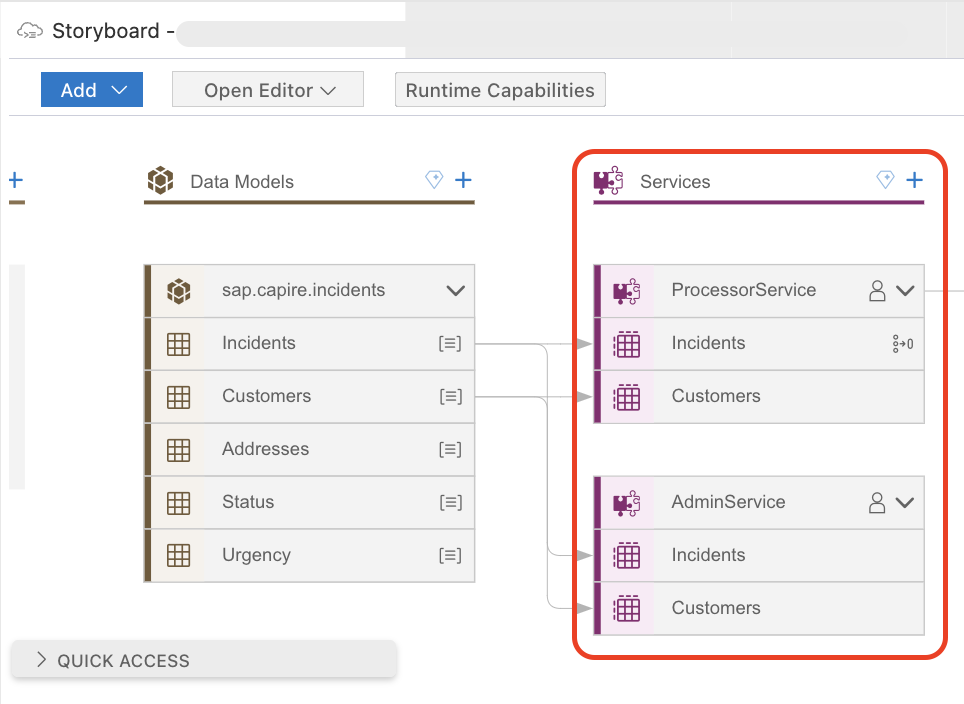
转到 Storyboard。在 Services 区域中确认 ProcessorService 和 AdminService 已创建。
[!Note] Joule 为服务生成的代码可能不同。请确保最终的
srv/service.cds文件如下所示:
using { sap.capire.incidents as my } from '../db/schema.cds';

@requires: 'Support'
service ProcessorService {

    @odata.draft.enabled
    entity Incidents as projection on my.Incidents;

    @readonly
    entity Customers as projection on my.Customers;
}

@requires: 'admin'
service AdminService {
    entity Customers as projection on my.Customers;

    entity Incidents as projection on my.Incidents;
}
下一步
使用 Joule 添加业务逻辑
将应用与 SAP Build Work Zone(标准版)集成
本教程介绍如何订阅 SAP Build Work Zone 标准版。
前提条件
在 SAP BTP Cloud Foundry 中部署应用,并按照 Deploy in SAP BTP, Cloud Foundry Runtime 进行测试。
更新内容
打开 SAP Build Work Zone。
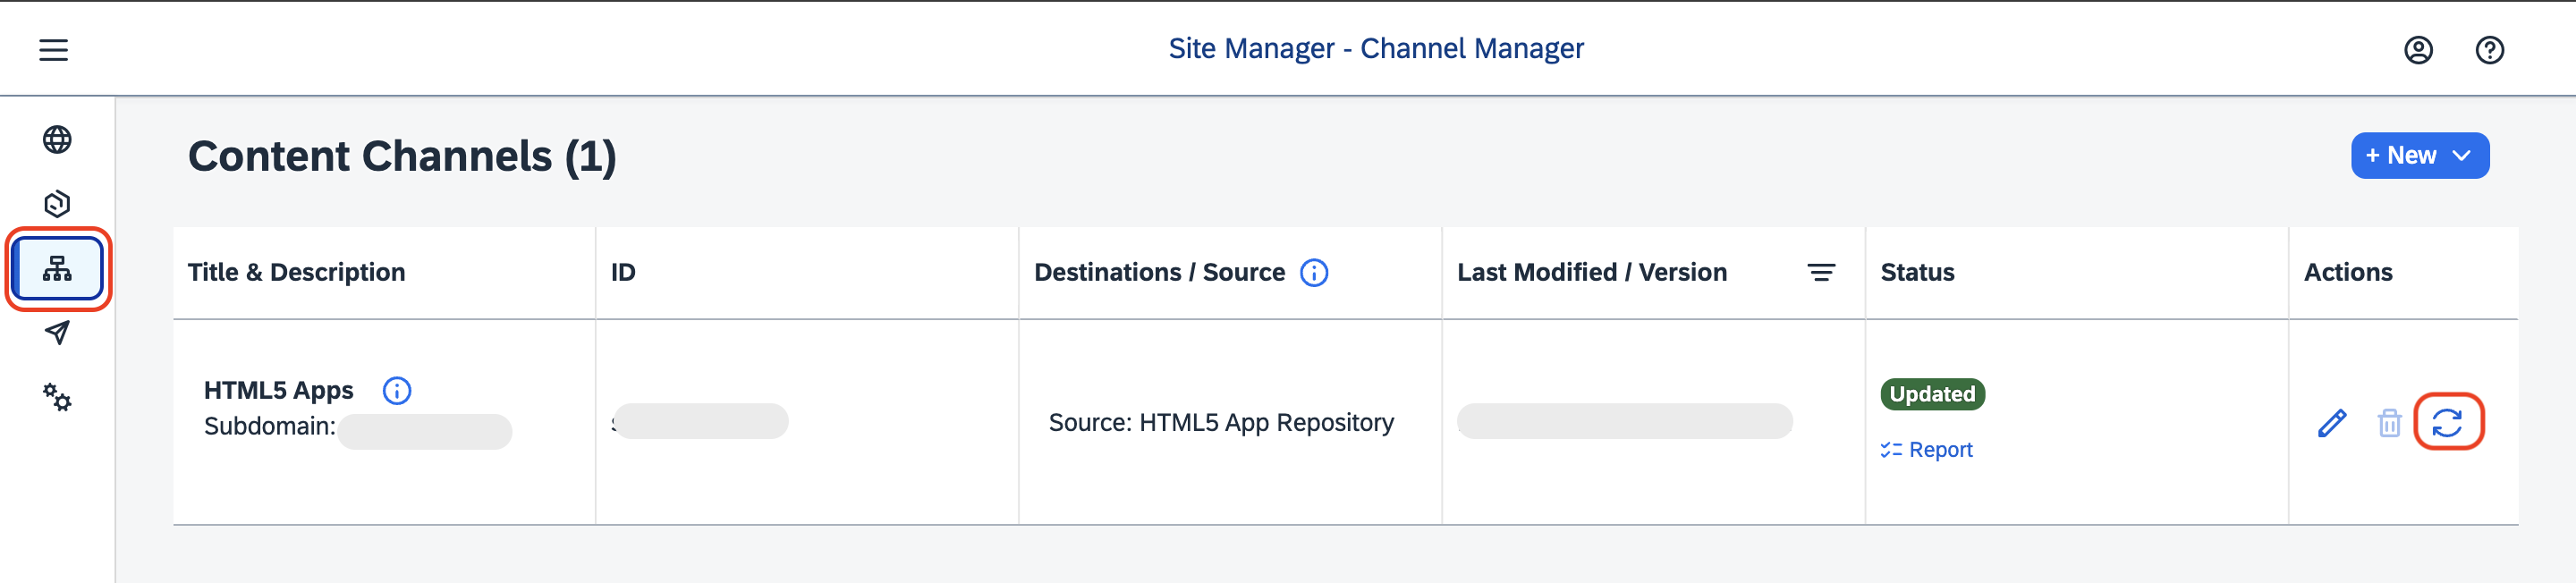
在左侧导航栏中单击 Channel Manager。
选择刷新图标以获取更新后的内容。
将应用添加到 Content Explorer
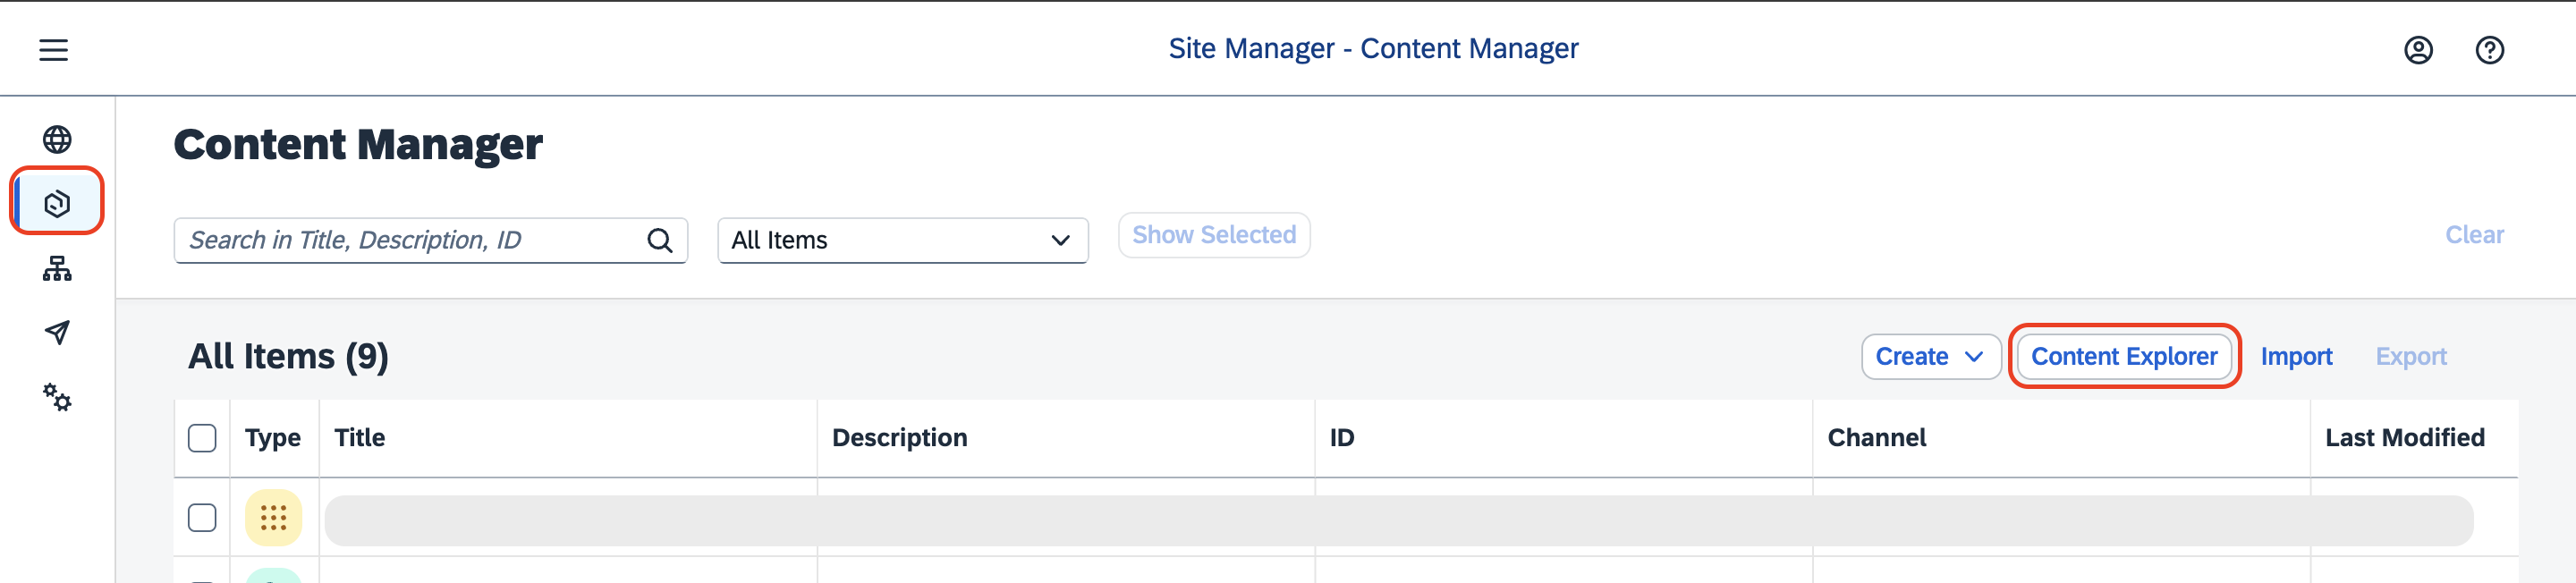
在左侧菜单中选择 Content Manager 图标,然后选择 Content Explorer 按钮。
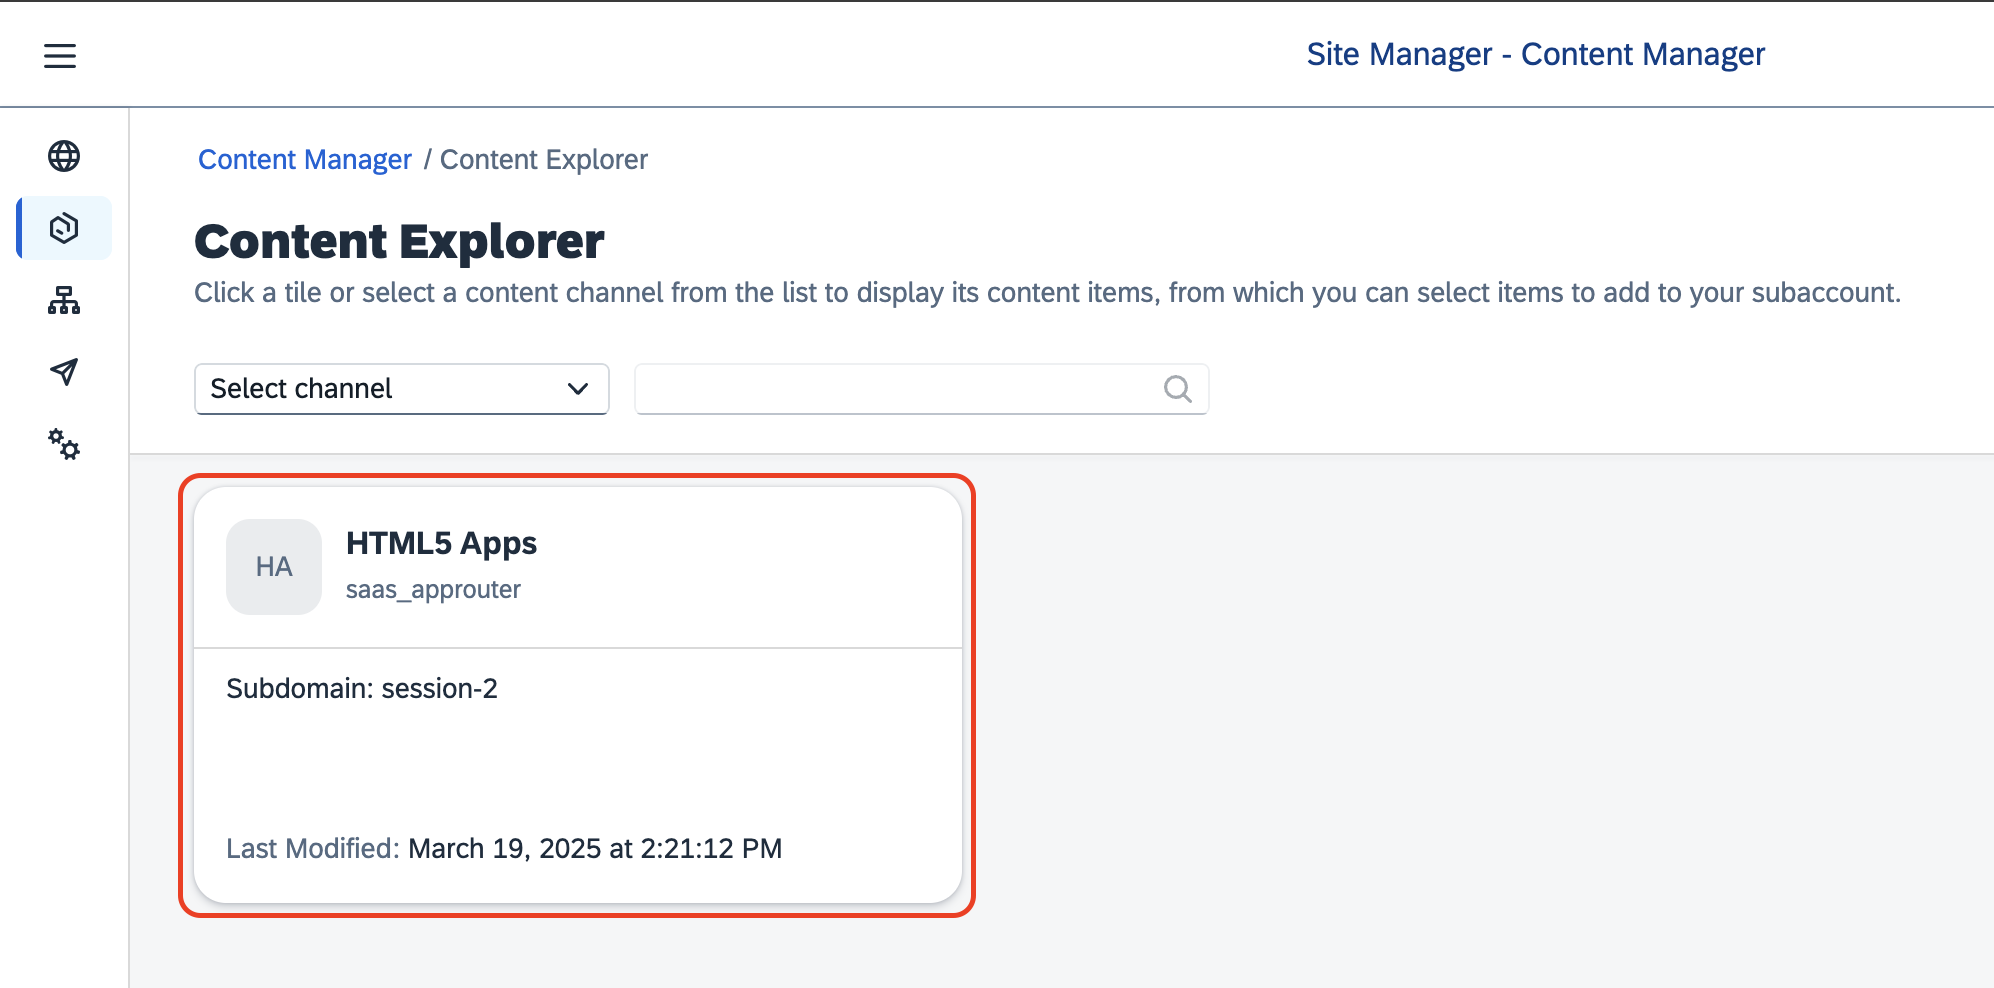
选择带有相应子域名的 HTML5 Apps 磁贴。
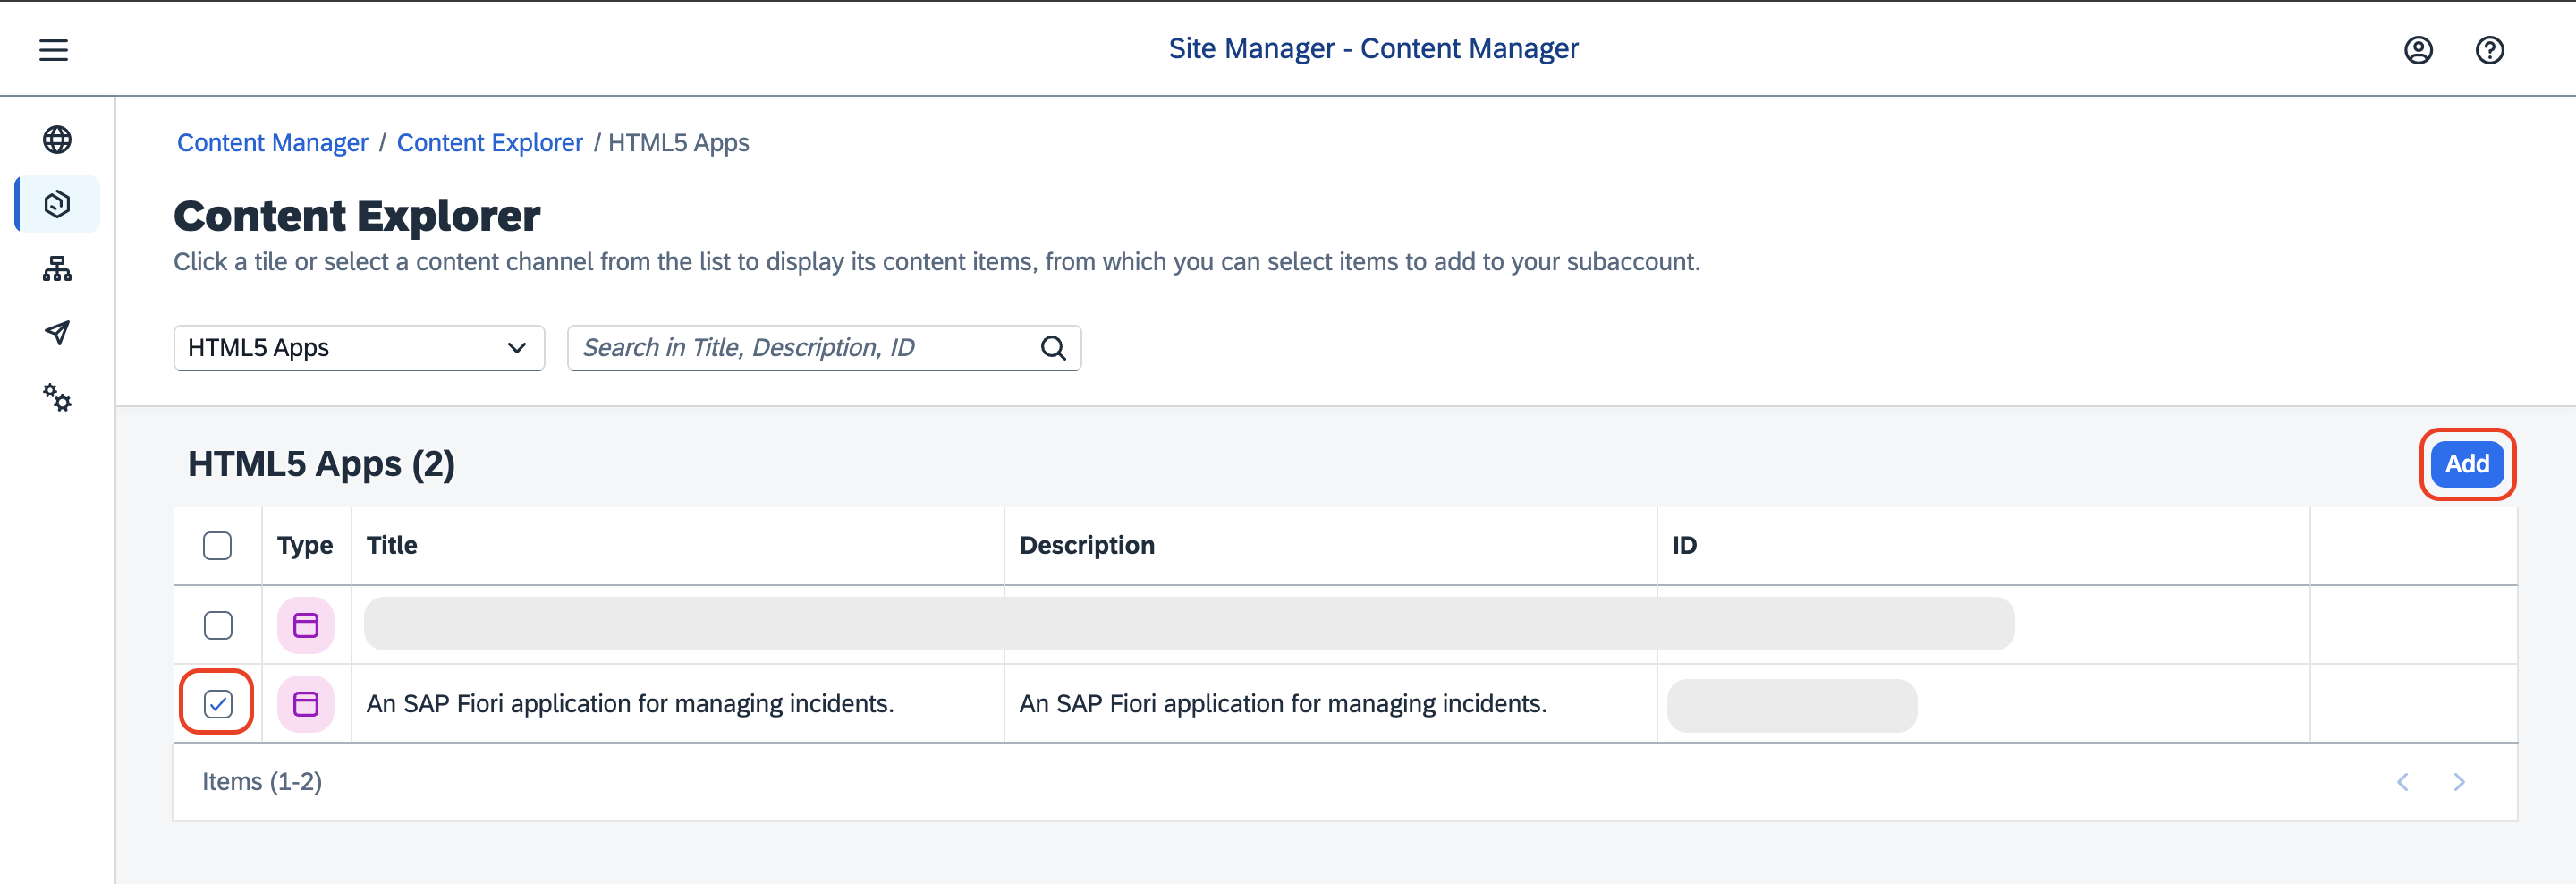
在项目表格中勾选应用 Incidents,然后选择 Add 按钮。
[!Note] 勾选时,请确保选择的是你创建的 ID 对应的应用。
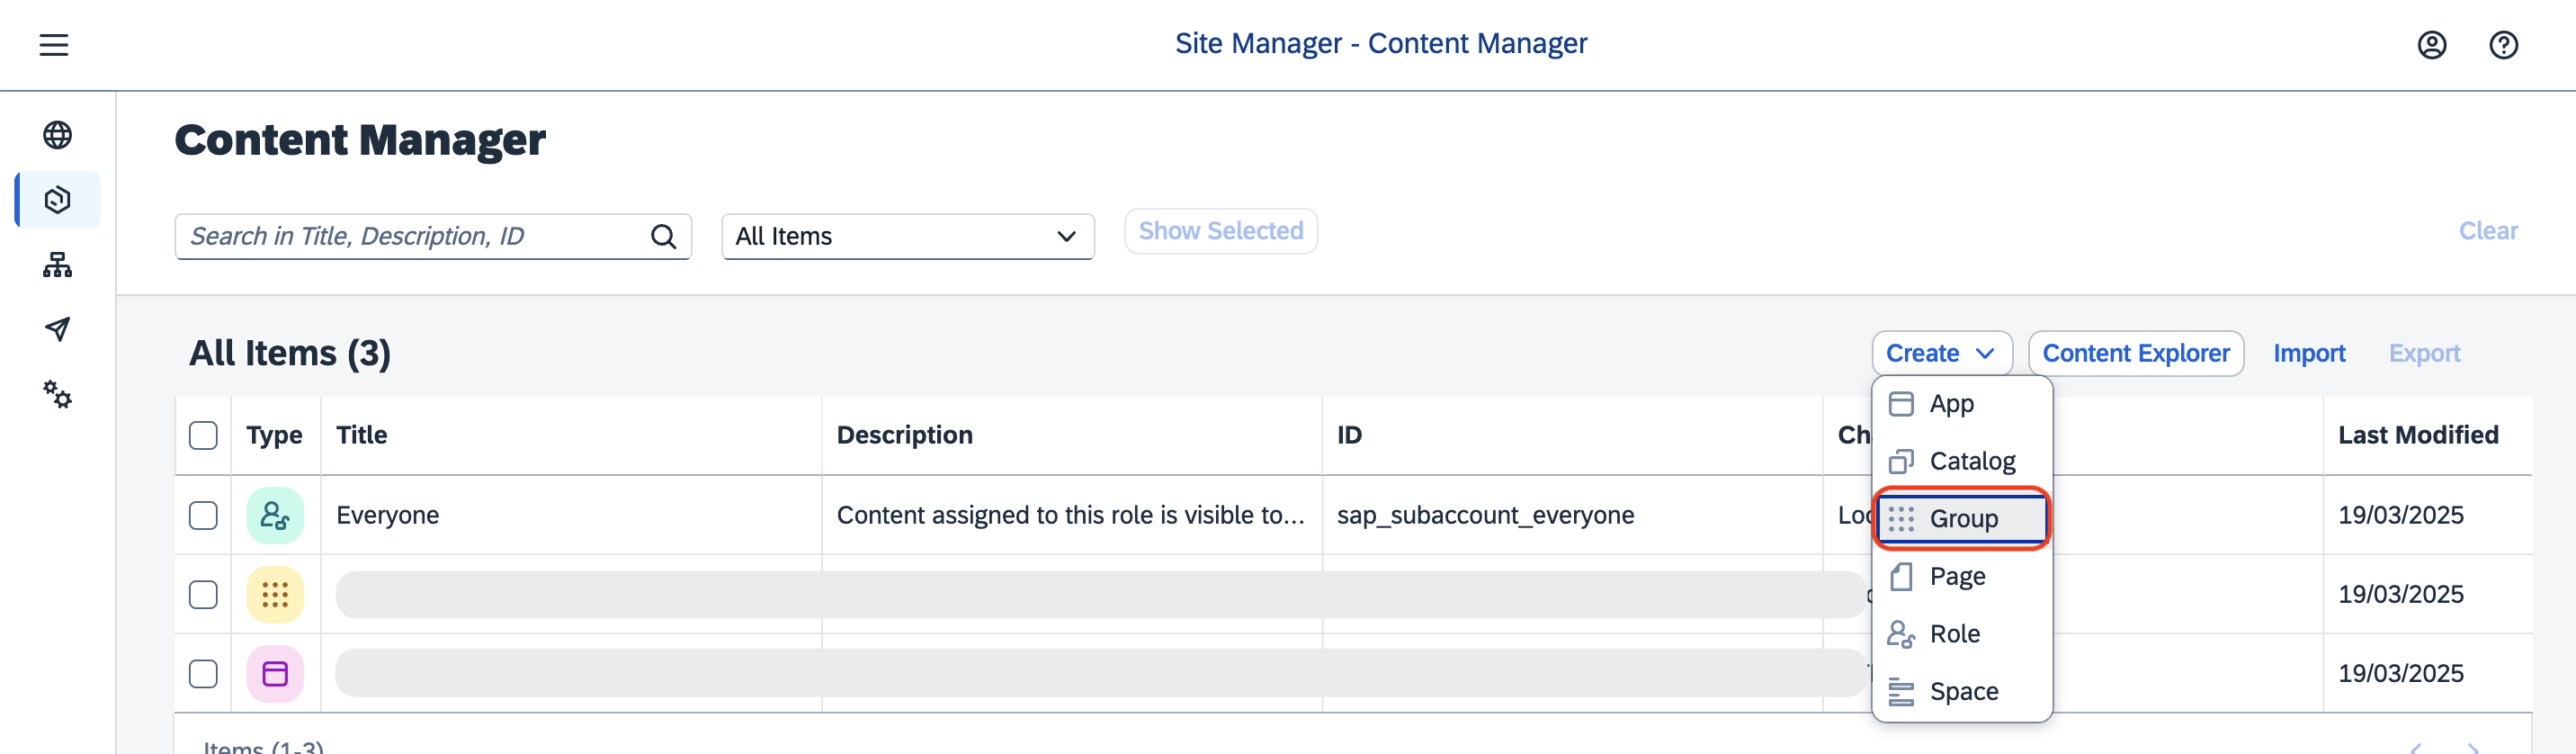
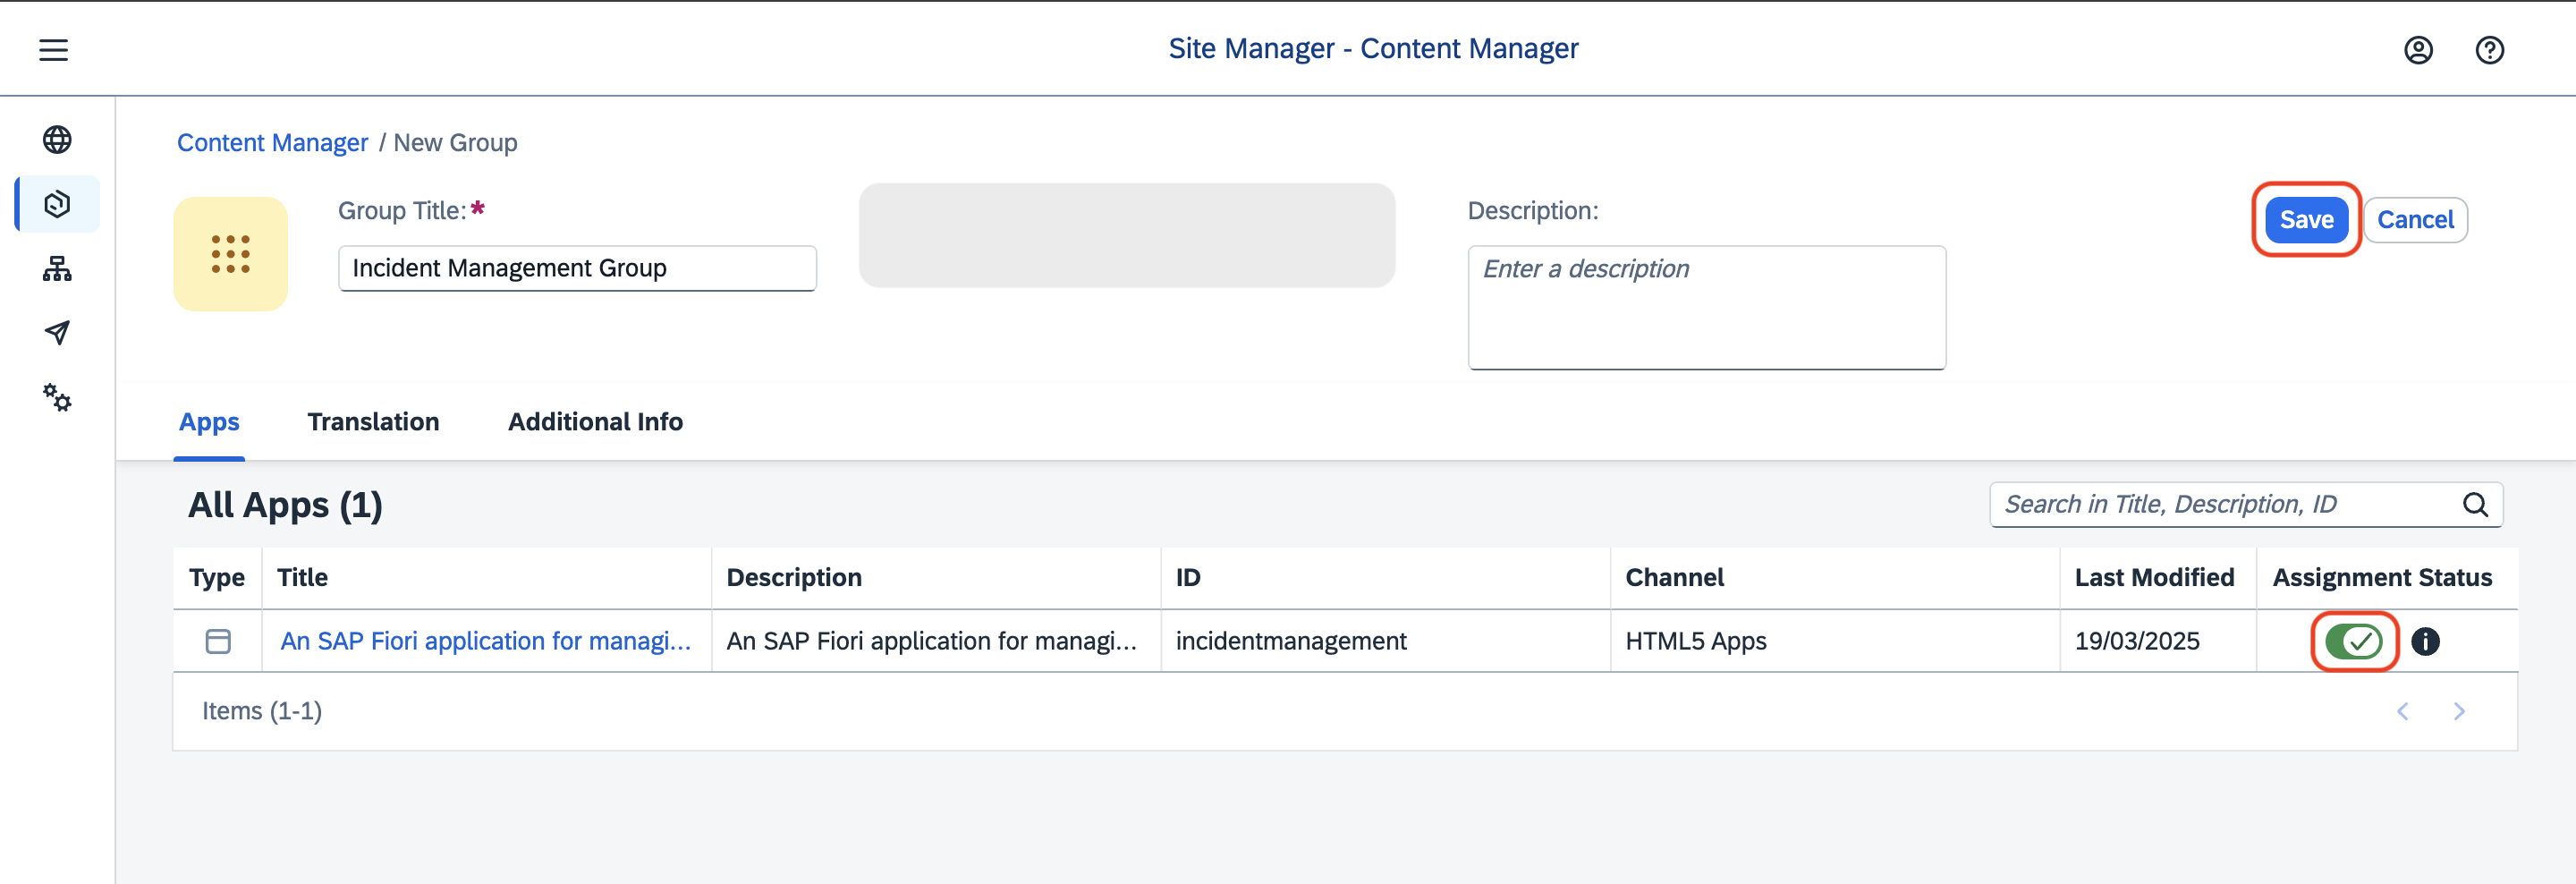
创建组
返回 Content Manager,选择 Create → Group。
添加标题
Incident Management Group <your-initials><unique-random-number>。例如标题可以是 Incident Management Group JD12。在 Assignment Status 中,通过滑块将 Incident-Management 应用分配给该组。
[!Note] 点击滑块时,请确保选择的是你创建的 ID 对应的应用。
选择 Save。
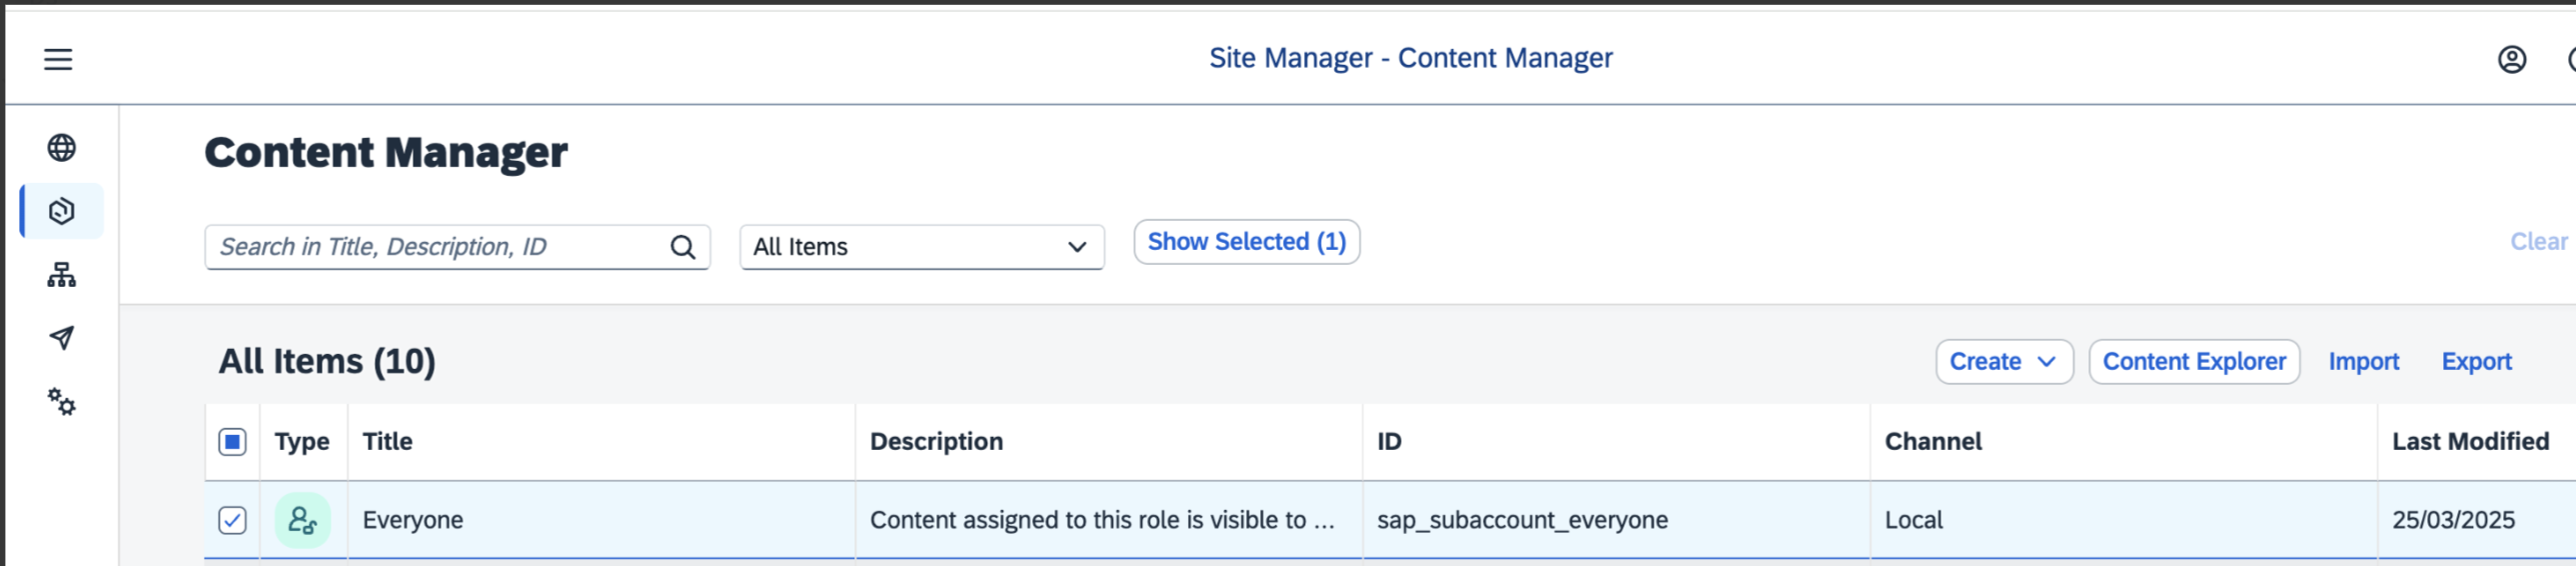
将应用添加到 Everyone 角色
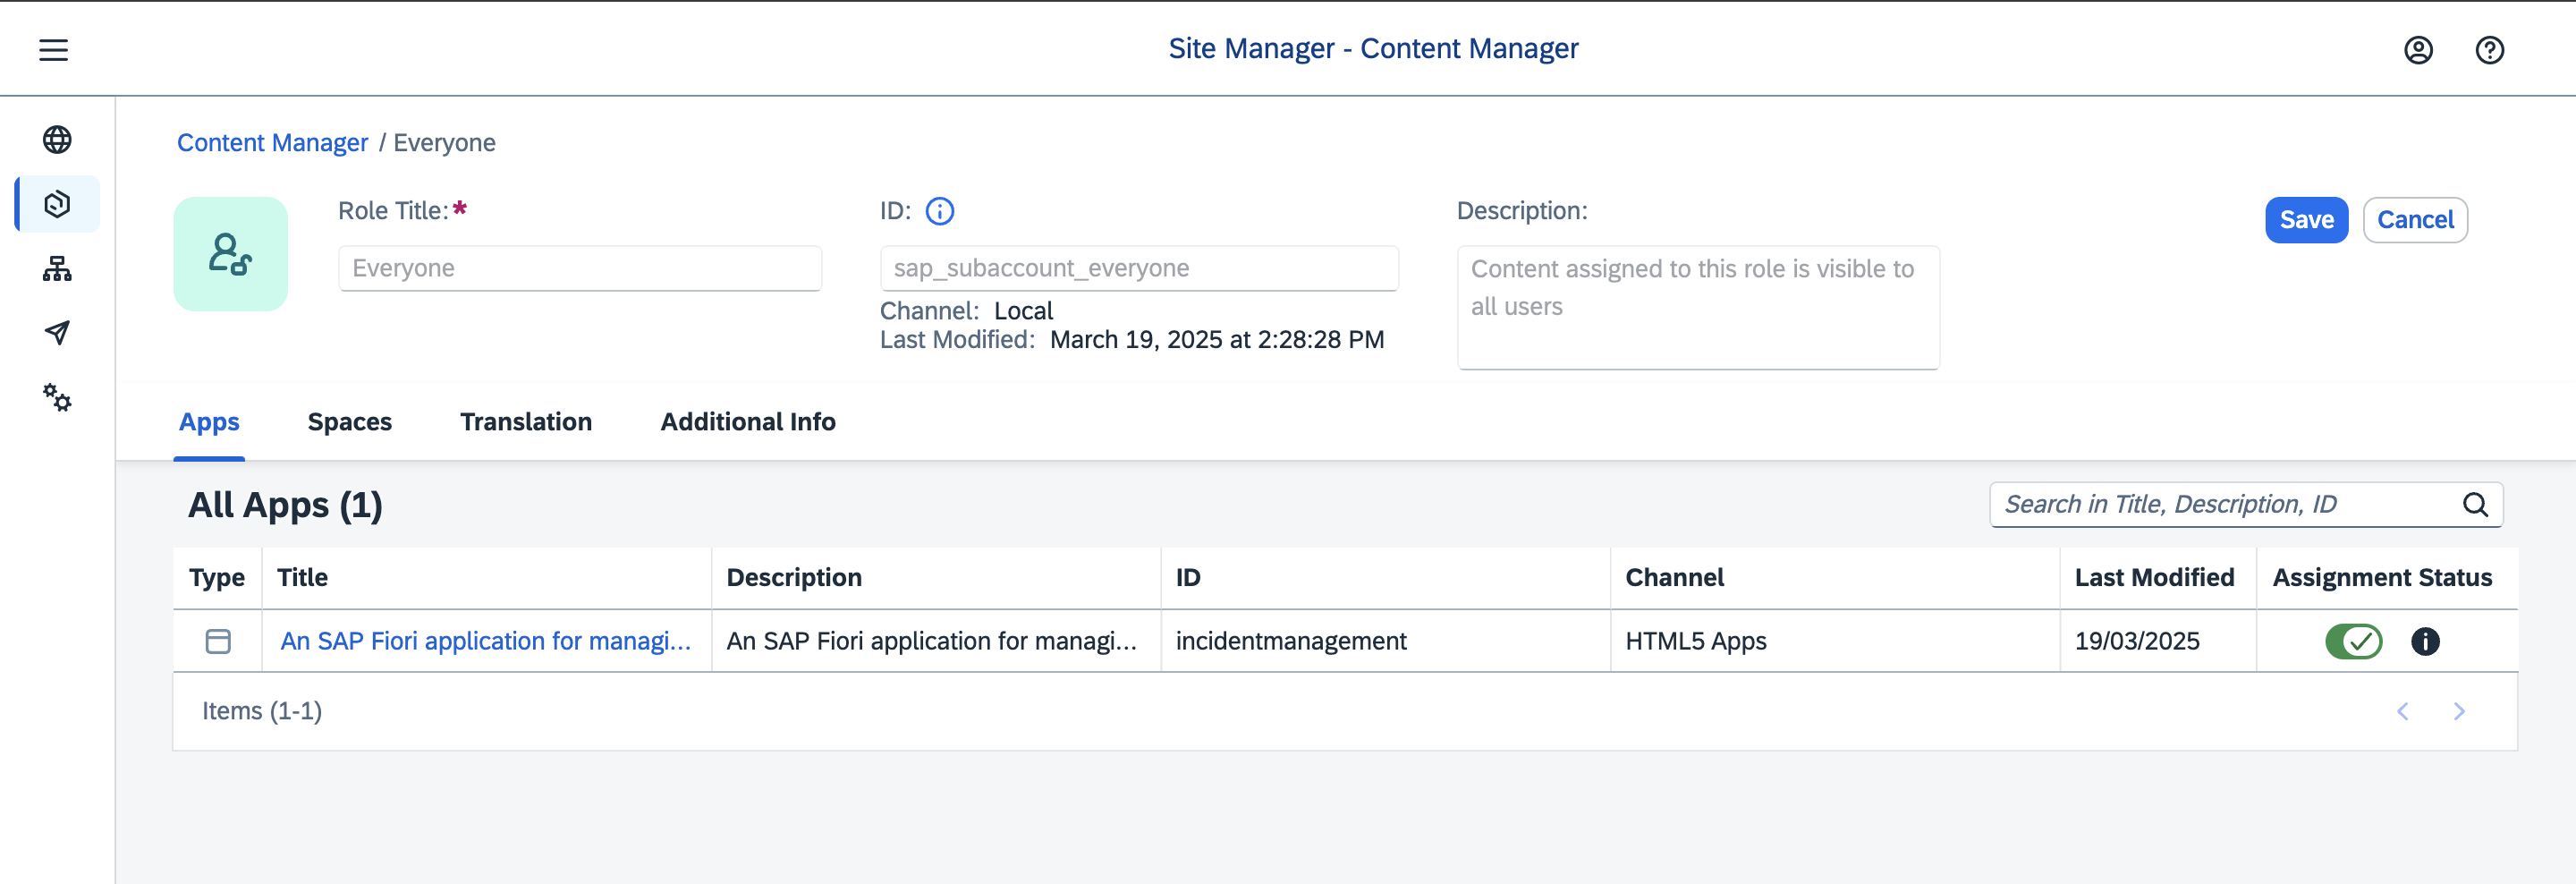
回到 Content Manager,选择角色 Everyone,然后选择 Edit。
在 Assignment Status 中,通过滑块将 Incident-Management 应用分配给该角色。
选择 Save。
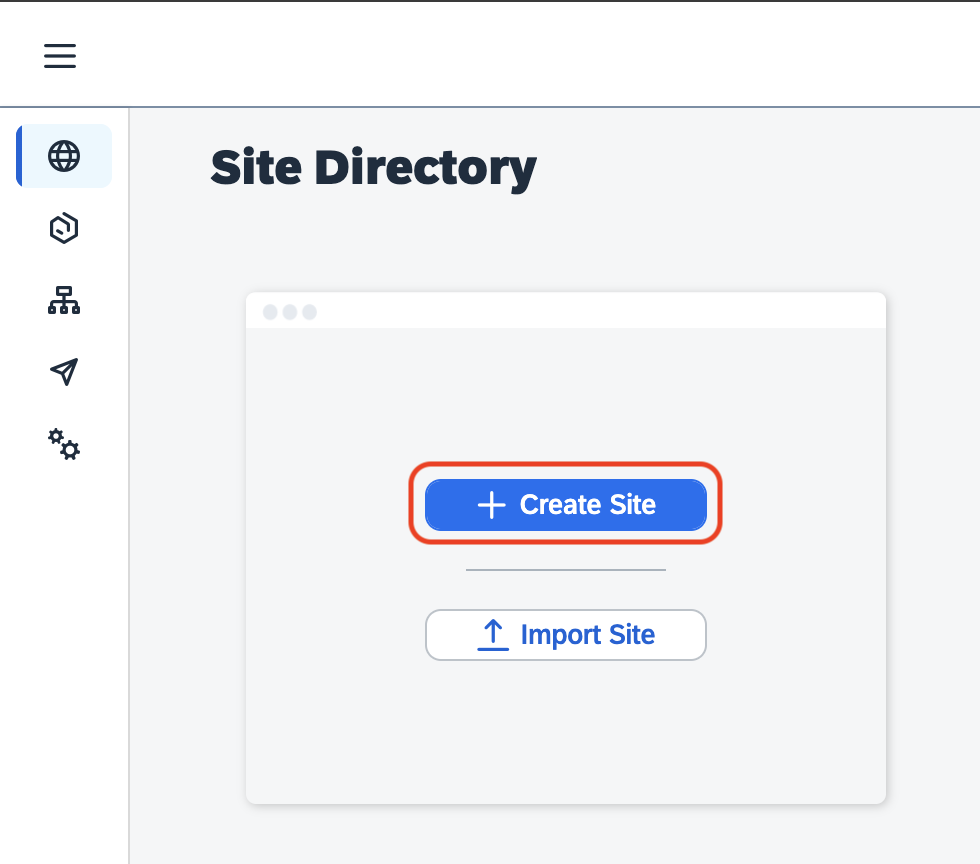
创建站点
导航到 Site Directory,选择 Create Site。
将站点名称输入为
Incident Management Site <your-initials><unique-random-number>,然后选择 Create。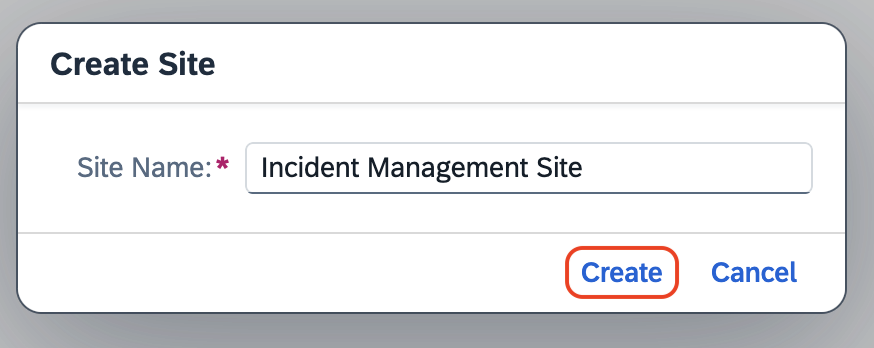
现在会跳转到你创建的站点。
测试站点
导航到 Site Directory,找到你的站点。
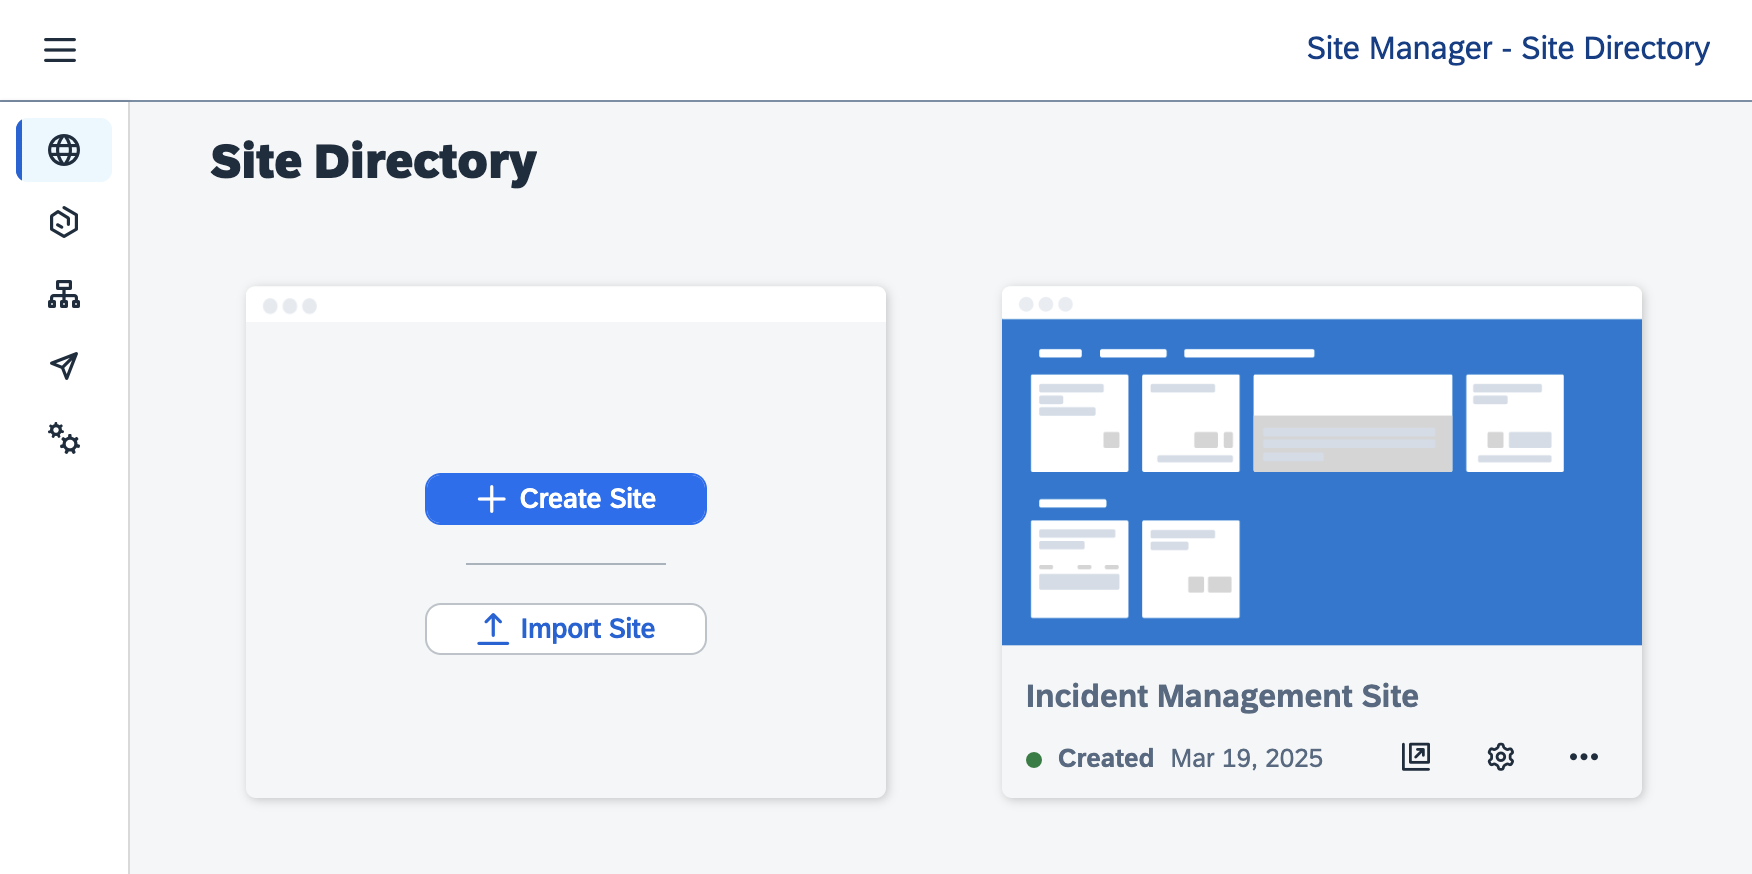
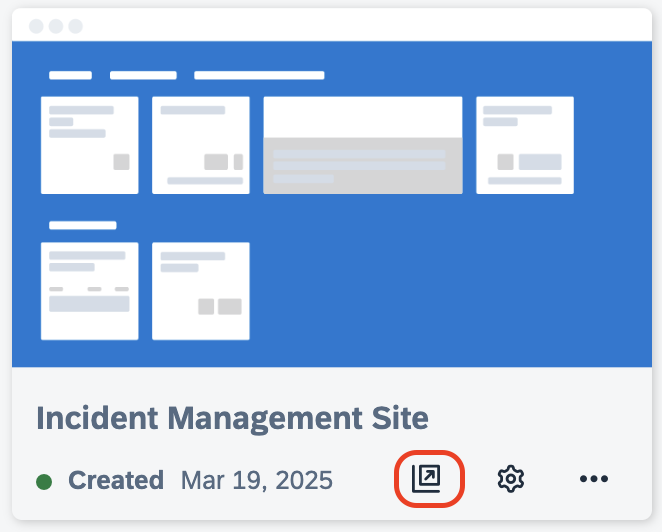
选择 Go to site。
从启动页面中选择 Incident Management 应用。
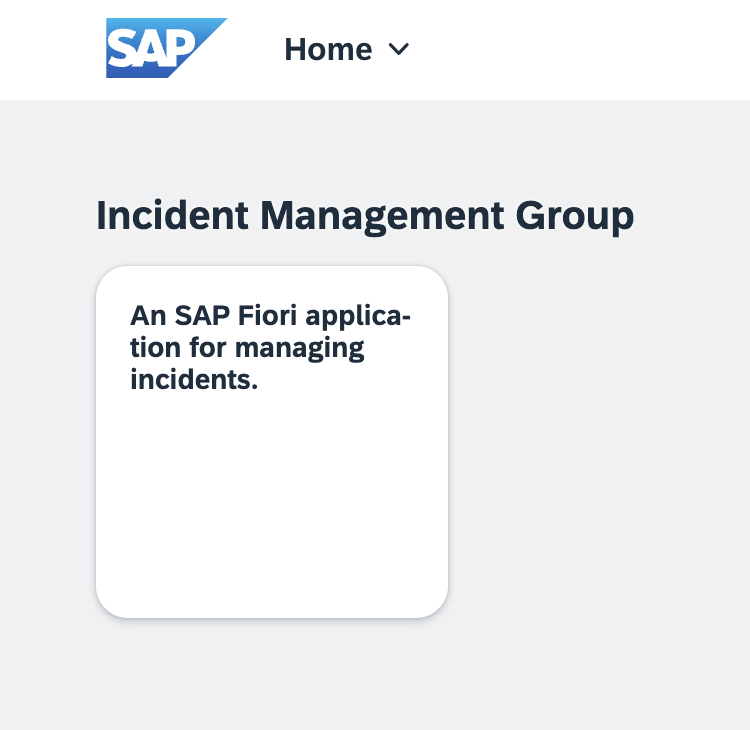
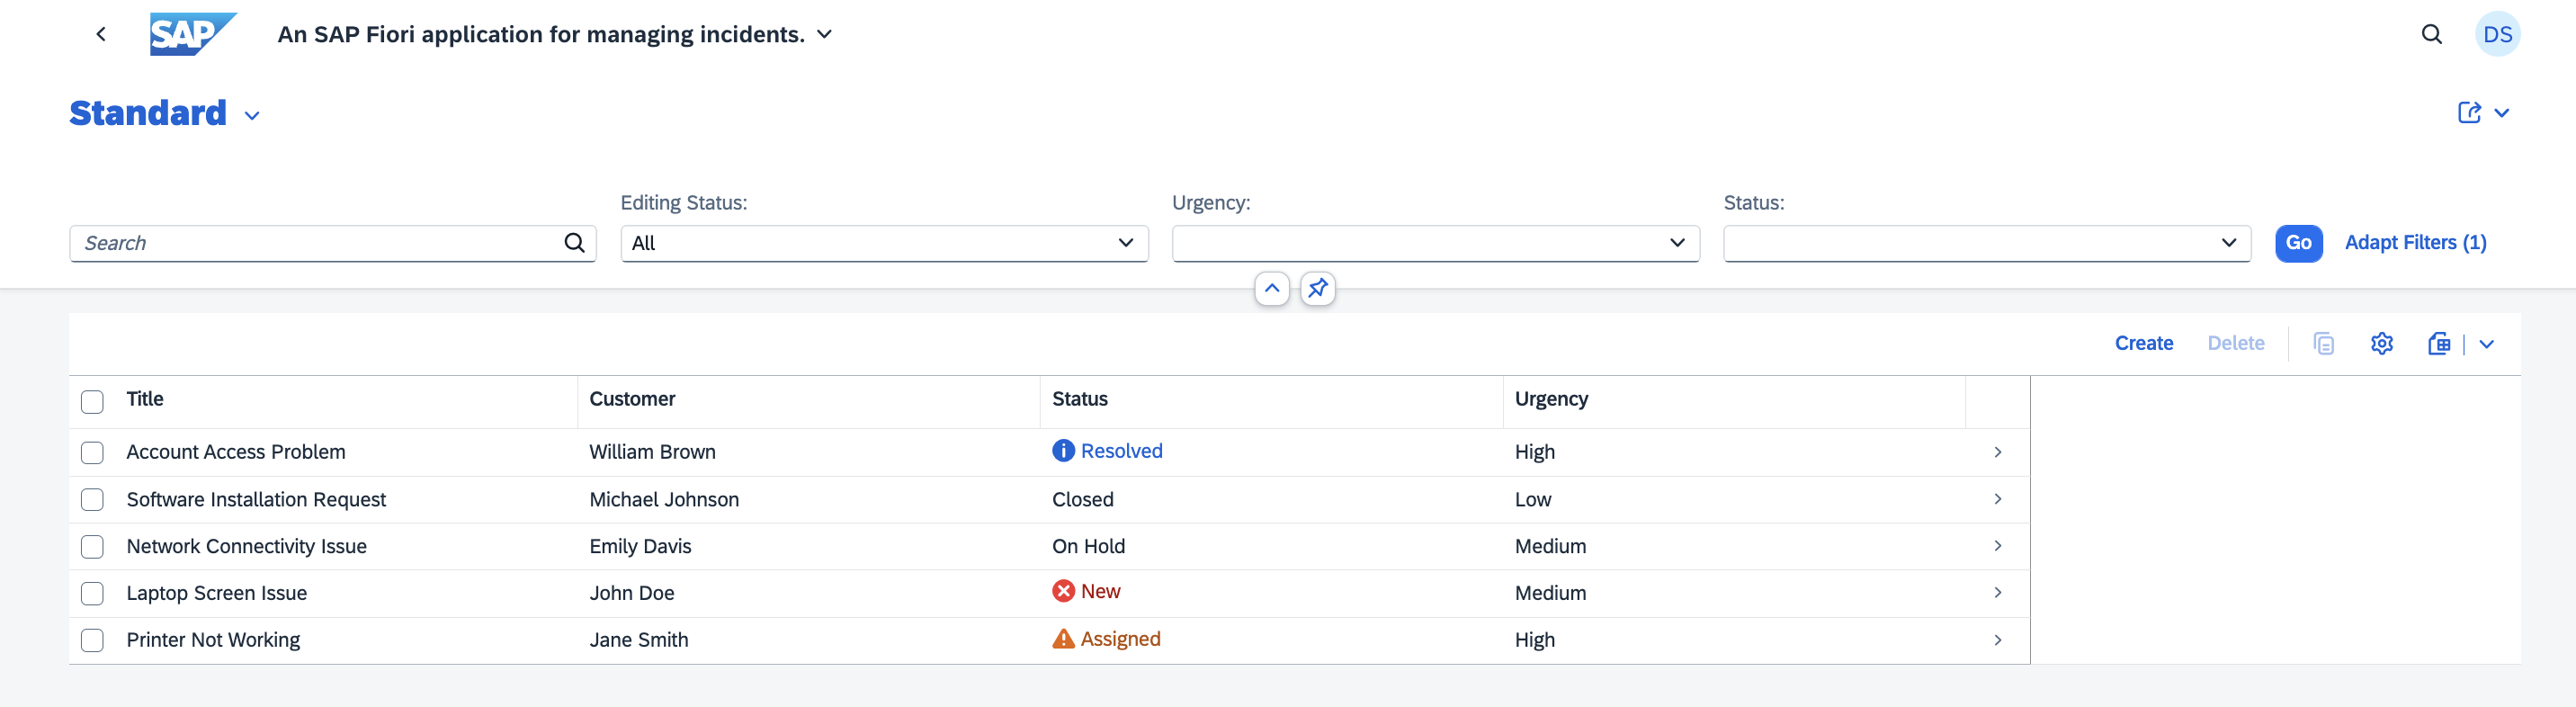
此时应能看到 list report 页面。
下一步
按照 Test the Application End to End 中的步骤,端到端测试整个流程。
为 SAP Cloud SDK for AI 添加依赖
添加并安装所需的包
打开 Package.json,添加以下依赖
"dependencies": {
    ...
    "@sap-ai-sdk/foundation-models": "^1.12.0",
    "@sap-ai-sdk/langchain": "^1.12.0",
    "csv-parser": "^3.2.0",
    "fs": "^0.0.1-security",
    "natural": "^8.0.1"
},
[!Note] 这些包是必需的。
在项目根目录下,选择汉堡菜单,然后选择 Terminal → New Terminal。
运行
npm install安装所需的依赖。
登录 Cloud Foundry
在终端中,使用以下命令登录 SAP BTP 中的子账户:
cf api <API-ENDPOINT>
cf login --sso
[!Note] 可以在 SAP BTP Cockpit 中子账户的 Overview 区域找到 API endpoint。
复制 URL 获取临时身份验证码,并将其粘贴到新标签页中。

找到 Enter the origin key 文本框,单击 Sign in with alternative identity provider。
注意:origin key 请向讲师索取。
注意:选择 Sign in with alternative identity provider 时,如果提示登录,请输入用户名和密码。 如果你已使用 Default Identity 登录,也可以选择用默认身份提供方登录。
选择 Copy 图标,获取临时身份验证码。
将复制的验证码粘贴到终端中,然后按回车键。
选择相关的 org,然后按回车。
选择已创建的 space,然后按回车。
为 Incident Management 应用设置初始数据
打开
schema.cds,添加以下代码片段:在
Incidents实体下添加solutions。solutions : Composition of many { key ID : UUID; confidence : String; solution : String; };
添加一个名为
vectorEmbeddings的新实体。entity vectorEmbeddings : cuid, managed{ metadata : LargeString; text_chunk : LargeString; embedding : Vector(1536); solution : LargeString; }
前面步骤生成的示例数据会在 test 文件夹下创建一个 data 文件夹。要在生产用途中使用这些数据,请将 data 文件夹移动到 db 文件夹。打开终端,运行以下命令移动 csv 文件。
mv test/data db/data
在终端中运行以下命令,对应用执行生产构建。
cds build --production
在终端中运行以下命令,将 csv 文件部署到 hana 数据库。
cds deploy --to hana
[!Note] 部署到 hana 可能需要几秒钟,完成后会收到部署成功的消息。
创建到 SAP AI Core 的服务绑定
在终端中运行以下命令,创建实例和绑定。
cf create-service destination lite <destination-name>
cds bind --to <destination-name>
下一步
扩展 Incident Management 应用